Tag: Cheesy
Quick & Easy: Fresh Mozzarella and Pear Grilled Cheese Sandwiches with Maple Mustard

Between my best friend’s amazing wedding last weekend (shout out to my girl, Karen G), and keeping myself on top of school as the workload steadily grows, and catching a bug of some kind this week, what better recipe to share than a total time-buster recipe? I mean, I barely had time to make a post this week, but because this recipe is so simple, I managed to pull it together. It must be easy, right?
I think everyone has those weeks when they’re desperate for something quick, easy, satisfying, comforting and delicious. I actually think many people consider this type of week the norm. So basically quick, easy, satisfying, comforting and delicious are always the ideal when it comes to weeknight meals. But that’s a tall order. Ok, now take meat out of the equation. Even taller. But trust me when I say, simple, yummy and vegetarian-friendly cooking is attainable.

The key to satisfying meals, sans meat, is creating depth and complexity by using new and different flavor combos. I get inspiration from everywhere when it comes to finding exciting new tastes. Today’s inspiration comes from a light lunch I made when trying to clean out the kitchen a few weeks back. I topped an English muffin with a fresh sliced pear, fresh mozzarella and a pinch of sea salt. It was love at first bite so I immediately wrote it down on my list of upcoming recipe ideas. And today, pear and mozzarella, will finally have their moment in the spotlight.

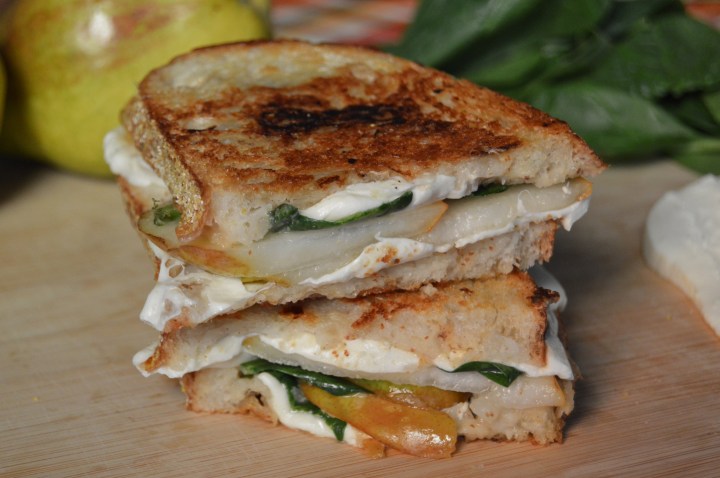
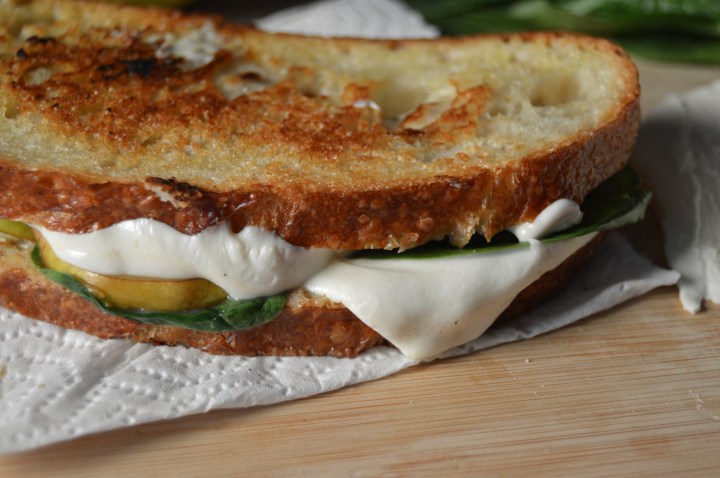
Pear and Mozzarella Grilled Cheeses are the perfect quick and easy dinner for the fall season. This time of year, pears are sweet and juicy, and their vibrant flavor goes perfectly with the creamy, salty profile of fresh mozzarella. I added fresh spinach leaves to pump up the nutritional profile and added a super simple, sweet and tangy sauce to compliment the sweetness in the pears and also to cut through the richness of the cheese. It’s almost like a honey mustard, but uses maple syrup to get that sweetness in addition to the grainy mustard. This 2-ingredient spread was one of the first things I learned at culinary school and I’ve been making it constantly ever since. It’s so basic, I am almost embarrassed to say that I had to learn it. But whatevs, it’s amazing.

Anyway, mozz, pears, fresh spinach and maple mustard sauce. That’s it. Barely any prep work whatsoever. Just some slicing really, because my spinach was already triple washed. Score (I hate washing lettuce). Then I layered the ingredients between two slices of bakery-fresh sourdough bread and brushed the outsides with a bit of oil. Yum!
Now for the grilling portion of the grilled cheese. What I’m about to tell you is my secret for the perfect grilled cheese. It’s hot and gooey on the inside and golden-crisp on the outside. Every. Time. I mean, have you had this problem before? It’s crazy how something as basic as grilled cheese can be so difficult to get right. But I’ve got the magic. First trick is a super low heat. Like basically as low as it can go. And the second trick is to use a lid on your pan. The low heat allows for the sandwich to cook very slowly and the lid traps the heat to surround the sandwich, ensuring the middle will be piping hot and uber melty. I also press the sandwich down every so often with the back of the spatula, an important step for a grilled cheese that contains more than just cheese. If you follow these three steps, I can promise you, you will be absolutely delighted!

So I spilled my deepest, darkest secret to you of how to make grilled cheeses absolutely perfect. And all you want to do now is to go try making a perfectly melty and crispy grilled cheese using this new-found cooking wisdom. And all I have left to say is go for it, good luck and let me know how it goes!
Quick & Easy: Fresh Mozzarella and Pear Grilled Cheese Sandwiches with Maple Mustard
Serves: 4 Start to finish: 20 minutes
Ingredients
8 slices bakery-fresh Sourdough Bread
12 ounces Fresh Mozzarella, sliced*
2 ripe Pears, sliced (I used organic Bartlett Pears)
2 handfuls fresh Baby Spinach Leaves
1\3 cup Whole Grain Mustard
2 tablespoons Maple Syrup
Sea Salt, fine grain
2 tablespoons Olive Oil
To Make
In a small bowl, mix mustard and maple syrup. Set aside.
Slice mozzarella into thin slices. It may be difficult to cut fresh mozzarella thin, do the best you can. Break up slices into 2 parts, this makes it easier to distribute evenly on the sandwich.
Assemble sandwiches. For each sandwich, layer like this…
1 slice bread
Light layer of maple mustard
2 pieces of cheese
Season with a pinch of salt
5 spinach leaves
2-3 slices of pear
2 pieces of cheese
Another slice of bread, spread with maple mustard
When sandwiches are assembled, heat a large skillet over low heat (very low) for about a minute. Meanwhile, brush the top slice of each sandwich with a bit of olive oil. Gently flip sandwiches into the pan, olive oil side down. Cover with a lid and allow to cook for 5-7 minutes, until golden and crispy. Press down on the sandwiches with a spatula every so often. Flip the sandwiches and cook for another 5 minutes, or until the 2nd side is golden and crispy.**
*i allow for 3 ounces of cheese per sandwich. But that’s up to you. Note that 2 ounces is an actual serving size of cheese.
**on your first time using a stovetop, keep an eye on the sandwiches to prevent burning. Once you know how your stove/heat works, you’ll have freedom while they cook to prepare a side dish or something. My stove is 6 minutes per side, with an extra 1 minute on each side at the end (lowest heat).
Cheap & Easy: Eggplant Parm Melts

Moving is the worst. It doesn’t matter how exciting the prospect of a new home is, when it comes time to move, misery is the prevailing emotion. That’s how it is for me, at least. Also contributing to the misery is the fact that I need things to be perfectly organized and scheduled, and when it comes to moving, even the most meticulous planning will no doubt unravel. It’s exhausting, frustrating and overwhelming. Needless to say, the last two weeks of packing and moving and unpacking have been non stop crazy.
Im so happy to say that we’re all moved in, pretty much set up, and absolutely loving our new apartment in Williamsburg, a trendy Brooklyn neighborhood of NYC. This is my 5th neighborhood since moving to New York in 2011, and I have a feeling it’s going to be my favorite. Although there is still a lot to do, I feel as though I can finally fall back into my usual routine and I couldn’t be more ready.
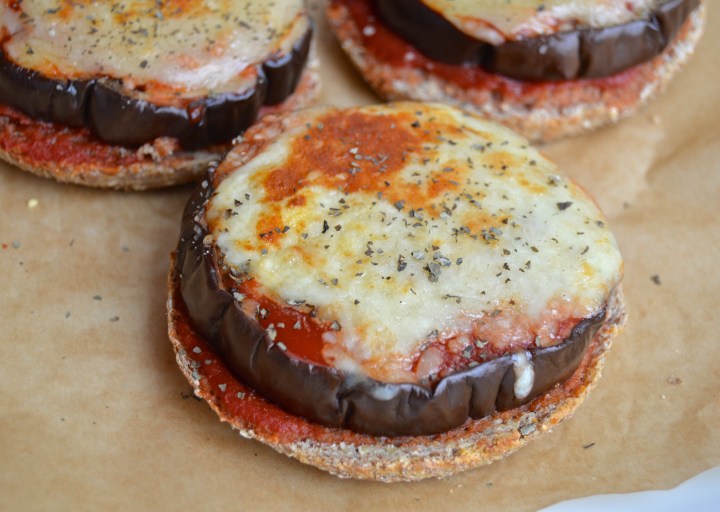
In honor of the move, I’m sharing a super simple, cheap and healthy dinner idea that came in handy during the moving process. I actually first made these delicious eggplant parm melts while in Florida a few weeks ago with my family. When trying to use up items in the fridge one afternoon, we used leftover grilled eggplant discs, fresh mozzarella cheese, jarred tomato sauce and my favorite Ezekiel English Muffins to make a light and simple lunch. I knew immediately that this would be a new go-to for us. Now let’s fast forward to the whole packing and moving process, when lack of time, saving money and staying healthy were all on my mind when coming up with dinner every night. My answer to these concerns on more than one occasion over the past couple weeks was to make these eggplant parm melts, and now I feel an almost emotional attachment to them.
 I changed up the recipe slightly from Florida to be even more economical. I replaced fresh mozzarella with regular mozzarella and used the Whole Foods brand canned tomato sauce instead of a fancy jarred marinara. The beauty of this recipe is that you can really use whatever you have on hand, the brands you prefer, or items on sale at the moment. I do find that using a simple canned sauce tastes better with some simple seasoning action, like dried basil and garlic powder. I further add flavor with the technique of rubbing raw garlic onto the lightly toasted base English muffins before adding the toppings. This is optional but highly recommended.
Finally, I have a quick note about cooking eggplant, but then I’ll get to the recipe. Cooking eggplant is sometimes seen as intimidating, probably because so many recipes require removing some of the moisture with salt or soaking the eggplant in water before cooking. These steps are important to remove the slight bitterness inherent in eggplants. But never fear, eggplant is rather forgiving and these small steps before cooking take minimal effort. And sometimes, I ignore these pre-cooking steps completely. It’s not the end of the world, depending on the recipe.

When it comes to cooking the eggplant for this recipe, there are a few options. Using leftover grilled eggplant like I did in Florida, or grilling eggplant for this specific recipe, makes these melts insanely quick and easy, like under 30 minutes. But not everyone has a grill pan for the stovetop and grilling outside can often become a production. In this case, I recommend roasting the eggplant. Roasting the eggplant takes a little longer, but it’s really just as simple. Make dinner time even easier by roasting the eggplant in advance.
And without further ado, my simple recipe for Eggplant Parmesan Melts, perfect for those days you want an easy dinner that won’t blow your wallet or your diet.

Cheap & Easy Eggplant Parm Melts
Serves: 4 Start to Finish: 45 minutes
Ingredients
1 Italian Eggplant, about a pound
2 tablespoons Olive Oil
Salt
4 English Muffins, split (I used Ezekiel Sprouted Grain English Muffins)
1 14-oz can Tomato Sauce (I used Whole Foods 365 brand)
4 ounces Part-Skim Mozzarella, shred while eggplant cooks (I used Whole Foods Brand)
1/4-1/2 cup Grated Parmesan Cheese (I used Whole Foods brand)
1 clove Garlic, kept whole and peeled, optional
Dried Basil, optional
Garlic Powder, optional
To Make
Trim ends of eggplant. Slice lengthwise into 1/2 inch discs. Season both sides of each disc with salt. Allow to sit for 20 minutes. Use a clean towel to remove the excess moisture.
Preheat oven to 425 degrees to roast eggplant.
Spread eggplant slices out on a parchment lined baking sheet. Brush each side with olive oil and season with black pepper. Roast eggplant for 25-30 minutes, flipping once half way through cooking.
While eggplant cooks, brush each muffin half with olive oil. Lightly toast English muffins in a toaster oven or in broiler. Peel a clove of a garlic and cut in half. Rub the cut side over toasted English muffins (doing this gives a slight garlic flavor, this step is optional).
When eggplant is finished, assemble the melts. Top each muffin half with 2 spoonfuls of sauce. I like to season the sauce layer with salt, garlic powder and dried basil (optional). Top sauce with 1 or 2 slices of eggplant, depending on size of slice. Top eggplant with 1 or 2 more spoonfuls of sauce, 1 or 2 tablespoons mozzarella, and then 1 tablespoon grated Parmesan cheese.
Using a broiler or toaster oven, broil muffins until cheese is melted and golden brown. Season with salt and liberally sprinkle on some dried basil.
Serve with fresh fruit or simple salad.
*The baking method takes about 30 minutes. You could also grill the discs over medium-high heat, using an outdoor grill or stovetop grill pan, for about 4 minutes per side (saves time).
