
Continue reading “Kale Pesto & Roasted Veggie Flatbread Sandwiches”
plant-forward food | good vibes | all eaters welcome


Yep, this my third grain bowl post this month. Why? Two reasons. First is because I love nourishing bowls of goodness, packed with an array of nutrients, flavors and textures. It’s my favorite way to eat because it’s healthy, convenient, packable, stores well in the fridge and, most importantly, absolutely delish. If you want to make a crave worthy nourish-style bowl, it’s not quite as easy as piling veggies, grains and protein into a bowl. My kind of nourish bowl (aka Buddha Bowl or Grain Bowl) has depth, richness and variety. It takes advantage of seasonal produce, flavor-bombs like garlic and citrus, and requires a tasty sauce or spread to pull it all together. This takes a little bit of time and planning, but it’s worth it. And once all of the components are ready, they’re easy to throw together.
The second reason why I’m focusing on grain bowls is because they’re all the rage these days. Everywhere from fast casual restaurants to fine dining establishments are jumping on the nourish bowl bandwagon. It’s a trend for sure, and food trends, specifically health-supportive ones, are my jam.
So there you have it. One more inspirational nourish bowl to get your creative juices and health vibes flowing. And if you missed the last two, check them out below.
Burrito Nourish Bowls with Roasted Peppers & Tomatillo Sauce
Cauliflower Satay Nourish Bowl

Roasted Summer Veggie Nourish Bowl with Classic Hummus
Serves: 4 Start to Finish: 1 hour Active Time: 30 minutes
Ingredients
For Veggies & Rice
1.5 cups dry brown rice
sea salt, fine grain
2 large zucchinis, cut into a large dice
olive oil
3 large cloves garlic, minced (2 for zucchini, 1 for hummus)
1 pint cherry tomatoes
2 orange bell peppers (red and yellow bell peppers work too)
For Hummus (use storebought if desired)
1 14-oz can chickpeas
3 tablespoons tahini
2 tablespoons fresh lemon juice
1 tablespoon olive oil
3/4 teaspoons sea salt, fine grain
1/2 teaspoon cumin
1/4 teaspoon black pepper
For Assembly
4 cups lightly packed greens (I used red leaf lettuce)
2 teaspoons red wine vinegar (lemon juice works too)
1 red onion, quartered and thinly sliced
3 tablespoons pine nuts, lightly toasted
To Make
Preheat oven to 400 degrees.
Cook 1.5 cups brown rice to package instructions – it goes something like this – rinse rice in colander, add to small sauce pan with 3/4 teaspoon sea salt and 3 cups water. Bring to boil, reduce to simmer, cover with lid. Allow to cook for 35-40 minutes, until water is mostly absorbed. Remove from heat and allow to steam, covered, for 10 minutes.
Toss zucchini cubes with 3/4 teaspoons salt, 2 cloves chopped garlic and 1 tablespoon olive oil. Transfer to a parchment lined baking sheet in a single layer. Toss tomatoes with 2 teaspoons olive oil and 1/4 teaspoon salt. Transfer to baking sheet with zucchini. Cook cherry tomatoes for 20 minutes. Cook zucchini for 30-35 minutes, flipping once through.
Roast the bell peppers. I like to do this over the open flames on my burner, which takes about 8 minutes and another 10 minutes in a sealed paper paper bag or covered bowl. This allows the peppers to steam and makes the charred skins easily peel off. Once charred skin is removed, discard stem and seeds, cut into a large dice. You can also roast the peppers in the over with the other veggies. To do this, remove stem and seeds, dice bell peppers, toss with a little oil and roast for about 25 minutes.
Meanwhile, make hummus. Combine all hummus ingredients plus 5-6 tablespoons water in a food processor or in a hand blender vessel. Use the water to achieve your desired consistency.
To assemble nourish bowls – toss greens with vinegar, sliced red onions and 1/4 teaspoon sea salt. Divide evenly between 4 dishes. Top each bowl with 3/4 cup cooked rice, 1/4 of all roasted vegetables and 3-4 tablespoons hummus. Garnish each serving with 2 teaspoons toasted pine nuts.

Matt and I are really big on camping. And when I say that Matt and I are really big on camping, I really mean that Matt is a camping pro and I’m along for the ride. That’s not to say I don’t love it though. I actually grew up spending my summers glamping (glamourous, more comfortable camping) on my family’s island in Ontario, Canada. While it wasn’t totally “roughing it”, going to Canada definitely made me super comfortable in nature and without the comforts of civilization. The only electricity on our little island comes from a small generator, which is rarely on. To get to the nearest major grocery store takes hours, and the nearest convenience store is a 40 minute boat ride away. On the island, we spend our time reading, playing cards, hiking, fishing, cooking, eating, napping, crafting and exploring. We sleep on old beds in ancient screened-in cabins, perfect for star gazing as you fall asleep, and we spend mornings sitting around the campfire, looking out over the beautiful Canadian wilderness. Sounds magical, right? To me, it’s heaven. In fact, we’ll be heading to Rickey Island in just over a month. Can’t wait.

In addition to our trips to Rickey Island, Matt and I always find time to do a little camping on our own. We’ve hiked to camp, we’ve canoed to camp, and we’ve car-camped. Car camping is my personal favorite, because you can take more stuff and leave the food and valuables in the car. It just makes it a little more relaxing and a little easier, ideal for a short weekend camping trip. And that’s exactly what we did last weekend. Matt and I joined some of his University of Vermont friends and had a wonderful 36 hours hiking and chilling on the water. This campsite, called Black Bear Campground, was totally awesome. One of my favorite campgrounds so far. It’s located in Phoenicia, a small town near Woodstock, New York. There were beautiful hiking trails, a wide, flowing creek running along the edge of each campsite, and a couple resident black bears. Yes, we saw a black bear and her cub at Black Bear Campground. Isn’t it ironic? Don’t you think? (I hope everyone picked up on that song reference). After our morning hike, I spent most of Saturday on a chair overlooking the creek with a beer in my hand. It was just lovely. I even saw a group of fly fishers waddle through and one of them caught a fish right in front of me! So cool.

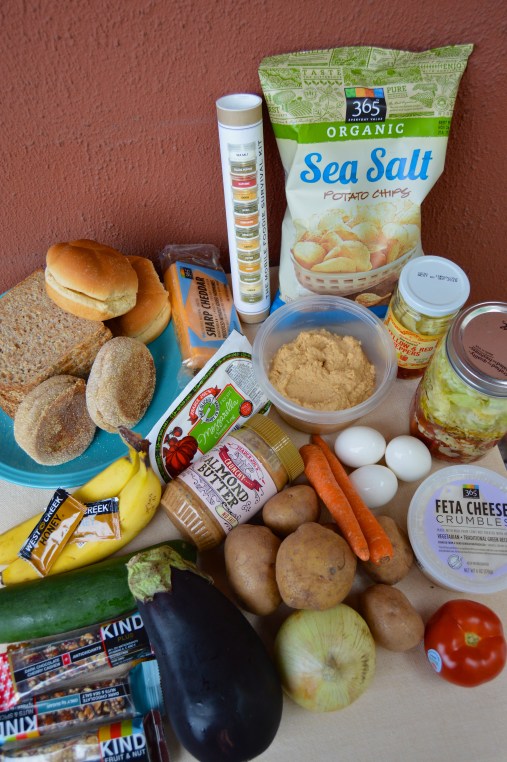
Anyway, being a whole foodie and cooking addict means that I’m not bringing just any old food supply. One of my favorite activities while camping is the food part! I like planning it, executing it, and most importantly, eating it. So what does a vegetarian whole-foodie bring camping that will satisfy both her and her carnivore boyfriend? Well that’s what this post is all about! Four meals and a few snacks that blend together the essential elements of camping food…simple, fun and satisfying. I’ve even included packing tips and essential utensils, to make prep even easier.


Matt and I didn’t arrive at the campsite until 11pm on Friday night, so we didn’t need to worry about Friday night dinner (we ordered pizza while packing up at home). Then for lunch on Sunday we headed to Woodstock for a sit down lunch. Basically this meal-plan covers all the food we needed for all of Saturday and Sunday morning (essentially one full day of camping, plus an extra breakfast before hitting the road on the second day). Use this as a guide and fill it in how you see fit…that could mean an extra dinner and lunch or maybe s’mores supplies for a classic camping dessert by the fire.


I hope my tips, tricks and pics inspire you to get outdoors, take advantage of summer and get a quick camping trip like ours on the calendar. 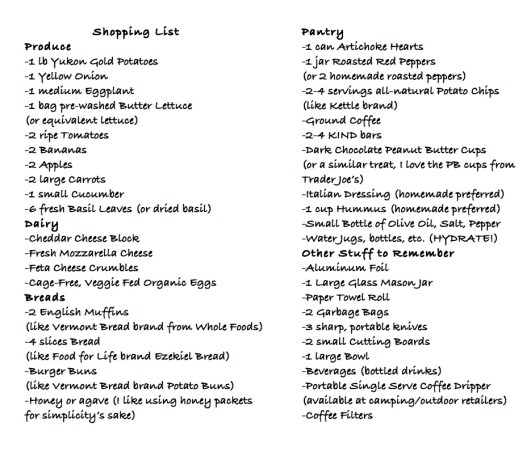
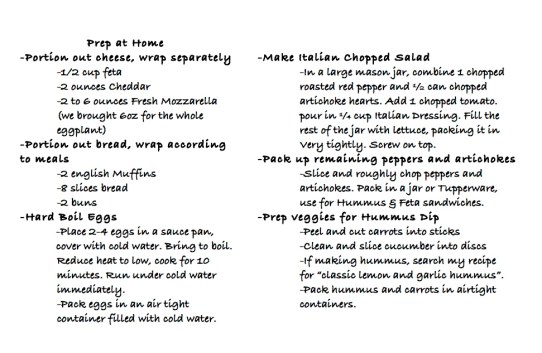
For Two Egg & Cheddar Breakfast Sandwiches and Home Fries
Cut potatoes and half the onion into a medium dice. Toss with a splash of olive oil, salt and pepper. Add a thin layer of olive oil to a skillet. Add potatoes and cook over camping stove or fire pit, stirring often to prevent burning. Honestly, ours got super crispy and a bit black/burned on the bottom but they still were amazing! You could also try cooking the potatoes in a foil packet over the camp fire. We didn’t want to start a fire because we were leaving after breakfast to hike, we used a camping pan and a portable flame.
Peel and slice 2 hard boiled eggs. Slice 2 ounces cheddar cheese. Use egg and cheese slices to make sandwiches on the English muffins. Season egg slices with cheese. You can griddle the sandwiches in a skillet/pan over a portable stove top or over a fire pit. Or wrap the sandwiches in foil and heat over the fire. Always be extra careful about burning food while camping, it happens easily.
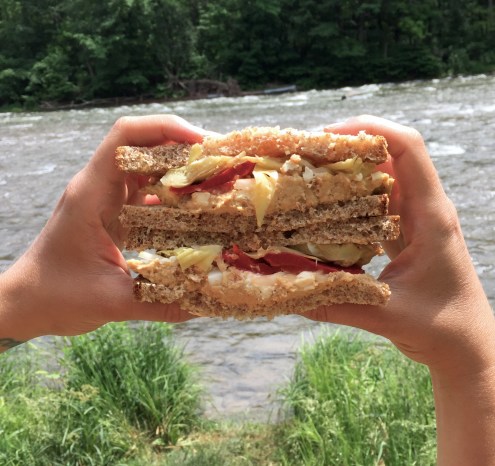
For Two Hummus Sandwiches
Spread about 1/4 cup of hummus onto 2 slices of bread. Top each slice with 1-2 ounces crumbled feta and the reserved roasted red peppers and artichoke hearts. Top each sandwich with a second slice of bread. Serve with all-natural potato chips.
For Eggplant Burgers and Chopped Salad
Slice eggplant width-wise into 1/2 slices. Sprinkle each slice with salt, allow to sit for 15-30 minutes to let the salt draw out the bitter liquid. Brush each side of each slice with olive oil. Season with pepper. Grill slices on a grate over the fire pit until soft and tender. On a BBQ it takes 3-5 minutes preside, over a fire pit the time will vary depending on the fire. When slices are almost cooked, top with 1 ounce slices fresh mozzarella cheese and allow to melt. Slice tomato. Stuff buns with 1 or 2 eggplant slices, a slice of tomato (seasoned with salt), and basil leaves (or a hefty seasoning of dried basil).
Dump mason jar filled with salad into a large bowl and toss. Serve with burgers.
I also bought a 1/3 lb beef patty for Matt. We grilled it with the eggplant and he topped his burger with both the patty and an eggplant slice.
For Almond Butter & Banana Sandwiches
Spread about 2 tablespoons of Almond Butter onto each of two slices bread. Drizzle with honey or agave (a little goes a long way. Slices bananas and layer over almond butter. Each open faced or top with another slice of bread. I prefer open face (less bread).


I was long distance chatting with my mom the other day, and because our conversations often revolve around food, she was raving about an avocado toast she recently had for lunch at a cafe in my hometown, St. Louis. She then proceeded to ask how to make Avocado Toast. I could feel my face twist up as I thought, “It’s pretty self explanatory, no?” But before saying anything out loud, I quickly realized that, to her point, there’s a difference between smashed avocado slathered on any old slice of bread and a real Avocado Toast. So my mom wants to know how to make the best version of a real Avocado Toast? Challenge accepted. Continue reading “Best of Basic: Avocado Toast”

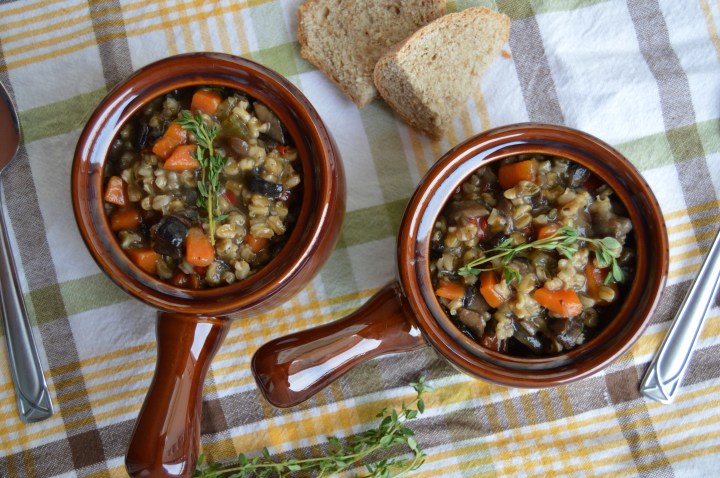
It’s April. Not a month typically viewed as stick-to-your-bones-soup-worthy. But I am once again reminded that my black and white vision of what the weather should look like during each month is totally irrelevant. Mother Nature does what she wants, and although she had the whole month of March to transition to true Spring, it’s still winter . You see, I can be patient with cold weather in March. But 40 degrees in April is just plain UGH.
However, instead of dwelling on my disappointment and unwavering desire to wear a skirt without tights, I decided to use this annoying down-coat-weather as a reason to make one last batch of hot and hearty cold-weather soup. What kind of soup? Something stick to your ribs, totally satisfying, and 100% healthy. Almost as fast as the idea for soup materialized, the thought of a vegan Mushroom & Barley Soup came to mind immediately. Back in the day, I loved eating my mom’s Beef & Barley Soup, and nostalgia typically drives many of my ideas. So my inkling to make a rich and flavorful batch of my mom’s soup (minus the meat) comes as no surprise.

Soups are generally pretty simple. Especially when using store-bought broth. This soup is just that: simple. Sautéed vegetables, organic veggie broth, fresh thyme and barley. That’s about it. I use thyme here because I love the flavor of mushrooms and thyme together, and because I find that the combination adds richness and substance that would normally come from the beef. To add even more heartiness and substance, at the very end of cooking I add a cornstarch slurry, which thickens the soup beautifully.
My Mushroom & Barley Soup is definitely one to keep in the recipe box. It is not only super healthy, packed with fresh vegetables, whole grains, and fiber, but it’s also vegan-friendly and oh so yummy. For dinner on Sunday, I made grilled Swiss cheese sandwiches to go alongside the soup, and for lunch leftovers I ate the soup with a couple hunks of bakery-fresh whole wheat peasant bread that perfect for dipping and soaking. Delicious. This soup is just plain awesome. So I guess I’d like to end this post by thanking Mother Nature for giving me the opportunity to create this recipe. But I’d still really like some 60 degree days in the very near future, ok?


Vegan Mushroom Barley Soup
Serves: 4-6 Start to Finish: 90 min.
Ingredients
1/4 cup Olive Oil
2 large Carrots, peeled and cut into medium dice
1 large Onion, medium to small dice
2 large stalks Celery, cut into medium dice
1 Red Bell Pepper, cut into medium dice
4 cloves Garlic, peeled and minced
Salt
Pepper
1/2 lb Portobello Caps, cut into medium-large dice
10 ounces White Button Mushrooms, cut into medium-large dice
2 tablespoons fresh chopped Thyme leaves, divided
4 cups Organic Veggie Stock
1 cup dry Barley
2 tablespoons Corn Starch + 1/3 cup Water
3 teaspoons Frank’s Red Hot Sauce (or preferred brand added to taste)
To Make
Prep and chop all veggies. I like the veggies big enough to see and taste, but cut to any size you prefer.
Heat oil over medium heat in a large pot. Add celery, carrots, onion, and red pepper to oil. Toss to coat. Cook for 5 minutes. Add garlic to pot, toss to combine. Season with salt and pepper (I used 1/2 teaspoon of each). Cook for 5 minutes.badd mushrooms. Cook for 5 minutes. Add 1 tablespoon thyme and season with salt (I used 1/2 teaspoon). Cook for 2 minutes. Add veggie stock and dry barley to pot. Turn heat to high and bring to boil. Once boiling, reduce heat to medium-low and cover. Simmer until barley is cooked, 45-60 minutes.
With a couple minutes to go, mix 2 tablespoons cornstarch with 1/3 cup cold water. When barley is fully cooked, add the cornstarch “slurry” mixture to pot. Add remaining tablespoon thyme and an additional 1/2 cup water (or more depending on desired consistency). Bring to boil and cook for 1-2 minutes until soup is thickened from cornstarch. Turn off heat. Salt to taste (I added 1/2 teaspoon) and add hot sauce. Note that the hot sauce adds a much need cut of vinegar, it does not make it spicy unless you add more than I did.
The soup is now ready to eat. Continue adding water if desired, to maintain ideal consistency. I like it super thick so I didn’t add any additional water.


Moving is the worst. It doesn’t matter how exciting the prospect of a new home is, when it comes time to move, misery is the prevailing emotion. That’s how it is for me, at least. Also contributing to the misery is the fact that I need things to be perfectly organized and scheduled, and when it comes to moving, even the most meticulous planning will no doubt unravel. It’s exhausting, frustrating and overwhelming. Needless to say, the last two weeks of packing and moving and unpacking have been non stop crazy.
Im so happy to say that we’re all moved in, pretty much set up, and absolutely loving our new apartment in Williamsburg, a trendy Brooklyn neighborhood of NYC. This is my 5th neighborhood since moving to New York in 2011, and I have a feeling it’s going to be my favorite. Although there is still a lot to do, I feel as though I can finally fall back into my usual routine and I couldn’t be more ready.
In honor of the move, I’m sharing a super simple, cheap and healthy dinner idea that came in handy during the moving process. I actually first made these delicious eggplant parm melts while in Florida a few weeks ago with my family. When trying to use up items in the fridge one afternoon, we used leftover grilled eggplant discs, fresh mozzarella cheese, jarred tomato sauce and my favorite Ezekiel English Muffins to make a light and simple lunch. I knew immediately that this would be a new go-to for us. Now let’s fast forward to the whole packing and moving process, when lack of time, saving money and staying healthy were all on my mind when coming up with dinner every night. My answer to these concerns on more than one occasion over the past couple weeks was to make these eggplant parm melts, and now I feel an almost emotional attachment to them.
 I changed up the recipe slightly from Florida to be even more economical. I replaced fresh mozzarella with regular mozzarella and used the Whole Foods brand canned tomato sauce instead of a fancy jarred marinara. The beauty of this recipe is that you can really use whatever you have on hand, the brands you prefer, or items on sale at the moment. I do find that using a simple canned sauce tastes better with some simple seasoning action, like dried basil and garlic powder. I further add flavor with the technique of rubbing raw garlic onto the lightly toasted base English muffins before adding the toppings. This is optional but highly recommended.
Finally, I have a quick note about cooking eggplant, but then I’ll get to the recipe. Cooking eggplant is sometimes seen as intimidating, probably because so many recipes require removing some of the moisture with salt or soaking the eggplant in water before cooking. These steps are important to remove the slight bitterness inherent in eggplants. But never fear, eggplant is rather forgiving and these small steps before cooking take minimal effort. And sometimes, I ignore these pre-cooking steps completely. It’s not the end of the world, depending on the recipe.

When it comes to cooking the eggplant for this recipe, there are a few options. Using leftover grilled eggplant like I did in Florida, or grilling eggplant for this specific recipe, makes these melts insanely quick and easy, like under 30 minutes. But not everyone has a grill pan for the stovetop and grilling outside can often become a production. In this case, I recommend roasting the eggplant. Roasting the eggplant takes a little longer, but it’s really just as simple. Make dinner time even easier by roasting the eggplant in advance.
And without further ado, my simple recipe for Eggplant Parmesan Melts, perfect for those days you want an easy dinner that won’t blow your wallet or your diet.

Cheap & Easy Eggplant Parm Melts
Serves: 4 Start to Finish: 45 minutes
Ingredients
1 Italian Eggplant, about a pound
2 tablespoons Olive Oil
Salt
4 English Muffins, split (I used Ezekiel Sprouted Grain English Muffins)
1 14-oz can Tomato Sauce (I used Whole Foods 365 brand)
4 ounces Part-Skim Mozzarella, shred while eggplant cooks (I used Whole Foods Brand)
1/4-1/2 cup Grated Parmesan Cheese (I used Whole Foods brand)
1 clove Garlic, kept whole and peeled, optional
Dried Basil, optional
Garlic Powder, optional
To Make
Trim ends of eggplant. Slice lengthwise into 1/2 inch discs. Season both sides of each disc with salt. Allow to sit for 20 minutes. Use a clean towel to remove the excess moisture.
Preheat oven to 425 degrees to roast eggplant.
Spread eggplant slices out on a parchment lined baking sheet. Brush each side with olive oil and season with black pepper. Roast eggplant for 25-30 minutes, flipping once half way through cooking.
While eggplant cooks, brush each muffin half with olive oil. Lightly toast English muffins in a toaster oven or in broiler. Peel a clove of a garlic and cut in half. Rub the cut side over toasted English muffins (doing this gives a slight garlic flavor, this step is optional).
When eggplant is finished, assemble the melts. Top each muffin half with 2 spoonfuls of sauce. I like to season the sauce layer with salt, garlic powder and dried basil (optional). Top sauce with 1 or 2 slices of eggplant, depending on size of slice. Top eggplant with 1 or 2 more spoonfuls of sauce, 1 or 2 tablespoons mozzarella, and then 1 tablespoon grated Parmesan cheese.
Using a broiler or toaster oven, broil muffins until cheese is melted and golden brown. Season with salt and liberally sprinkle on some dried basil.
Serve with fresh fruit or simple salad.
*The baking method takes about 30 minutes. You could also grill the discs over medium-high heat, using an outdoor grill or stovetop grill pan, for about 4 minutes per side (saves time).
