Cheap & Easy: Garlicky Spinach & Feta Pizza

Cheap & Easy: Garlicky Spinach & Feta Pizza

DSC_0346 2

In our household, Friday night is always dinner date night. Although Matt and I eat dinner together just about every night, there’s something about Friday night (or any night without work the next day) that feels so much more relaxed and intimate. You can really focus on the food, enjoy a couple drinks without fearing the early morning alarm clock, and fully relax. For date night, we always switch it up; choosing to go out to dinner for some date nights, ordering delivery for some and, of course, cooking some date night meals ourselves. Don’t get me wrong, I love going out to eat, but I’m starting to think I like the homemade, reclusive version of date night the best. Why? Because not only is it more comfy and cozy, but it’s also so much cheaper.

DSC_0333

Last Friday, before date night, I made a quick trip to Whole Foods where I was able to pick up the few ingredients needed for this easy and delicious meal, Spinach & Feta Pizza on Whole Wheat Crust. You may be thinking “Whole Foods? Cheap?” Yes, because just about all of the ingredients for these pizzas are available in the Whole Foods 365 version. Now, if you don’t know about 365 brand products, you’re doing Whole Foods all wrong. I’m constantly hearing how expensive Whole Foods is, and I agree that there are definitely pricey products and brands at Whole Foods. But that’s where 365 comes in. 365 is the Whole Foods generic brand, and one that can be trusted in terms of quality ingredients at a great price. You can get everything from pasta, dairy and spices to canned beans, fresh spinach and frozen entrees. Literally, the store is stuffed to the brim with 365 products. If you go to Whole Foods and focus on only buying 365 brand products, you’re going to be pleasantly surprised at the register. Trust me, you will be.

DSC_0314

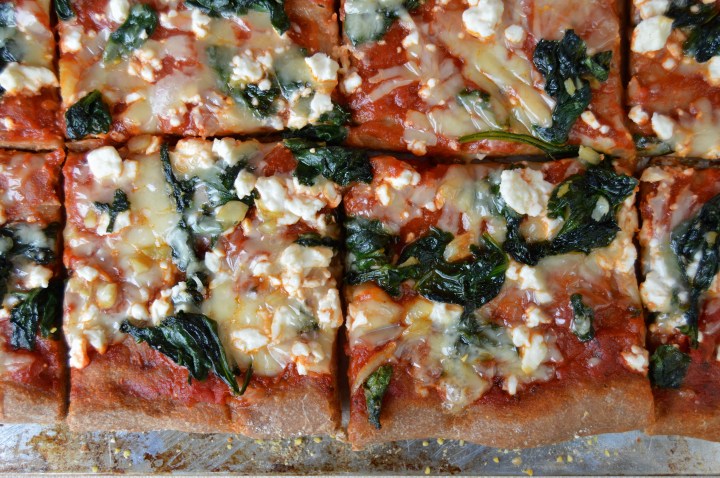
So anyways, the pizza turned out uber flavorful and delicious, and it was ready in a pinch. I simply sautéed the the spinach with oil, fresh garlic and salt, and then layered it onto the store-bought whole wheat crust with marinara and double cheese. A quick 10 minutes in the oven the pizza is ready for devouring. I just love this pizza. Sautéed spinach and garlic is already one of all-time fave foods. Add salty feta, gooey mozzarella and a crispy crust? Winner winner [pizza] dinner.

DSC_0328

This will be my last post until the last week of July. I’m so happy to say that I’ll be MIA next week as we are leaving tonight for our rustic lake house in Canada. It’s in the middle of nowhere and I couldn’t be more excited to get away (check out my Instagram throughout the week to experience this heavenly place, it really can’t be described). And when I return, I have a super exciting announcement to make. Intrigued? You’ll just have to wait. So enjoy the weekend and this upcoming week and definitely make this pizza. You won’t be disappointed!

Garlicky Spinach & Feta Pizza
Serves: 2-3*   Start to Finish: 30 minutes

Ingredients

22 ounces Pizza Dough, approx. (I’m using Whole Wheat for added nutritional value)
1 cup all-natural Marinara Sauce
1 cup (4 ounces) shredded Mozzarella
1/2 cup crumbled Feta Cheese
1 tablespoon Olive Oil, plus more
1 bag fresh Baby Spinach
2 cloves Garlic, peeled and roughly minced
Sea Salt, fine-grain
Corn Meal (optional)
Crushed Red Pepper Flake (optional)

To Make

Refrigerated dough should sit out for at least an hour prior to baking. Place ball of dough in a lightly oiled bowl and cover. Leave at room temperature for 1-2 hours.

Preheat oven to 450 degrees.

Make garlicky spinach topping. In a medium skillet heat 1 tablespoon olive oil and 2 cloves minced garlic over medium heat. When garlic begins to sizzle, cook for 1-2 minutes, then add fresh spinach leaves, tossing to coat with garlic and oil. When the spinach has wilted slightly, or after about 1 minute, add 2 teaspoons water and 1/4 teaspoon salt to the spinach, toss to combine. Cook for an additional 3-4 minutes, remove from heat.

Spread dough out to the fit the size of a large sheet pan (use whatever shape pan you want and/or divide dough between multiple pans, this amount of dough should make one large pizza or two smaller pizzas).

Lightly oil baking sheet with olive oil and sprinkle a thin layer of corn meal evenly over oiled pan. Place dough onto pan, readjust shape as needed.

Evenly spread sauce over the dough, leaving a thin ring around the edges untouched. Evenly distribute about half of the spinach mixture over the sauce. Sprinkle mozzarella and feta over spinach. Top with remaining spinach. At this point I like to sprinkle the crust with a little bit of salt and also add a dash or two to the whole pie, that’s optional though.

Bake pizza for 10-12 minutes. Allow to cool slightly before cutting.

* Matt and I ate, combined, about 3/4 of the pizza for dinner, with side salads. We were stuffed. It could’ve easily served 3 people with a side salad too. Without a side of some kind, I would plan on 1 pizza for every 2 people.

DSC_0344

Buffalo Cauliflower & Brown Rice Bowls (vegan optional)

Buffalo Cauliflower & Brown Rice Bowls (vegan optional)

DSC_0387

There are oh so many ways to enjoy my stellar recipe for a major food trend, Buffalo Cauliflower “Wings”. This post highlights one of my fave recipes using vegan buffalo wings, in the form of a nourish bowl. Casual yet creative, tasty yet nutritious. This recipe is simply perfect.

DSC_0399

The idea for a brown rice bowl topped with buffalo wings was inspired by a popular fast-casual restaurant in my hometown of St. Louis called Crazy Bowls and Wraps. CBW, as St. Louis-ans like to call it, has been around forever, even before healthy fast-casual joints became a thing. CBW offers customizable rice bowls, salads and wraps with all kinds of creative fillings and options. One of my absolute favorites is the buffalo fried tofu, so it wasn’t hard to come up with the idea for a buffalo cauliflower brown rice bowl.DSC_0370

I love the idea of layered bowls when serving a crowd. It makes it easy for each person to get exactly what they want. Plus, bowls like this are easy to eat. But I don’t need company to make bowls like this. In fact, last night for dinner I made Mexican rice bowls with roasted potatoes and peppers, cabbage, shredded cheddar and marinated tomatoes. When it comes to “bowls”, the possibilities are endless. Whenever I don’t know what to make, I start with a starch like rice or orzo pasta and simply add toppings according to a theme (Mexican, Greek, Italian, Asian etc.). That’s actually a really good tip if you’re ever struggling with what to cook. I use it all them time.

DSC_0383
If you’re new to rice bowls, this is a great one to start with. The spicy, crispy cauliflower compliments the fresh veggies and creamy sauce perfectly. It feels so indulgent, but it’s really very balanced. And it’s also a lot easier than it sounds. These bowls are seriously so yummy and I highly recommend trying them out, STAT. I know I can’t wait to make them again.

Buffalo Brown Rice Bowls
Serves: 4   Start to Finish: 1 hour 15 min

Ingredients

1 batch Buffalo Cauliflower (get recipe here)
1 cup Brown Rice
Sea Salt
8-10 ounces chopped Romaine Lettuce
10 ounces Cherry Tomatoes
2 large Carrots, peeled and trimmed
1 cup Dressing (get my creamy blue cheese dressing here or use the vegan recipe below)

Creamy Vegan Dressing
1 cup Vegan Mayonnaise (I like Follow Your Heart brand)
2 teaspoons Red Wine Vinegar
2 tablespoons unsweetened non-dairy milk or water (+ more to consistency)
3/4 teaspoon Garlic Powder
3/4 teaspoon Onion Powder
1/2 teaspoon Salt
1/2 teaspoon Black Pepper
1/2 teaspoon Dried Parsley

To Make

Make rice. Add 1 cup brown rice, 2 1/4 cups water and 1/2 teaspoon sea salt into a medium sauce pan. Bring to boil, reduce heat to lower simmer, cover. Simmer for 35-40 minutes. Remove from heat when all water is absorbed, allow to sit, still covered, until ready to assemble bowls.

While rice simmers, preheat oven to 450 degrees and get the Buffalo Cauliflower “Wings” started (get recipe here).

While cauliflower bakes, make dressing by combining all ingredients for vegan dressing (ingredients above) or make my yummy blue cheese dressing (get recipe here). Set aside.

Prep veggies. Wash & chop lettuce. Cut cherry tomatoes in half. Prep carrots as desired. I like making “carrot shavings” for salads. Use a vegetable peeler to peel off long strips of carrots, then run your knife through the strips to make shavings.

When cauliflower and rice are finished, assemble the bowls. Divide lettuce into 4 bowls. Top each bowl with brown rice, tomatoes, carrots, buffalo cauliflower “wings” and 2-4 tablespoons dressing.


Best of Basic: Perfect Oven Fries

Best of Basic: Perfect Oven Fries

DSC_0220

Fried potatoes are my jam. Cheese fries? Amaze. Tater tots? Obsessed. Hashbrowns? Yes please. Are there people out there who don’t love fried potatoes? No way. While deep fried foods are totally fine in moderation (that is, if they’re whole foods that are fried in healthy oils), I want French fries on the daily. So a recipe for slightly lighter and healthier oven fries was a natural for me.

I’ve been making oven fries since forever. And after a lot of trial-and-error, I’ve come up with a go-to method that makes flavorful, crispy fries that are neutral enough to go with any dipping sauce. I use small yellow or Yukon Gold potatoes for my oven fries. Yukon Golds are my favorite type of potato. I like the waxy texture, the golden color and the small size. After cutting the potatoes in thick fries, I soak them in cold water. This trick removes excess starchiness and makes for a crispy fry. Then I just toss with a simple blend of spices and olive oil. When baking the fries, I start at a lower temperature which allows the insides to become fully cooked. Then I crank up the heat to get those guys golden brown and crispity-crunchy. Perfect every time.

I’ve been meaning to share this recipe for quite awhile. Then I saw these amazing red, white and blue basket liners at Sur la Table and couldn’t resist. These liners are perfect in those red plastic woven baskets you get at diners and casual food joints. As soon as I saw them I thought “oven fries! 4th of July! BBQ perfection!” You can use these lined baskets to serve apps and sides or everyone can have their very own basket for their meal. So cute, so fun and so festive.

DSC_0217

Honestly, I’m not even sure what Matt and I are doing for the 4th. Independence Day has always been a big holiday for me. I grew up spending every July 4th at our family friends’ lake house near Milwaukee, Wisconsin, and it was always quite the celebration. The fireworks were unreal, the drinks were flowing and the group of us (sometimes over 30 people sleeping in one house) always got a little too rowdy. Those were the days. As of this year though, the lake house has been retired. I’ll really miss that place. But I wouldn’t be able to go this year anyway because it’s Matt’s brother’s engagement party in New York (woohoo!). There are plenty of activities planned for the weekend, but for the actual 4th of July we have nothing going on. I’m thinking a festive BBQ on our balcony, some all American beers, and a few sparklers will be totally awesome. I’m not quite the party-er I used to be and these days, I prefer to celebrate on the tamer side. But if this intimate celebration does end up happening, these fries will most definitely be on the menu.

Pine Lake Way Back When
Scenes from Pine Lake, Wisconsin – Back in the Day – That’s me!

I hope everyone has a super fun (and safe) holiday weekend with lots of good food and good company!

Best of Basic: Perfect Oven Fries
Serves: 4    Start to Finish: 1.5 hours

Ingredients

2 lbs Yukon Gold Potatoes
2 tablespoons Olive or Canola Oil
1/2 teaspoon Sea Salt
1/2 teaspoon Paprika
1/4 teaspoon Garlic Powder
1/4 teaspoon Black Pepper

To Make

Cut potatoes into 1/4-1/2″ slices, length wise. Cut each slice into sticks or wedges. Place cut potatoes in a big bowl of ice water. Allow to soak for 30 minutes.

Meanwhile, preheat oven to 375 degrees. Line a large baking sheet or two with parchment paper. I use one large pan for this amount but the more room the potatoes have, the crispier they’ll be.

When potatoes are finished soaking, drain and dry with a clean towel. Toss potatoes with oil and seasoning. Spread out over baking sheets. Bake for 20 min. Remove from heat, gently toss. Turn heat up to 450 degrees. Cook for 30-40 more minutes, tossing every 10-15 minutes.

Herb Goat Cheese Toasts with Roasted Tomatoes & Red Onion

Herb Goat Cheese Toasts with Roasted Tomatoes & Red Onion

DSC_0239

It’s been about 10 days since my last blog post and I couldn’t be happier to get back in the groove. Since coming back to NYC after a fabulous vaca in my hometown of St. Louis, life has seemed a bit crazier than normal. Maybe it was a few days without cooking gas and hot water (long story), maybe it was the inevitable homesickness that comes after going back home and spending time with my parents, or maybe it was an abnormal amount of items on my to do list last week. Most likely, it was a combination of all three and I was in need of a recharge. You see, I’m a creature of habit and routine makes me feel in control. So because routine is hard to come by as an adult, if I’m feeling a bit out of control, I need to center myself by refocusing on the things in my life that are routine. Thank goodness for Saturday, it was just what the doc ordered.

DSC_0263

Matt spent most of the day playing golf this past Saturday which gave me the day to gain some control. Morning yoga, lots of iced coffee, a trip to the farmers market and quality time in the kitchen. Amazing. But the most amazing part? The simply scrumptious goat cheese and veggie topped toasts I made for lunch using fresh and local bread from the farmers market. The flavors in these toasts are out of control. Tangy goat cheese, sweet basil, bright roasted cherry tomatoes and slow cooked red onion come together to create a total masterpiece. And so simple too!

DSC_0230

I’ve been thinking a lot about simplicity lately. I actually think about simplifying my life quite often. Whether my apartment or my wardrobe, it’s definitely a work in progress but I try to take steps toward decluttering and cleansing whenever possible. But recently I’ve been thinking a lot about simplifying my food and recipes. Don’t get me wrong, I love a complicated recipe that takes hours of time and loads of energy. After all, the kitchen is my happy place. But I really want to come up with delicious and wholesome meals that require less ingredients and less work. I can see my future and it’s going to be busier than ever, so I really have no choice but to start now to come up with lots of easy go-to dishes that allow me a little time in the kitchen to decompress while also getting healthy, clean food on the table quickly and seamlessly.

DSC_0237

Making a toast (aka an open face sandwich) is the perfect base for a simple dish. You can really top a good quality slice of bread with any combination of flavors. It’s kind of like a pizza, kind of like a sandwich, so what’s not to love? This recipe for Herb Goat Cheese Toasts with Roasted Tomatoes and Red Onion is the first of many toast recipes and the perfect dish to kick off my effort to create delicious and simple recipes for when life gets crazy.

DSC_0212

DSC_0217

Herb Goat Cheese Toasts with Roasted Tomato & Red Onion
Servings: 4   Start to Finish: 45 minutes

Ingredients

1 pint Cherry Tomatoes
2 cloves Garlic, peeled & minced
Olive Oil
Sea Salt
1 large Red Onion
8 ounces Plain Goat Cheese
1/3 cup fresh Basil Leaves
4 thick Slices Fresh Bread (I love the whole wheat Peasant Round Loaf from Baker’s Bounty)

To Make

Remove goat cheese from fridge to soften.

Preheat oven to 375 degrees. Line a baking sheet with parchment paper. Cut tomatoes in half. In a bowl, toss tomatoes with chopped garlic, 1 teaspoon olive oil and 1/4 teaspoon salt. Spread tomatoes out onto baking sheet in a single, closely packed layer. Bake for 10-15 minutes. Remove from oven, toss, and bake again for another 30-35 minutes.

When the tomatoes go in the oven, start caramelizing the onion. Slice onion into half moon slices (1/4″ to 1/2″). Heat 1 tablespoon olive oil over medium heat in a medium skillet. Add onions, toss to coat with oil and to separate the layers. Cook for about 10 minutes. Reduce heat to low or medium-low. Add 1/4 teaspoon salt and 2 tablespoons water to onion. Cook for 40 minutes, stirring occasionally, until onions are soft and sweet. Add a tablespoon or two of water if the onions are getting too dry.

While tomatoes and onions cook, mix goat cheese with chopped basil leaves. Set aside. When tomatoes and onions are cooked, remove from heat to cool. Drizzle one side of each bread slice with 1/2 teaspoon oil and a pinch of salt. Toast in toaster oven or under broiler until lightly golden and crisp.

To assemble toasts, spread each slice of bread with 1/4 of the herbed goat cheese mixture. Divide tomatoes and onions evenly over toasts. Serve cold, warm or at room temp. Garnish with more fresh basil.

Meatless Meal Plan: Car Camping for Two

Meatless Meal Plan: Car Camping for Two

DSC_0181

Matt and I are really big on camping. And when I say that Matt and I are really big on camping, I really mean that Matt is a camping pro and I’m along for the ride. That’s not to say I don’t love it though. I actually grew up spending my summers glamping (glamourous, more comfortable camping) on my family’s island in Ontario, Canada. While it wasn’t totally “roughing it”, going to Canada definitely made me super comfortable in nature and without the comforts of civilization. The only electricity on our little island comes from a small generator, which is rarely on. To get to the nearest major grocery store takes hours, and the nearest convenience store is a 40 minute boat ride away. On the island, we spend our time reading, playing cards, hiking, fishing, cooking, eating, napping, crafting and exploring. We sleep on old beds in ancient screened-in cabins, perfect for star gazing as you fall asleep, and we spend mornings sitting around the campfire, looking out over the beautiful Canadian wilderness. Sounds magical, right? To me, it’s heaven. In fact, we’ll be heading to Rickey Island in just over a month. Can’t wait.

Sitting by the Water
My favorite spot while camping last weekend, right by the water.

In addition to our trips to Rickey Island, Matt and I always find time to do a little camping on our own. We’ve hiked to camp, we’ve canoed to camp, and we’ve car-camped. Car camping is my personal favorite, because you can take more stuff and leave the food and valuables in the car. It just makes it a little more relaxing and a little easier, ideal for a short weekend camping trip. And that’s exactly what we did last weekend. Matt and I joined some of his University of Vermont friends and had a wonderful 36 hours hiking and chilling on the water. This campsite, called Black Bear Campground, was totally awesome. One of my favorite campgrounds so far. It’s located in Phoenicia, a small town near Woodstock, New York. There were beautiful hiking trails, a wide, flowing creek running along the edge of each campsite, and a couple resident black bears. Yes, we saw a black bear and her cub at Black Bear Campground. Isn’t it ironic? Don’t you think? (I hope everyone picked up on that song reference). After our morning hike, I spent most of Saturday on a chair overlooking the creek with a beer in my hand. It was just lovely. I even saw a group of fly fishers waddle through and one of them caught a fish right in front of me! So cool.Whole Food Camping Menu.jpg

Fly Fishers
View from our campsite. You can see the fly fishers!

Anyway, being a whole foodie and cooking addict means that I’m not bringing just any old food supply. One of my favorite activities while camping is the food part! I like planning it, executing it, and most importantly, eating it. So what does a vegetarian whole-foodie bring camping that will satisfy both her and her carnivore boyfriend? Well that’s what this post is all about! Four meals and a few snacks that blend together the essential elements of camping food…simple, fun and satisfying. I’ve even included packing tips and essential utensils, to make prep even easier.


DSC_0233

Matt and I didn’t arrive at the campsite until 11pm on Friday night, so we didn’t need to worry about Friday night dinner (we ordered pizza while packing up at home). Then for lunch on Sunday we headed to Woodstock for a sit down lunch. Basically this meal-plan covers all the food we needed for all of Saturday and Sunday morning (essentially one full day of camping, plus an extra breakfast before hitting the road on the second day). Use this as a guide and fill it in how you see fit…that could mean an extra dinner and lunch or maybe s’mores supplies for a classic camping dessert by the fire.

Hummus Sandwich

DSC_0227

DSC_0193
I hope my tips, tricks and pics inspire you to get outdoors, take advantage of summer and get a quick camping trip like ours on the calendar. Camping Shopping ListPrep at Home

For Two Egg & Cheddar Breakfast Sandwiches and Home Fries

Cut potatoes and half the onion into a medium dice. Toss with a splash of olive oil, salt and pepper. Add a thin layer of olive oil to a skillet. Add potatoes and cook over camping stove or fire pit, stirring often to prevent burning. Honestly, ours got super crispy and a bit black/burned on the bottom but they still were amazing! You could also try cooking the potatoes in a foil packet over the camp fire. We didn’t want to start a fire because we were leaving after breakfast to hike, we used a camping pan and a portable flame.

Peel and slice 2 hard boiled eggs. Slice 2 ounces cheddar cheese. Use egg and cheese slices to make sandwiches on the English muffins. Season egg slices with cheese. You can griddle the sandwiches in a skillet/pan over a portable stove top or over a fire pit. Or wrap the sandwiches in foil and heat over the fire. Always be extra careful about burning food while camping, it happens easily.

For Two Hummus Sandwiches

Spread about 1/4 cup of hummus onto 2 slices of bread. Top each slice with 1-2 ounces crumbled feta and the reserved roasted red peppers and artichoke hearts. Top each sandwich with a second slice of bread. Serve with all-natural potato chips.

For Eggplant Burgers and Chopped Salad

Slice eggplant width-wise into 1/2 slices. Sprinkle each slice with salt, allow to sit for 15-30 minutes to let the salt draw out the bitter liquid. Brush each side of each slice with olive oil. Season with pepper. Grill slices on a grate over the fire pit until soft and tender. On a BBQ it takes 3-5 minutes preside, over a fire pit the time will vary depending on the fire. When slices are almost cooked, top with 1 ounce slices fresh mozzarella cheese and allow to melt. Slice tomato. Stuff buns with 1 or 2 eggplant slices, a slice of tomato (seasoned with salt), and basil leaves (or a hefty seasoning of dried basil).

Dump mason jar filled with salad into a large bowl and toss. Serve with burgers.

I also bought a 1/3 lb beef patty for Matt. We grilled it with the eggplant and he topped his burger with both the patty and an eggplant slice.

For Almond Butter & Banana Sandwiches

Spread about 2 tablespoons of Almond Butter onto each of two slices bread. Drizzle with honey or agave (a little goes a long way. Slices bananas and layer over almond butter. Each open faced or top with another slice of bread. I prefer open face (less bread).

DSC_0198
The view of Phoenicia, New York while hiking.