Quick & Easy: Roasted Asparagus & Hummus Gyros

Quick & Easy: Roasted Asparagus & Hummus Gyros

vegetarian asparagus & hummus gyros.png

More and more these days, Matt and I find ourselves playing the fridge-clean-out-game when deciding what to do for dinner. We do about one main grocery shop per week at which point we buy tons of produce, a little bit of meat or poultry for matt and restock our grains, beans and dairy arsenal. I may plan for a couple specific meals, but other than that, dinners are improvisational. The benefits? Playing the clean-out-game a few nights a week minimizes waste, saves money, avoids getting takeout, and it’s actually a pretty fun game. The hard part? Knowing what to have on hand to be able to successfully improv a delicious, balanced and satisfying meal. There’s no exact formula for this, and it really depends on your diet and food preferences. In any case, I’ve come up with a vegetarian-friendly list of staple categories to stock up on, and a few of my fave examples of each…

lettuce/dark leafy greens – hearts of romaine, lacinato kale, arugala
citrus – lemons, limes, blood oranges
flavor boosters – garlic, red onions, yellow onions, jalapenos, avocados
other produce – broccoli, cauliflower, asparagus, red bell peppers, eggplant, potatoes, sweet potatoes, squash, apples, grapes etc.
whole grains (uncooked) – short grain brown rice, quinoa, lentils
breads/pasta – whole wheat penne pasta, whole wheat pita/flatbread
dairy – cheddar cheese, mozzarella cheese, grass-fed plain yogurt, whole milk
canned foods (organic only) – black beans, chickpeas, lentils, diced tomatoes, coconut milk
oils – olive, organic canola, virgin coconut, toasted sesame
vinegars – red wine, champagne, apple cider
pantry/fridge staples – sea salt, hot sauce, tamari, tahini, dijon mustard, yellow miso, ketchup, raw cashews, maple syrup, agave, all purpose flour, corn meal, yeast
herbs/spices (dried) – black pepper, oregano, dill, parsley, smoked paprika, garlic powder, onion powder, chili powder, cumin, coriander, cardamon, cinnamon

IMG_7789.jpg
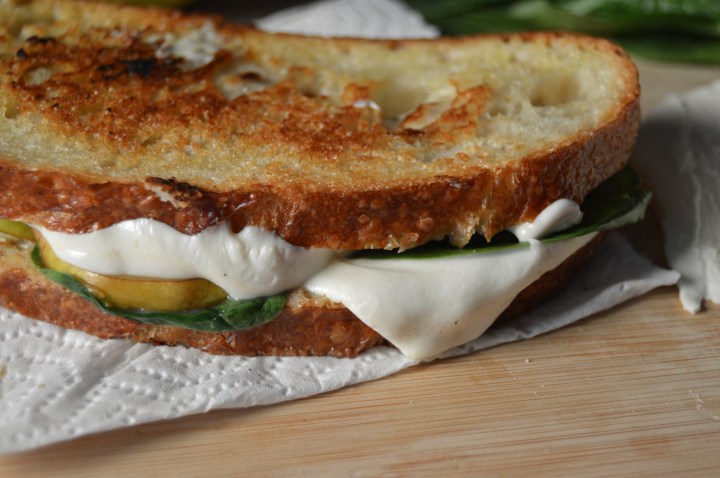
So now let’s put this list to work. A perfect example of an amazing fridge-clean-out meal using my handy-dandy staples list? You got it – these healthy and delicious Asparagus & Hummus Gyros. I threw these wraps together without much effort, and, you guessed it, each item I used is on my staples list. I made hummus from canned chickpeas, garlic, tahini, olive oil, lemon juice and salt. I did a simple roast of the asparagus spears, which I had purchased without a purpose. To make it a balanced and substantial meal, I added shredded romaine, leftover minced red onion and a stupid-easy dill-yogurt sauce that utilized the last 1/3 cup of yogurt left from my family-size tub. Then I wrapped it all up in basic pita flatbreads. So yummy and so easy. This dinner ended up taking less than 30 minutes to prepare, and Matt and I were both blown away by how tasty it was. Balance it out with some crispy red grapes or apple slices and you’ve got yourself a full meal.

Anyway, I’d love to know your go-to tips and tricks for stocking the pantry and playing the kitchen improv game. Or, even better, any successful improvs you’d like to share. Let’s hear it!

IMG_7782.jpg
Roasted Asparagus & Hummus Gyros with Dill-Yogurt Sauce

Servings: 4    Start to Finish: 30 minutes

Ingredients

for roasted asparagus
16 asparagus spears, trimmed
2 teaspoons olive oil
1/8 teaspoon sea salt, fine grain
for hummus (you could also use 1 cup store-bought hummus)
1 can chickpeas, drained and rinsed
3 tablespoons tahini
1 clove garlic
1/4 cup water (+ more for texture)
3/4 teaspoon sea salt
1/4 teaspoon black pepper
1/4 teaspoon ground cumin (optional)
hot sauce, to taste (optional)
for dill-yogurt sauce
1/2 cup plain yogurt
1/4 teaspoon sea salt, fine grain
1/2 teaspoon dried dill
1/2 teaspoon lemon juice
for assembly
1 romaine heart, shredded and washed
1/2 red onion, peeled and finely chopped
4 flatbreads or pitas

To Make

Preheat oven to 400 degrees (F).

Toss trimmed asparagus spears with 2 teaspoons olive oil and salt. Transfer to parchment lined baking sheet. Roast in oven for about 20 minutes, checking spears and flipping them every 5-10 minutes. When finished, the tips of the spears should be brown and the flesh a rich olive green.

Combine all hummus ingredients in a food processor. Blend until smooth, adding more water if needed, a tablespoon or 2 at a time. Transfer to bowl, season to taste. I use 3 dashes hot sauce and an extra tablespoon or 2 of water.

In a small bowl, stir together yogurt-dill sauce ingredients. Season with salt and lemon juice, to taste.

Prep veggies. Warm pitas, if desired, in microwave (wrapped in a clean towel) or in the oven, wrapped in aluminum foil.

When all components are complete, build the gyros. Spread 3-4 tablespoons of hummus across each pita. Top with 4 asparagus spears, shredded lettuce, chopped onions and about 2 tablespoons dill-yogurt sauce.


The Best Chickpea Falafel Patties

The Best Chickpea Falafel Patties

dsc_0104

Truth – falafel is one of my all time favorite foods, it’s right up there with pizza & burritos. Falafel is a vegan & gluten-free crowd pleaser making it an easy choice for this healthy, plant-eating girl. So I obviously have my own version of falafels that’s quick & simple to make at home, and, not to mention, totally delicious & addictive.

dsc_0107
To make my falafel patties, I blend soaked chickpeas with onion, garlic, cumin, parsley, paprika, salt & olive oil. No gluten, no eggs, no dairy. AMAZING! I pan fry them to get some good color on the outside and then finish them up in the oven for a no-fuss, no-vat-of-oil-needed rendition.

These guys are a great snack on their own or an epic meal stuffed into pitas with loads of fixings. They reheat beautifully and taste great cold so, you guessed it, meal prep friendly!

dsc_0126

The falafels you get at restaurants are generally deep fried, so I love being able to control the quality and health-factor when making them at home. I use organic chickpeas & high-quality olive oil to make my falafels, and they’re honestly just as satisfying as the restaurant falafel patties.

I recommend whipping up some simple lemon tahini sauce for serving. Or an easy yogurt tzatziki sauce would be stellar too. Eat as sandwiches or pile onto lettuce for a more veg-heavy meal. There’s so much you can do with these guys, go for a double batch and thank me later.

dsc_0102
Easy Falafel Patties

Serves: 4     Start to Finish: 30 minutes (not including soaking time)

Ingredients

1 cup dry garbanzo beans/chickpeas, soaked*
2 cloves garlic, peeled and roughly chopped
1 small or 1/2 medium/large yellow onion, peeled and roughly chopped
1/4 cup olive oil, + more for browning
1.5 teaspoons ground cumin
1.5 teaspoons sea salt, fine grain
1/2 teaspoon paprika
1/4 cup packed fresh parsley leaves (or 1.5 tablespoons dried parsley)

To Make

Preheat oven  to 375 degrees. Prepare a baking sheet with parchment.

Drain and rinse soaked beans. Add all ingredients to a food processor or blender and process until a uniform batter is formed (it will still have a visibly grainy texture). Form the batter into 12 patties. It might seem very wet, but should still form into patties easily. You can refrigerate the batter or patties for a bit to make them easier to handle. I don’t find this necessary but I sometimes do it.

On a griddle pan or in a frying pan (cast iron recommended), heat a very thin layer of olive oil over medium-low heat. Fry patties for 3-5 minutes per side, or until golden and crisp. Cook patties in batches if needed, replacing oil between batches.

Transfer to oven and bake for 8-10 minutes at 375 degrees.

Serve the falafels on a salad or in a pita with sauces & toppings of choice. Need an idea? Check out this pita sandwich I made using this recipe!

Notes:

To soak chickpeas either 1) soak in water over night in the fridge or 2) bring chickpeas and water to a boil, boil for 2 minutes, turn off heat, cover and soak for 1 hour. Drain soaking liquid off before cooking with the chickpeas.

Side note, these patties reheat really well. But I often eat them cold anyway, so reheating after the fridge is definitely not necessary.

I recently tried forming 4 burger size patties instead of 12 smaller ones, and it was great (much less work)! Bake them for 12-15 minutes instead of 8-10 after browning.

Quick & Easy: Fresh Mozzarella and Pear Grilled Cheese Sandwiches with Maple Mustard

Quick & Easy: Fresh Mozzarella and Pear Grilled Cheese Sandwiches with Maple Mustard

dsc_0067

Between my best friend’s amazing wedding last weekend (shout out to my girl, Karen G), and keeping myself on top of school as the workload steadily grows, and catching a bug of some kind this week, what better recipe to share than a total time-buster recipe? I mean, I barely had time to make a post this week, but because this recipe is so simple, I managed to pull it together. It must be easy, right?

I think everyone has those weeks when they’re desperate for something quick, easy, satisfying, comforting and delicious. I actually think many people consider this type of week the norm. So basically quick, easy, satisfying, comforting and delicious are always the ideal when it comes to weeknight meals. But that’s a tall order. Ok, now take meat out of the equation. Even taller. But trust me when I say, simple, yummy and vegetarian-friendly cooking is attainable.

dsc_0021
The key to satisfying meals, sans meat, is creating depth and complexity by using new and different flavor combos. I get inspiration from everywhere when it comes to finding exciting new tastes. Today’s inspiration comes from a light lunch I made when trying to clean out the kitchen a few weeks back. I topped an English muffin with a fresh sliced pear, fresh mozzarella and a pinch of sea salt. It was love at first bite so I immediately wrote it down on my list of upcoming recipe ideas. And today, pear and mozzarella, will finally have their moment in the spotlight.

dsc_0038
Pear and Mozzarella Grilled Cheeses are the perfect quick and easy dinner for the fall season. This time of year, pears are sweet and juicy, and their vibrant flavor goes perfectly with the creamy, salty profile of fresh mozzarella. I added fresh spinach leaves to pump up the nutritional profile and added a super simple, sweet and tangy sauce to compliment the sweetness in the pears and also to cut through the richness of the cheese. It’s almost like a honey mustard, but uses maple syrup to get that sweetness in addition to the grainy mustard. This 2-ingredient spread was one of the first things I learned at culinary school and I’ve been making it constantly ever since. It’s so basic, I am almost embarrassed to say that I had to learn it. But whatevs, it’s amazing.

dsc_0004
Anyway, mozz, pears, fresh spinach and maple mustard sauce. That’s it. Barely any prep work whatsoever. Just some slicing really, because my spinach was already triple washed. Score (I hate washing lettuce). Then I layered the ingredients between two slices of bakery-fresh sourdough bread and brushed the outsides with a bit of oil. Yum!

dsc_0019

Now for the grilling portion of the grilled cheese. What I’m about to tell you is my secret for the perfect grilled cheese. It’s hot and gooey on the inside and golden-crisp on the outside. Every. Time. I mean, have you had this problem before? It’s crazy how something as basic as grilled cheese can be so difficult to get right. But I’ve got the magic. First trick is a super low heat. Like basically as low as it can go. And the second trick is to use a lid on your pan. The low heat allows for the sandwich to cook very slowly and the lid traps the heat to surround the sandwich, ensuring the middle will be piping hot and uber melty. I also press the sandwich down every so often with the back of the spatula, an important step for a grilled cheese that contains more than just cheese. If you follow these three steps, I can promise you, you will be absolutely delighted!

dsc_0047

So I spilled my deepest, darkest secret to you of how to make grilled cheeses absolutely perfect. And all you want to do now is to go try making a perfectly melty and crispy grilled cheese using this new-found cooking wisdom. And all I have left to say is go for it, good luck and let me know how it goes!

Quick & Easy: Fresh Mozzarella and Pear Grilled Cheese Sandwiches with Maple Mustard
Serves: 4   Start to finish: 20 minutes

Ingredients

8 slices bakery-fresh Sourdough Bread
12 ounces Fresh Mozzarella, sliced*
2 ripe Pears, sliced (I used organic Bartlett Pears)
2 handfuls fresh Baby Spinach Leaves
1\3 cup Whole Grain Mustard
2 tablespoons Maple Syrup
Sea Salt, fine grain
2 tablespoons Olive Oil

To Make

In a small bowl, mix mustard and maple syrup. Set aside.

Slice mozzarella into thin slices. It may be difficult to cut fresh mozzarella thin, do the best you can. Break up slices into 2 parts, this makes it easier to distribute evenly on the sandwich.

Assemble sandwiches. For each sandwich, layer like this…

1 slice bread
Light layer of maple mustard
2 pieces of cheese
Season with a pinch of salt
5 spinach leaves
2-3 slices of pear
2 pieces of cheese
Another slice of bread, spread with maple mustard

When sandwiches are assembled, heat a large skillet over low heat (very low) for about a minute. Meanwhile, brush the top slice of each sandwich with a bit of olive oil. Gently flip sandwiches into the pan, olive oil side down. Cover with a lid and allow to cook for 5-7 minutes, until golden and crispy. Press down on the sandwiches with a spatula every so often. Flip the sandwiches and cook for another 5 minutes, or until the 2nd side is golden and crispy.**

*i allow for 3 ounces of cheese per sandwich. But that’s up to you. Note that 2 ounces is an actual serving size of cheese.

**on your first time using a stovetop, keep an eye on the sandwiches to prevent burning. Once you know how your stove/heat works, you’ll have freedom while they cook to prepare a side dish or something. My stove is 6 minutes per side, with an extra 1 minute on each side at the end (lowest heat).

Caprese Bowls with Pesto-Rice & Peaches

Caprese Bowls with Pesto-Rice & Peaches

DSC_0878

Hello readers! I’m just going to jump right in because I’m so excited for this post. I don’t say this often because I’m cooking literally all the time, but this recipe tops the charts for me. One of my favorite dishes I’ve ever come up with. While this dish is really simple, there’s a lot going on, so let’s break it down a little.

Last week I made a batch of classic basil pesto. I first used it for a simple pesto fusilli pasta with sun dried tomatoes, artichoke hearts, zucchini and roasted red peppers. Yummy no doubt, but pretty standard. So for the remainder of the pesto, I wanted to come up with something new and original. While at a restaurant a couple weeks ago, I had a delish Caprese salad layered with pesto instead of fresh basil and it was just divine. Additionally, Chop’t (my go-to fast-casual restaurant for inventive and fresh salads) recently added a summer seasonal salad plate that combines the classic Caprese flavors with sweet peaches. A Caprese-style dish with basil pesto and peaches was obviously the direction I needed to go. But the question was, how to make it a meal? Why not toss the pesto with nutty brown rice and make it a rice bowl!? Perfect.

DSC_0899

When I put this dish together last night, Matt was definitely skeptical. I have tried peaches in savory dishes a handful of times, so I wasn’t quite as worried as him. But still, I was eager to see if my recipe came together as deliciously as I had imagined. Short answer, it did. Matt and I both absolutely loved it. The ripe and juicy peaches with the savory basil pesto worked together in perfect harmony. And who doesn’t love mini balls of fresh mozzarella and sweet cherry tomatoes? The last touch was to add mixed greens tossed in balsamic vinaigrette. Ugh, so good. I’m totally obsessed. It’s summer in a bowl!

DSC_0910

I love this dish too because not only are the flavors out of control, but it’s also a balanced and light meal that I don’t feel even the slightest bit guilty eating. It’s naturally gluten-free due to the brown rice and packed with fresh produce (aka tons of vitamins and nutrients). Because of this, I definitely consider it to be a “detox meal”. Yes, it has cheese. But that doesn’t stop me from calling something healthy. No way.

Warning, I’m about to go on a mini rant.

I got a comment on my Instagram one time because I had hash-tagged “healthy” on a simple cage-free-vegetarian-fed-egg and cheese sandwich on a sprouted grain English muffin. Side note: I love commentary, especially commentary that sparks healthy debate so know I’m not lashing out because of a controversial comment. Anyway, the commentor simply said “cheese isn’t healthy”. Since then, the whole “cheese is not healthy” issue is something that really bothers me. Not only because I love cheese and find that it can make many meat-free meals more satisfying, but also because it’s such a  ridiculous notion. Processed cheese in excessive quantities, not good. Anything high in fat and sodium in excessive quantities, not good. Natural, calcium- and protein-rich cheese in moderation? Go for it. The word “healthy” is subjective and can be defined in countless ways. To label cheese as unhealthy is a major generalization that doesn’t take a lot of factors into consideration. Net net, please do not generalize all cheeses and place them automatically in the category of “unhealthy”. At least not to me.

DSC_0871

Anyway, I think I’m getting a little bit hangry here, and I have leftovers from last night’s Caprese Bowls calling my name. Screaming my name actually. Gotta go!

Caprese Bowls with Pesto Rice & Ripe Peaches
Serves: 4   Start to Finish: 20-50 min (depending on rice cooking method)

Ingredients

1 cup dry Brown Rice or 2 cups cooked Brown Rice
Sea Salt
1/3 cup Basil Pesto (get my recipe here or use store bought)
Mixed Greens
1/4 cup Balsamic Vinegar
2 ripe Peaches, pits removed, cut into bite size pieces
1 pint Cherry Tomatoes, halved or quartered
8 ounces Fresh Mozzarella (I used Bocconcini, or bite size mozzarella, each ball halved)

To Make

Cook rice according to package instructions. Cooking dry rice takes about 45 minutes, frozen cooked rice or pre-cooked rice works too. If cooking dry rice, use 1 cup rice with 2-1/4 cups water and 1/2 teaspoon salt.

Meanwhile, prepare pesto (if making from scratch, store bought works too). Cut peaches, tomatoes and mozzarella. Toss greens with vinegar. Divide dressed lettuce between 4 bowls or plates. Evenly distribute peaches, tomatoes and mozzarella over greens.

When rice is finished cooking, add pesto to rice and stir until well combine. Scoop about 1/2 cup pesto-rice onto each bowl. Serve with a fresh basil garnish if desired.