
Continue reading “Curried Lentil Soup with Citrus Brown Rice”
plant-forward food | good vibes | all eaters welcome
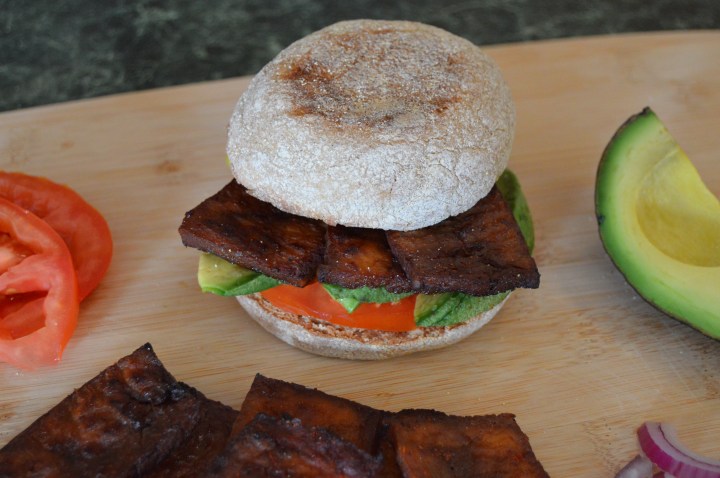
I’m on a mission, guys. I’m actually on lots of missions at any given time, but this one is a particularly important one. Why? One word. Bacon. Yep, you heard me. This vegetarian whole-foodie needs bacon in her life. As always, it’s not about the meat here. It’s about the smoky flavor and hearty texture that bacon adds. I don’t need it to taste exactly like pork bacon or turkey bacon. I just need that same flavor and texture profile. Simply put, I’m missing out on too many dishes without having a go-to recipe for a rich and chewy bacon substitute. BLT’s, mac and cheese with bacon, cobb salad, avocado and bacon toast…the list goes on and on. And so, my mission, if I choose to accept it (and I will because I thought of it), is to find the best bacon-y substitute recipe.

I’ve seen many different versions of a vegan bacon-style strip. Some recipes use tempeh, like the vegan bacon at one of my favorite Brooklyn sandwich spots, Urban Rustic. Some recipes use rice paper for a super thin and delicate strip. But today’s recipe, and my first attempt at fakin’ bacon, utilizes the most familiar option to me, tofu.

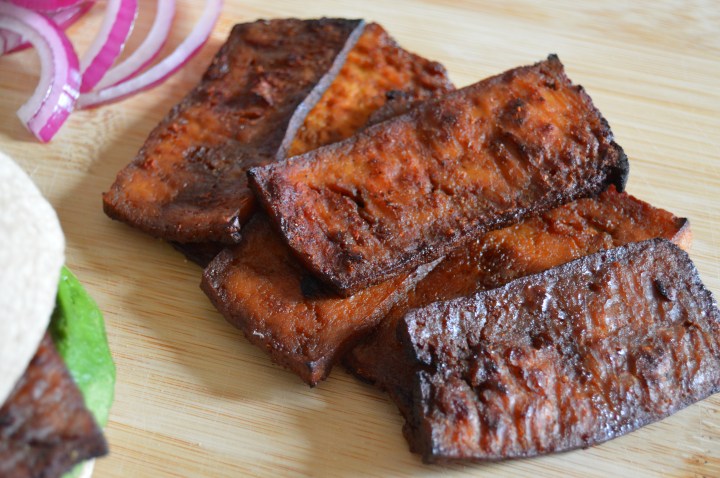
When the strips were done baking they were a beautiful deep red color and the flavor was subtle and balanced. Baking tofu tightens up the texture so that the soft, delicate slices turn into chewy, more dense strips. In terms of texture, I really like the way the tofu works and I find that the it’s exactly the texture I would hope for. The flavor was nice too and went perfectly on an English muffin with avocado and tomato (holy amazing vegan breakfast). The strips also held up nicely in the wrap I brought to work for lunch and tasted fab paired with blue cheese crumbles, red onion, avocado, tomato and Dijon mustard.
I give this bacon two thumbs up. But it’s all relative, so my final verdict will have to wait until after I’ve tried a couple more versions. Be sure to stay tuned for more trials and to chime in with any of your own suggestions or experiences.
Vegan Smoky Tofu Bacon
Serves: 4 Start to Finish: 1 hour 15 min (plus marinating time if needed)
1/4 teaspoon Paprika
To Make
Remove excess moisture from tofu using a tofu press. Or by sandwiching tofu between paper towel layers on a plate and applying weight with a heavy object on top, allow to sit for about 30 minutes, draining liquid when needed.
Slice tofu as thin as possible. I got 16 slices out of 1 block. Mix together remaining ingredients to made the marinade. In a pie plate or plastic bag, add tofu slices and marinade. Make sure all tofu is exposed to marinade. Seal out air and allow to sit in the fridge overnight (4 hours minimum).
You could also simmer the strips in the marinade over medium-low heat for about 20 minutes.
Preheat oven to 400 degrees. Line a baking sheet with parchment paper or alternative.
When finished marinating (or simmering), place tofu slices in a single layer onto lined baking sheet. Bake for 15-20 minutes. Flip. Continue baking for another 20 minutes or so, being careful not to burn the strips. Remove from oven and allow to cool slightly.
Strips can be refrigerated for a couple days or frozen for a couple months. Reheat or bring to room temperature before serving again.

Yesterday was a very big day for me. A day that marked the beginning of an end and also the start of a new chapter. You see, for the last five years, ever since graduating from college, I’ve worked in New York City for the same fashion company. More recently, I decided that fashion is not the field for me, and that I needed to make a switch to an industry more in line with my passions, ideals and values. So yesterday, I gave my boss notice that I wouldn’t be returning to Ralph Lauren come September, as I’ll be pursuing a career and a life dedicated to wholesome and healthy cooking and living.
Although I’ve known about this move for a bit, there’s something about saying it out loud, without hesitation, to everyone, even coworkers, that makes it feel real. I feel free and excited. I feel like I’m finally starting to find my way. My first step in this journey is to study at the Natural Gourmet Institute in Manhattan, a nationally recognized culinary school focusing on healthful cooking. So I’m going back to school (amazing) and taking my life in a new direction. I seriously couldn’t be more thrilled.

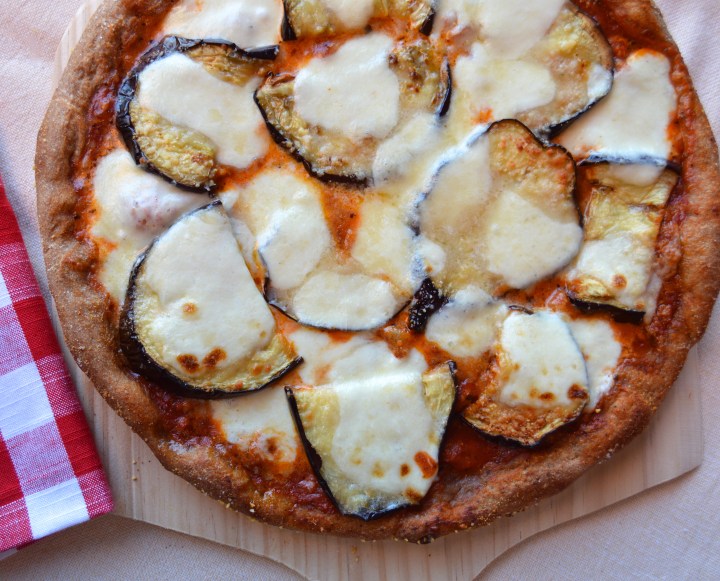
In addition to the freedom to fully announce and embrace the next phase of my life, I also had a great day yesterday because of dinner. That sounds weird (or maybe it doesn’t if you love eating as much as I do), but hear me out. When deciding what to do for dinner last night, I had only one requirement. It had to be ready quick so Matt could eat before leaving for rec hockey (and so I could enjoy a night of relaxing and watching Bravo). I raced through Whole Foods, grabbing refrigerated whole wheat pizza dough, a big beautiful eggplant, a ball of fresh mozzarella and a jar of marinara, knowing that I could pull these ingredients together with little thought or effort.

As soon as I got home I sliced the eggplant and got it into the oven. Once finished, I piled on the sauce, roasted eggplant, mozz, and some finishing touches, and my roasted eggplant and fresh mozzarella pizza was ready for the oven.
After a long 10 minutes, I took it out and was seriously taken aback by how good it looked. My eyes darted to the balcony, and to my delight, I saw daylight, which means adequate food-photography lighting. On a night when a blog post was the last thing on my mind, the stars aligned and I accidentally came up with a delicious recipe and the pictures to go along with it. Awesome.

So here I am, everything seemingly falling into place; both my life and a delicious Eggplant Pizza post. I have no idea what the future holds, which is kind of scary. But, of course, that’s life; an ongoing series of ups, downs and unknowns. All I can really do is cherish the ups, learn from the downs and enjoy the whole ride, and that’s exactly what I plan to do.
Eggplant Parmesan Pizza
Serves: 2-3 Start to Finish: 45 minutes
Ingredients
1 15-16 oz package refrigerated Pizza Dough, I used whole wheat*
1 Eggplant, about 1.5 pounds
Sea Salt
Olive Oil
Cornmeal
1 cup Marinara or Pizza Sauce
6 ounces Fresh Mozzarella Cheese
1/4 cup grated Parmesan Cheese
Garlic Powder, optional
To Make
Remove dough from fridge, allow to sit at room temp for an hour or so.
Preheat oven to 425 degrees.
Trim eggplant ends and slice width-wise into 1/4 to 1/2 inch slices. Sprinkle each side of each slice with salt and allow to sit for about 10 minutes. Dab off excess moisture and place in a single layer onto a parchment lined baking sheet. Lightly coat each side of each slice with olive oil. Bake for 35 minutes, flipping once during cooking.
When the eggplant is about 10 minute from done, form dough into desired shape. Place onto pizza pan or baking sheet that’s been brushed with a little olive oil and dusted with cornmeal. I used a circular pizza pan this time for a thicker crust.
Top crust with an even layer of sauce. Slice mozzarella and cut into big bite size pieces. Remove eggplant from oven and turn the oven temp up to 500 degrees. Place the eggplant discs evenly over the sauce (I cut them in half to make placement easier). Top with mozzarella and grated parm.
Optional step: brush olive oil onto crust and season with sea salt and garlic powder.
Bake for 10 minutes or until crust is crisp and cheese is starting to brown.
*of course you can use homemade dough too, get my recipe here (use 1/2 batch)


Hello readers! I’m just going to jump right in because I’m so excited for this post. I don’t say this often because I’m cooking literally all the time, but this recipe tops the charts for me. One of my favorite dishes I’ve ever come up with. While this dish is really simple, there’s a lot going on, so let’s break it down a little.
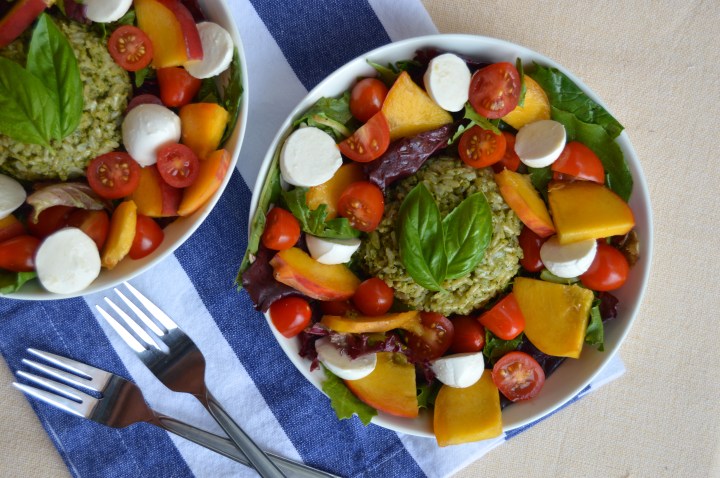
Last week I made a batch of classic basil pesto. I first used it for a simple pesto fusilli pasta with sun dried tomatoes, artichoke hearts, zucchini and roasted red peppers. Yummy no doubt, but pretty standard. So for the remainder of the pesto, I wanted to come up with something new and original. While at a restaurant a couple weeks ago, I had a delish Caprese salad layered with pesto instead of fresh basil and it was just divine. Additionally, Chop’t (my go-to fast-casual restaurant for inventive and fresh salads) recently added a summer seasonal salad plate that combines the classic Caprese flavors with sweet peaches. A Caprese-style dish with basil pesto and peaches was obviously the direction I needed to go. But the question was, how to make it a meal? Why not toss the pesto with nutty brown rice and make it a rice bowl!? Perfect.

When I put this dish together last night, Matt was definitely skeptical. I have tried peaches in savory dishes a handful of times, so I wasn’t quite as worried as him. But still, I was eager to see if my recipe came together as deliciously as I had imagined. Short answer, it did. Matt and I both absolutely loved it. The ripe and juicy peaches with the savory basil pesto worked together in perfect harmony. And who doesn’t love mini balls of fresh mozzarella and sweet cherry tomatoes? The last touch was to add mixed greens tossed in balsamic vinaigrette. Ugh, so good. I’m totally obsessed. It’s summer in a bowl!
I love this dish too because not only are the flavors out of control, but it’s also a balanced and light meal that I don’t feel even the slightest bit guilty eating. It’s naturally gluten-free due to the brown rice and packed with fresh produce (aka tons of vitamins and nutrients). Because of this, I definitely consider it to be a “detox meal”. Yes, it has cheese. But that doesn’t stop me from calling something healthy. No way.
Warning, I’m about to go on a mini rant.
I got a comment on my Instagram one time because I had hash-tagged “healthy” on a simple cage-free-vegetarian-fed-egg and cheese sandwich on a sprouted grain English muffin. Side note: I love commentary, especially commentary that sparks healthy debate so know I’m not lashing out because of a controversial comment. Anyway, the commentor simply said “cheese isn’t healthy”. Since then, the whole “cheese is not healthy” issue is something that really bothers me. Not only because I love cheese and find that it can make many meat-free meals more satisfying, but also because it’s such a ridiculous notion. Processed cheese in excessive quantities, not good. Anything high in fat and sodium in excessive quantities, not good. Natural, calcium- and protein-rich cheese in moderation? Go for it. The word “healthy” is subjective and can be defined in countless ways. To label cheese as unhealthy is a major generalization that doesn’t take a lot of factors into consideration. Net net, please do not generalize all cheeses and place them automatically in the category of “unhealthy”. At least not to me.
Anyway, I think I’m getting a little bit hangry here, and I have leftovers from last night’s Caprese Bowls calling my name. Screaming my name actually. Gotta go!
Caprese Bowls with Pesto Rice & Ripe Peaches
Serves: 4 Start to Finish: 20-50 min (depending on rice cooking method)
Ingredients
1 cup dry Brown Rice or 2 cups cooked Brown Rice
Sea Salt
1/3 cup Basil Pesto (get my recipe here or use store bought)
Mixed Greens
1/4 cup Balsamic Vinegar
2 ripe Peaches, pits removed, cut into bite size pieces
1 pint Cherry Tomatoes, halved or quartered
8 ounces Fresh Mozzarella (I used Bocconcini, or bite size mozzarella, each ball halved)
To Make
Cook rice according to package instructions. Cooking dry rice takes about 45 minutes, frozen cooked rice or pre-cooked rice works too. If cooking dry rice, use 1 cup rice with 2-1/4 cups water and 1/2 teaspoon salt.
Meanwhile, prepare pesto (if making from scratch, store bought works too). Cut peaches, tomatoes and mozzarella. Toss greens with vinegar. Divide dressed lettuce between 4 bowls or plates. Evenly distribute peaches, tomatoes and mozzarella over greens.
When rice is finished cooking, add pesto to rice and stir until well combine. Scoop about 1/2 cup pesto-rice onto each bowl. Serve with a fresh basil garnish if desired.


