The Best Chickpea Falafel Patties

The Best Chickpea Falafel Patties

dsc_0104

Truth – falafel is one of my all time favorite foods, it’s right up there with pizza & burritos. Falafel is a vegan & gluten-free crowd pleaser making it an easy choice for this healthy, plant-eating girl. So I obviously have my own version of falafels that’s quick & simple to make at home, and, not to mention, totally delicious & addictive.

dsc_0107
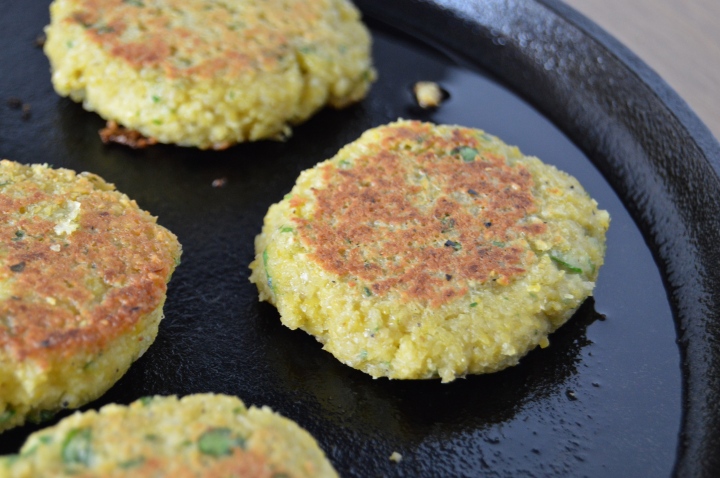
To make my falafel patties, I blend soaked chickpeas with onion, garlic, cumin, parsley, paprika, salt & olive oil. No gluten, no eggs, no dairy. AMAZING! I pan fry them to get some good color on the outside and then finish them up in the oven for a no-fuss, no-vat-of-oil-needed rendition.

These guys are a great snack on their own or an epic meal stuffed into pitas with loads of fixings. They reheat beautifully and taste great cold so, you guessed it, meal prep friendly!

dsc_0126

The falafels you get at restaurants are generally deep fried, so I love being able to control the quality and health-factor when making them at home. I use organic chickpeas & high-quality olive oil to make my falafels, and they’re honestly just as satisfying as the restaurant falafel patties.

I recommend whipping up some simple lemon tahini sauce for serving. Or an easy yogurt tzatziki sauce would be stellar too. Eat as sandwiches or pile onto lettuce for a more veg-heavy meal. There’s so much you can do with these guys, go for a double batch and thank me later.

dsc_0102
Easy Falafel Patties

Serves: 4     Start to Finish: 30 minutes (not including soaking time)

Ingredients

1 cup dry garbanzo beans/chickpeas, soaked*
2 cloves garlic, peeled and roughly chopped
1 small or 1/2 medium/large yellow onion, peeled and roughly chopped
1/4 cup olive oil, + more for browning
1.5 teaspoons ground cumin
1.5 teaspoons sea salt, fine grain
1/2 teaspoon paprika
1/4 cup packed fresh parsley leaves (or 1.5 tablespoons dried parsley)

To Make

Preheat oven  to 375 degrees. Prepare a baking sheet with parchment.

Drain and rinse soaked beans. Add all ingredients to a food processor or blender and process until a uniform batter is formed (it will still have a visibly grainy texture). Form the batter into 12 patties. It might seem very wet, but should still form into patties easily. You can refrigerate the batter or patties for a bit to make them easier to handle. I don’t find this necessary but I sometimes do it.

On a griddle pan or in a frying pan (cast iron recommended), heat a very thin layer of olive oil over medium-low heat. Fry patties for 3-5 minutes per side, or until golden and crisp. Cook patties in batches if needed, replacing oil between batches.

Transfer to oven and bake for 8-10 minutes at 375 degrees.

Serve the falafels on a salad or in a pita with sauces & toppings of choice. Need an idea? Check out this pita sandwich I made using this recipe!

Notes:

To soak chickpeas either 1) soak in water over night in the fridge or 2) bring chickpeas and water to a boil, boil for 2 minutes, turn off heat, cover and soak for 1 hour. Drain soaking liquid off before cooking with the chickpeas.

Side note, these patties reheat really well. But I often eat them cold anyway, so reheating after the fridge is definitely not necessary.

I recently tried forming 4 burger size patties instead of 12 smaller ones, and it was great (much less work)! Bake them for 12-15 minutes instead of 8-10 after browning.

Best of Basic: Vegan Veggie Pizza

Best of Basic: Vegan Veggie Pizza

dsc_0142

It’s no secret to anyone that I love pizza. And typically, when it comes to pizza, ‘cheese’ is the name of the game. But not today. Things are changing around here. I have recently discovered how good pizza can be without cheese, and I’m totally hooked. I mean, I’ve had cheese-less slices before, but after a recent slice of super simple vegan pizza from a popular NYC pizza joint, Joe’s, it came to me. A crispy and chewy crust, a robust sauce and loads of veggies are all that’s needed for a bomb pie.

dsc_0145

The true key to an amazing cheese-less slice, in my opinion, is the sauce. For this pizza I used a sauce I’ve been making at school during our improvisation classes. Leeks, carrots, celery and garlic give this classic red sauce lots of flavor, and crushed red pepper flake adds a good bit of heat. It’s complex and rich and perfect for my vegan veggie pie.

dsc_0125

dsc_0131

As for the veggies on the pizza, I kept it simple but strategic. Just four toppings here; sliced baby bella mushrooms, par-cooked broccoli florets, thinly sliced onions and sliced black olives. While simple, this combo is a winner with a satisfying variety of colors, textures and tastes. I mean, look at it. This pizza is really just breath taking. Anything that showcases vegetables like this is bound to be pretty, but that doesn’t stop me from being mesmerized by the beauty of this pizza. Not only is it attractive aesthetically, but to me it’s also beautiful because of the overwhelming health and wellness benefits provided by this overload of vegetables. Fiber, vitamins A, C, D, E, and K, calcium, iron, folate, potassium are some of the all-star benefits coming straight to your body from this pizza. See? Beautiful. And I think it’s safe to say I’m a total veggie-nerd at this point. Thoughts?

dsc_0135

So that’s all I really have to say about this recipe. It’s simple, satisfying and packs a nutritional-punch. And that’s a pizza you can feel good about eating. So why not try cheese-free next time? I know it sounds crazy, but you won’t be disappointed.

Best of Basic: Vegan Veggie Pizza
Serves: 4-6    Start to Finish: 50-60 minutes

Ingredients
2 balls pizza dough (get my quick & simple recipe here, yields 2 balls)*
For Sauce

1 tablespoon olive oil
1 leek, trimmed, halved length-wise, thinly sliced**
4 cloves garlic, peeled and minced
1 carrot, peeled and cut into a small dice
1 celery stalk, cleaned and cut into a small dice
sea salt, fine grain
1/2 teaspoon dried thyme
3/4 teaspoon dried oregano
1/4 teaspoon crushed red pepper flake (slightly spicy, reduce to 1/8 for less spice)
1 28-ounce can tomatoes (diced or whole, organic and salt-free preferred)
1.5 tablespoons maple syrup
2 teaspoons fresh thyme leaves, chopped
For Pizza Toppings

1 white or yellow onion, halved, trimmed, thinly sliced
8 cremini mushrooms, washed and thinly sliced
1 head broccoli, stem removed, cut into small florets
1 small can sliced black olives, liquid removed
sea salt, fine grain
garlic powder or granulated garlic

To Make

Allow refrigerated dough to rest at room temperature for an hour. Preheat oven to 500 degrees F.

To make sauce, heat olive oil over medium heat in a medium saucepan. Add leeks, garlic, celery, carrots and 1 teaspoon salt. Add dried thyme, oregano and crushed red pepper flake. Allow mixture to cook, stirring occasionally, for 6-8 minutes.

Add 1/2 cup water, canned tomatoes, 1 teaspoon salt and 1.5 tablespoons maple syrup. Bring to boil, reduce to simmer, cover. Simmer for 20 minutes. Using a blender (immersion, high power, standard, food processor), blend sauce until smooth. Stir in fresh thyme leaves. Season to taste (I added another 1/4 teaspoon of salt).

Add 2 inches of water to a small saucepan. Bring to boil. Using a steamer basket, steam broccoli in saucepan, covered, for 2 minutes or until bright green. Set aside. Prep remaining toppings.

Press out dough balls to fit a pan or pizza peel.Transfer crusts to cornmeal dusted pans or a peel. Add 2/3 to 1 cup of sauce to each pizza, spreading it out evenly from center to crust. Evenly distribute broccoli, mushrooms, onions and olives over pizzas. Season each pizza with 2 pinches of salt and 2 pinches of garlic powder. Bake for about 10-15 minutes, or until bottom of crust is golden and sturdy.

dsc_0146


Roasted Beet Hummus

Roasted Beet Hummus

dsc_0003

Growing up, my mom took every opportunity to make the ordinary into the extraordinary. From something as small as the icing monograms on our toaster strudels before school, to something as meaningful as Christmas morning, she always did (and still does) know how to make things special. So it’s no wonder why I turned out the exact same way, and why I find that holidays are the most perfect opportunity to get creative, make some memories, and have some festive (and often times, delicious) fun.

Halloween is a particularly fun holiday on which to get into the spirit. So last week, on All Hallow’s Eve, I planned a relaxed and laid back date night with Matt…spooky-style. Since he’s never seen Hocus Pocus (I know, sinful), I thought a “Netflix and chill” theme for the evening was a no-brainer. Can’t you just picture it? Tasty noshes, a couple libations, candle light, pumpkin-print napkins, and a good ole classic flick. Doesn’t that sounds simply delightful? Only one question remained. What to cook?

img_5886
I finally settled on a three course, couch-friendly, vegan meal plan. The mains? A Leek and Carrot Brown Rice Risotto and a Perfectly Poached Pear with a Coconut-Caramel Reduction Sauce. Both of these dishes are easy to keep on the counter or stove until a commercial break gives just enough time to finish and plate the dishes. But today’s featured recipe is actually not for the risotto or the pear, but rather, for the appetizer portion of the meal, the premiere dish, the opener, if you will; Roasted Beet Hummus.

dsc_0002
Roasted Beet Hummus is not much different than my classic Hummus recipe, except of course, for the subtly sweet addition of roasted beets, which add not only flavor and nutritional power, but also change the color of the hummus to a bright, rich red-pink color. Beautiful! I served the hummus with blanched veggies and pita wedges. But then, I ate it the next day as a veggie burger topping, and it was phenomenal. I can also see myself creating a layered veggie sandwich with this spread, and maybe using it as a vegan pizza base. Only time will tell all the ways this super-food hummus will be used in my kitchen.

dsc_0021
I think this hummus was the perfect addition to our festive Halloween feast because, not only is it visually appealing and vibrant, but it’s also something you don’t see every day, making it special enough for a celebration like this one. But there’s one more reason why this spread is a winner – this hummus also happens to be super healthy and nourishing, always something to think about when making for for myself and to others. Beets are seriously a health and wellness all-star, so before I get to the recipe, I want to end by going over these health-supportive qualities of beets. Beets are a good source of protein and fiber. They contain immune-boosting vitamin-C, potassium, bone- and liver-strengthening manganese, and b-vitamin folate. Basically, beets are a fantastic way to nourish and cleanse the body and the mind, making this Roasted Beet Hummus a must-try for  whole-foodie type like me. Ok, now on to the recipe.

dsc_0026
Roasted Beet Hummus
Yield: 2 1/4 cups

Ingredients

2 medium-size fresh beets, trimmed, peeled and cut into bite size pieces
1 tablespoon olive oil, divided
3/4 teaspoon sea salt, fine grain
1 14-oz can chickpeas, liquid reserved, drained, rinsed (equivalent to 1 1/3 cups cooked Chickpeas)
1 large clove garlic
3 tablespoons tahini
1/4 cup fresh lemon juice
6 tablespoons water or reserved chickpea liquid (or combo)

To Make

Preheat oven to 400 degrees. Prep beets, and toss with 1 tablespoon oil and 1/4 teaspoon salt. Spread out onto a parchment lined baking sheet and roast until super tender (poke with a knife, no resistance), 45-65 minutes.

When beets are finished roasting, allow to cool for 10-20 minutes. In a food processor combine beets, chickpeas, water or chickpea liquid, garlic, tahini and lemon juice. Add salt to taste (1/4 teaspoon salt is a good place to start). Add additional liquid or water until desired consistency is reached.

Serve with crudités and pita chips. This also makes a great topping for veggie burgers and a yummy spread on a veggie sandwich.