Herb Goat Cheese Toasts with Roasted Tomatoes & Red Onion

Herb Goat Cheese Toasts with Roasted Tomatoes & Red Onion

DSC_0239

It’s been about 10 days since my last blog post and I couldn’t be happier to get back in the groove. Since coming back to NYC after a fabulous vaca in my hometown of St. Louis, life has seemed a bit crazier than normal. Maybe it was a few days without cooking gas and hot water (long story), maybe it was the inevitable homesickness that comes after going back home and spending time with my parents, or maybe it was an abnormal amount of items on my to do list last week. Most likely, it was a combination of all three and I was in need of a recharge. You see, I’m a creature of habit and routine makes me feel in control. So because routine is hard to come by as an adult, if I’m feeling a bit out of control, I need to center myself by refocusing on the things in my life that are routine. Thank goodness for Saturday, it was just what the doc ordered.

DSC_0263

Matt spent most of the day playing golf this past Saturday which gave me the day to gain some control. Morning yoga, lots of iced coffee, a trip to the farmers market and quality time in the kitchen. Amazing. But the most amazing part? The simply scrumptious goat cheese and veggie topped toasts I made for lunch using fresh and local bread from the farmers market. The flavors in these toasts are out of control. Tangy goat cheese, sweet basil, bright roasted cherry tomatoes and slow cooked red onion come together to create a total masterpiece. And so simple too!

DSC_0230

I’ve been thinking a lot about simplicity lately. I actually think about simplifying my life quite often. Whether my apartment or my wardrobe, it’s definitely a work in progress but I try to take steps toward decluttering and cleansing whenever possible. But recently I’ve been thinking a lot about simplifying my food and recipes. Don’t get me wrong, I love a complicated recipe that takes hours of time and loads of energy. After all, the kitchen is my happy place. But I really want to come up with delicious and wholesome meals that require less ingredients and less work. I can see my future and it’s going to be busier than ever, so I really have no choice but to start now to come up with lots of easy go-to dishes that allow me a little time in the kitchen to decompress while also getting healthy, clean food on the table quickly and seamlessly.

DSC_0237

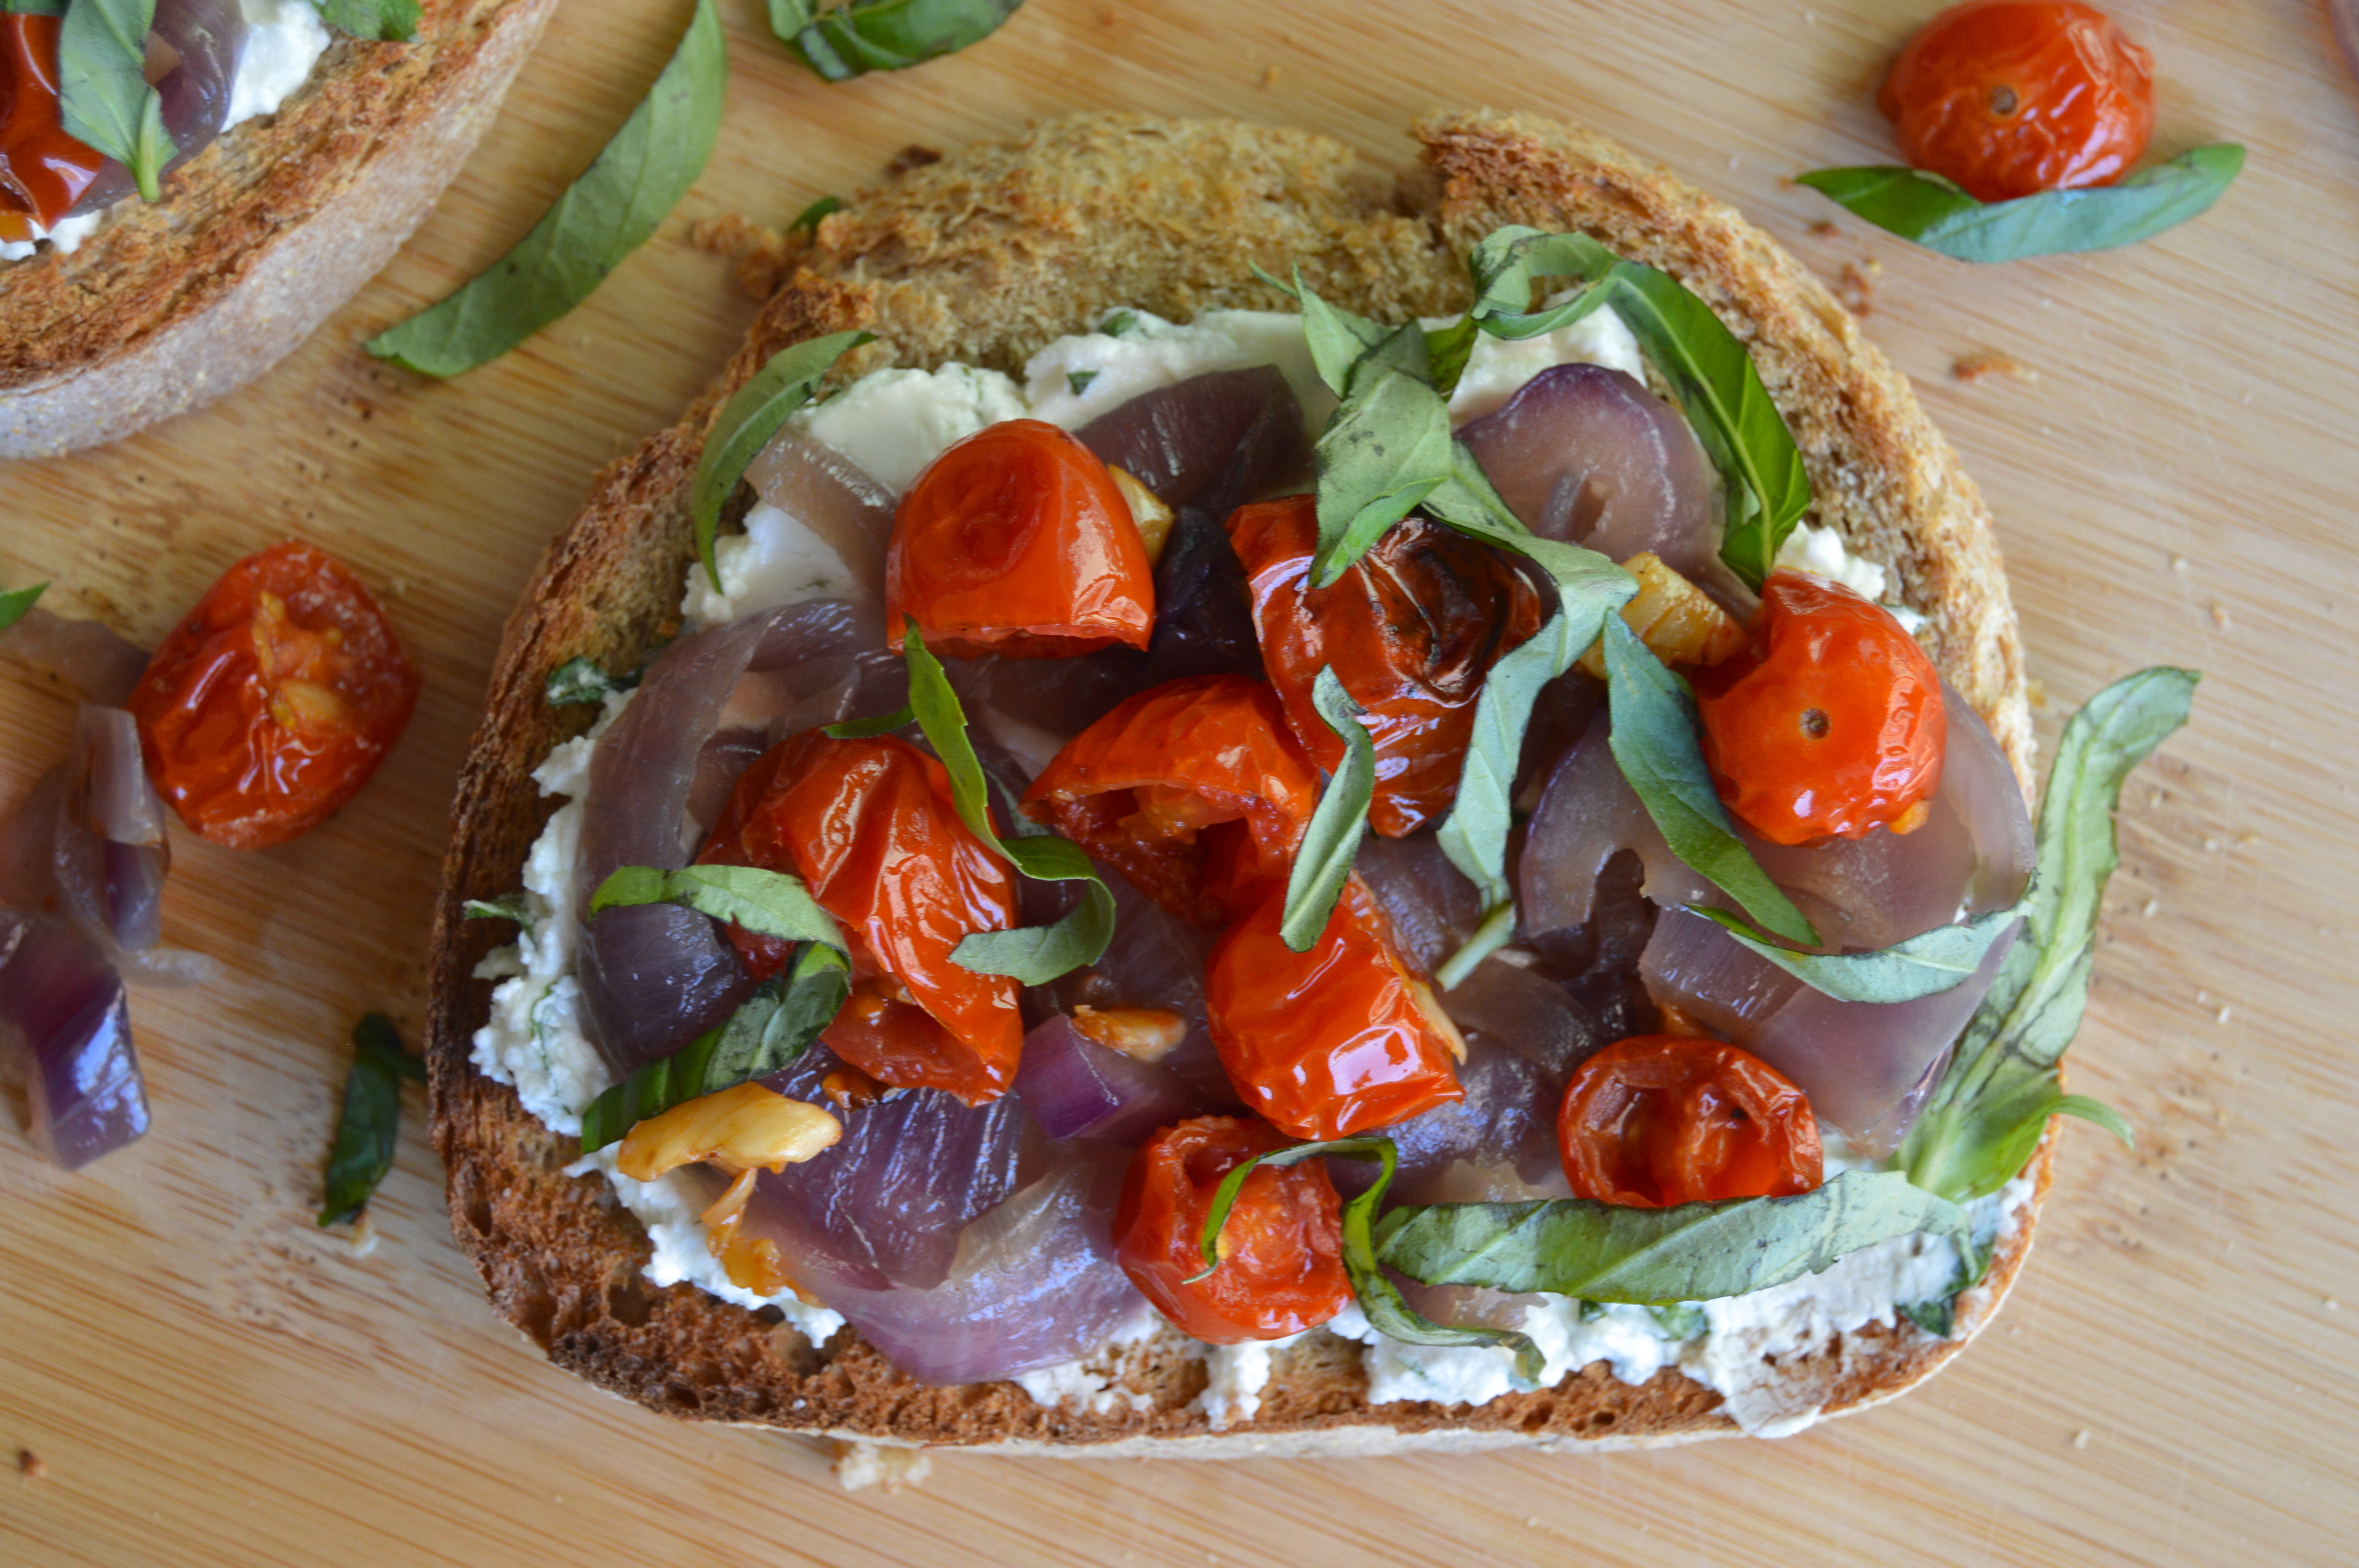
Making a toast (aka an open face sandwich) is the perfect base for a simple dish. You can really top a good quality slice of bread with any combination of flavors. It’s kind of like a pizza, kind of like a sandwich, so what’s not to love? This recipe for Herb Goat Cheese Toasts with Roasted Tomatoes and Red Onion is the first of many toast recipes and the perfect dish to kick off my effort to create delicious and simple recipes for when life gets crazy.

DSC_0212

DSC_0217

Herb Goat Cheese Toasts with Roasted Tomato & Red Onion
Servings: 4   Start to Finish: 45 minutes

Ingredients

1 pint Cherry Tomatoes
2 cloves Garlic, peeled & minced
Olive Oil
Sea Salt
1 large Red Onion
8 ounces Plain Goat Cheese
1/3 cup fresh Basil Leaves
4 thick Slices Fresh Bread (I love the whole wheat Peasant Round Loaf from Baker’s Bounty)

To Make

Remove goat cheese from fridge to soften.

Preheat oven to 375 degrees. Line a baking sheet with parchment paper. Cut tomatoes in half. In a bowl, toss tomatoes with chopped garlic, 1 teaspoon olive oil and 1/4 teaspoon salt. Spread tomatoes out onto baking sheet in a single, closely packed layer. Bake for 10-15 minutes. Remove from oven, toss, and bake again for another 30-35 minutes.

When the tomatoes go in the oven, start caramelizing the onion. Slice onion into half moon slices (1/4″ to 1/2″). Heat 1 tablespoon olive oil over medium heat in a medium skillet. Add onions, toss to coat with oil and to separate the layers. Cook for about 10 minutes. Reduce heat to low or medium-low. Add 1/4 teaspoon salt and 2 tablespoons water to onion. Cook for 40 minutes, stirring occasionally, until onions are soft and sweet. Add a tablespoon or two of water if the onions are getting too dry.

While tomatoes and onions cook, mix goat cheese with chopped basil leaves. Set aside. When tomatoes and onions are cooked, remove from heat to cool. Drizzle one side of each bread slice with 1/2 teaspoon oil and a pinch of salt. Toast in toaster oven or under broiler until lightly golden and crisp.

To assemble toasts, spread each slice of bread with 1/4 of the herbed goat cheese mixture. Divide tomatoes and onions evenly over toasts. Serve cold, warm or at room temp. Garnish with more fresh basil.

Meatless Meal Plan: Car Camping for Two

Meatless Meal Plan: Car Camping for Two

DSC_0181

Matt and I are really big on camping. And when I say that Matt and I are really big on camping, I really mean that Matt is a camping pro and I’m along for the ride. That’s not to say I don’t love it though. I actually grew up spending my summers glamping (glamourous, more comfortable camping) on my family’s island in Ontario, Canada. While it wasn’t totally “roughing it”, going to Canada definitely made me super comfortable in nature and without the comforts of civilization. The only electricity on our little island comes from a small generator, which is rarely on. To get to the nearest major grocery store takes hours, and the nearest convenience store is a 40 minute boat ride away. On the island, we spend our time reading, playing cards, hiking, fishing, cooking, eating, napping, crafting and exploring. We sleep on old beds in ancient screened-in cabins, perfect for star gazing as you fall asleep, and we spend mornings sitting around the campfire, looking out over the beautiful Canadian wilderness. Sounds magical, right? To me, it’s heaven. In fact, we’ll be heading to Rickey Island in just over a month. Can’t wait.

Sitting by the Water
My favorite spot while camping last weekend, right by the water.

In addition to our trips to Rickey Island, Matt and I always find time to do a little camping on our own. We’ve hiked to camp, we’ve canoed to camp, and we’ve car-camped. Car camping is my personal favorite, because you can take more stuff and leave the food and valuables in the car. It just makes it a little more relaxing and a little easier, ideal for a short weekend camping trip. And that’s exactly what we did last weekend. Matt and I joined some of his University of Vermont friends and had a wonderful 36 hours hiking and chilling on the water. This campsite, called Black Bear Campground, was totally awesome. One of my favorite campgrounds so far. It’s located in Phoenicia, a small town near Woodstock, New York. There were beautiful hiking trails, a wide, flowing creek running along the edge of each campsite, and a couple resident black bears. Yes, we saw a black bear and her cub at Black Bear Campground. Isn’t it ironic? Don’t you think? (I hope everyone picked up on that song reference). After our morning hike, I spent most of Saturday on a chair overlooking the creek with a beer in my hand. It was just lovely. I even saw a group of fly fishers waddle through and one of them caught a fish right in front of me! So cool.Whole Food Camping Menu.jpg

Fly Fishers
View from our campsite. You can see the fly fishers!

Anyway, being a whole foodie and cooking addict means that I’m not bringing just any old food supply. One of my favorite activities while camping is the food part! I like planning it, executing it, and most importantly, eating it. So what does a vegetarian whole-foodie bring camping that will satisfy both her and her carnivore boyfriend? Well that’s what this post is all about! Four meals and a few snacks that blend together the essential elements of camping food…simple, fun and satisfying. I’ve even included packing tips and essential utensils, to make prep even easier.


DSC_0233

Matt and I didn’t arrive at the campsite until 11pm on Friday night, so we didn’t need to worry about Friday night dinner (we ordered pizza while packing up at home). Then for lunch on Sunday we headed to Woodstock for a sit down lunch. Basically this meal-plan covers all the food we needed for all of Saturday and Sunday morning (essentially one full day of camping, plus an extra breakfast before hitting the road on the second day). Use this as a guide and fill it in how you see fit…that could mean an extra dinner and lunch or maybe s’mores supplies for a classic camping dessert by the fire.

Hummus Sandwich

DSC_0227

DSC_0193
I hope my tips, tricks and pics inspire you to get outdoors, take advantage of summer and get a quick camping trip like ours on the calendar. Camping Shopping ListPrep at Home

For Two Egg & Cheddar Breakfast Sandwiches and Home Fries

Cut potatoes and half the onion into a medium dice. Toss with a splash of olive oil, salt and pepper. Add a thin layer of olive oil to a skillet. Add potatoes and cook over camping stove or fire pit, stirring often to prevent burning. Honestly, ours got super crispy and a bit black/burned on the bottom but they still were amazing! You could also try cooking the potatoes in a foil packet over the camp fire. We didn’t want to start a fire because we were leaving after breakfast to hike, we used a camping pan and a portable flame.

Peel and slice 2 hard boiled eggs. Slice 2 ounces cheddar cheese. Use egg and cheese slices to make sandwiches on the English muffins. Season egg slices with cheese. You can griddle the sandwiches in a skillet/pan over a portable stove top or over a fire pit. Or wrap the sandwiches in foil and heat over the fire. Always be extra careful about burning food while camping, it happens easily.

For Two Hummus Sandwiches

Spread about 1/4 cup of hummus onto 2 slices of bread. Top each slice with 1-2 ounces crumbled feta and the reserved roasted red peppers and artichoke hearts. Top each sandwich with a second slice of bread. Serve with all-natural potato chips.

For Eggplant Burgers and Chopped Salad

Slice eggplant width-wise into 1/2 slices. Sprinkle each slice with salt, allow to sit for 15-30 minutes to let the salt draw out the bitter liquid. Brush each side of each slice with olive oil. Season with pepper. Grill slices on a grate over the fire pit until soft and tender. On a BBQ it takes 3-5 minutes preside, over a fire pit the time will vary depending on the fire. When slices are almost cooked, top with 1 ounce slices fresh mozzarella cheese and allow to melt. Slice tomato. Stuff buns with 1 or 2 eggplant slices, a slice of tomato (seasoned with salt), and basil leaves (or a hefty seasoning of dried basil).

Dump mason jar filled with salad into a large bowl and toss. Serve with burgers.

I also bought a 1/3 lb beef patty for Matt. We grilled it with the eggplant and he topped his burger with both the patty and an eggplant slice.

For Almond Butter & Banana Sandwiches

Spread about 2 tablespoons of Almond Butter onto each of two slices bread. Drizzle with honey or agave (a little goes a long way. Slices bananas and layer over almond butter. Each open faced or top with another slice of bread. I prefer open face (less bread).

DSC_0198
The view of Phoenicia, New York while hiking.

Rich & Creamy Vegan Vodka Sauce

Rich & Creamy Vegan Vodka Sauce

DSC_0235

Happy Friday, everyone!

If you read my last post sharing a delicious recipe for Eggplant & White Bean Veggie Balls, then you know that I served these delicious “meatballs” with a homemade Vegan Vodka Sauce. The sauce was so tasty that I just had to share the recipe. And just in time for the weekend, the best time to spend some relaxation time in the kitchen.

With everything I have going on in my life (work, blogging, yoga, social life, etc.), I’d be crazy not to take advantage of shortcuts when it comes to food and cooking. A tasty jar of red sauce (made with only natural ingredients, of course) is one of those shortcuts that I often take advantage of. But still, nothing compares to a homemade tomato sauce bursting with fresh Italian flavor. So when I have the time to make my own tomato sauce, I’m all over it.

DSC_0261

When thinking about the sauce I wanted to make to go along with the veggie balls, I really wanted to experiment with a new homemade (and vegan-friendly) sauce. Vodka Sauce was an easy choice for Matt and me because we’ve been talking about making our own version of vodka sauce for some time now. Adding vodka to a freshly made tomato sauce was simple enough, because I’ve made red sauce a million times and I always have vodka in the freezer. The real question was how to achieve the richness, creaminess and beautiful pink color of a traditional vodka sauce…without using cream.

DSC_0188

Let’s get something straight. I love real cream. On weekends, I always treat myself to iced coffee with a splash of half-and-half. And there’s nothing like a whipped cream frosting on a moist cake. But not for this recipe. Why not use cream? Well, not only do I like the challenge of omitting dairy from recipes, but I also like to keep some days and meals dairy-free for the health and ecological benefits. So for this sauce, I’m going cream-free.

DSC_0181

To replace the rich cream, I decided to try a vegan cream made from raw cashews. Since I’ve never made cashew cream myself, I used a recipe from Beard & Bonnet as a guide. It was so simple, just soak the cashews and then grind them up with water, lemon juice and salt until a delectably smooth cream is formed. Easy enough. While the cashews soaked I made the red sauce and vodka portion of the sauce.

DSC_0225

This sauce is classic. Fresh plum tomatoes, lots of garlic, yellow onion and a blend of dried Italian seasonings. Not so classic is my use of coconut oil, rather than olive oil or butter. I find that coconut oil has the richness of butter and creates the subtle sweetness that I love about vodka sauce, without adding dairy or sweetener. I love what the coconut oil does for this sauce, so although it may sound strange, it’s worth a try.

DSC_0237

I hope everyone has a super Friday and lovely weekend! And if you feel like kicking Sunday dinner up a notch, why not try this amazing vegan vodka sauce.

Creamy Vegan Vodka Sauce
Serves: 4   Start to Finish: 2 hours (45 minutes active)Ingredients2 tablespoons Coconut Oil
4 cloves Garlic
1 yellow Onion
2 pounds Tomatoes (I used Organic Plum Tomatoes)
1 cup Water (plus more if necessary)
2 teaspoons Sea Salt*
1 teaspoon Dried Basil
1 teaspoon Dried Oregano
1 teaspoon Dried Thyme
1/2 teaspoon Black Pepper
1/4 teaspoon Crushed Red Pepper Flake
1/3-1/2 cup quality Vodka**
1/4-1/2 cup Cashew Cream (get Beard & Bonnet’s recipe here or my adaptation below)

To Make

Cut tomatoes and onions into a fine dice. Finely mince garlic.

Heat coconut oil and garlic over medium heat, allow garlic to sizzle for 1-2 minutes. Add onion. Cook onion and garlic for 6-8 minutes. Add tomatoes, water and seasoning. When liquid boils, reduce to simmer. Simmer covered for 90 minutes. You can leave the sauce with some texture or you can use a food processor or emulsion blender to get a smoother consistency (I like something in the middle so I use an emulsion blender to break it up a little bit).

To make vodka sauce, carefully mix vodka into the hot (or reheated) red sauce (or 2 1/2 or 3 cups of any red sauce). Add 1/2 cup vodka. Simmer uncovered for 10 minutes or until alcohol is cooked off. Remove from heat. Stir in 1/4 cup vegan cashew cream (see recipe below) or 1/4 cup dairy cream. You can add more or less cream depending on your taste.

*adjust salt according to personal taste
**i used 1/2 cup of vodka and I could definitely taste it, in a great way. 1/4 cup or 1/3 cup will work, just with a lighter vodka flavor. Your call!

Cashew Cream Recipe (adapted from Beard & Bonnet’s recipe)
1.5 cups raw, unsalted Cashews
1 1/4 cups water (more or less)*
1 tablespoon Lemon Juice (or half of a large lemon)
3/4 teaspoon salt (more or less)

Soak raw cashews in a bowl of filtered water for 1-4 hours. Add soaked cashews to a food processor or high powered blender. Add water salt and lemon juice. Blend until smooth.

I used a food processor and it took longer than I expected. I had to stop and hand stir/scrape the bowl a couple times. When in doubt, just keep blending.

*start with 3/4 cup water and add more as needed

Vegan Eggplant & White Bean Veggie Balls

Vegan Eggplant & White Bean Veggie Balls

DSC_0275

When I think of some of my favorite meals from my meat-eating days, classic Italian meatballs definitely top the list. Whether on a sub sandwich, over pasta or even on pizza (shout out to Dewey’s Pizza in STL), meatballs are the bomb.

Whenever my parents come to visit me in NYC, one of their go-to eateries is The Meatball Shop. It’s a favorite of mine as well, and I’ve been lucky enough to live within walking to two of their locations over the past five years. The concept of this trendy yet casual local chain of restaurants is actually really cool. Using dry erase markers, you choose what you want by “checking it off” on a laminated menu. You choose the type of ball (beef, pork etc) and the sauce (pesto, cream, tomato etc.) and then the preparation (hero, over pasta, alongside steamed spinach etc).

DSC_0261
Whenever I say that I love The Meatball Shop, I’m undoubtedly asked how that is possible when I don’t eat meat. Easy answer. One of the ball options is a delicious veggie ball, and I like it best as either a hero sandwich or in “the kitchen sink” market plate form. No matter what preparation I choose, when choosing a sauce, I always go for the classic tomato sauce with a side of their silky parmesan cream sauce.

DSC_0199

I think subconsciously the idea for a veggie ball hero with tomato cream sauce was inspired by my typical order at The Meatball Shop. And it was a delicious idea. I spent literally all of this past Sunday in the kitchen making my own veggie balls, vegan cashew cream and a homemade vodka sauce. I always love spending hours in the kitchen, but this particular meal turned out perfectly, so this was a long but particularly rewarding cooking sesh.

DSC_0241

The recipe I’m sharing in this post is one of my favorite ways to make veggie balls, a Roasted Eggplant and White Bean Veggie Ball.

The inspiration for an eggplant-based veggie ball comes from Matt. A year or two ago, Matt made us a batch of roasted eggplant balls stuffed with fresh mozzarella, and they were so tasty. My variation uses the roasted eggplant and then I also added some white canellini beans for a protein boost and some hearty substance.

DSC_0300
These meat-less meatballs are my favorite for a few reasons; they are super flavorful and yummy, they stay together and hold their shape, and they contain no eggs dairy making them vegan friendly.

But mostly I love them because of how delicious they are. The balls get their amazing flavor from sweet roasted eggplant, fresh basil, and lots of garlic. Other than all-natural whole wheat bread crumbs and some additional seasoning and a bit of olive oil, that’s all you need to create these fabulous balls. I recommend making a double batch and use them in different ways throughout the week. I should’ve made a double batch on Sunday because this batch was gone by Monday.

Italian Eggplant & White Bean Veggie Balls
Serves: 4    Start to Finish: 2 hours (20 min active time)

Ingredients

2 pounds Eggplant
1 tablespoon Olive Oil
Sea Salt*
1 can Canellini Beans, drained & rinsed
15 fresh Basil leaves
4 cloves Garlic, peeled and roughly chopped
1/2 cup Whole Wheat Bread Crumbs, divided (I like Whole Foods brand)
1 tablespoon Nutritional Yeast (optional)**
1/4 teaspoon Garlic Powder
1 teaspoon Olive Oil

To Make

Slice eggplant into 1″ discs. Cube each disc into 4-10 cubes, depending on disc size. Soak eggplant in a bowl of cold water for 45-90 minutes, tossing occasionally.

Preheat oven to 400 degrees.

Rinse eggplant cubes and drain in colander. Use a clean towel to remove excess moisture. Toss eggplant cubes with 1 tablespoon olive oil and 1 teaspoon salt. Bake at 400 degrees for about 40 minutes, tossing half way through cooking.

Reduce oven temperature to 375 degrees.

Allow eggplant to cool slightly. I put it in a the food processor with the top on for a few minutes to release some liquid. Combine eggplant, canellini beans, basil leaves, 4 cloves garlic and 1/2 teaspoon sea salt. Pulse until a smooth mixture begins to form, be sure to keep a little texture. Pour eggplant mixture into a bowl. Stir in 1/4 cup bread crumbs and 1 tablespoon nutritional yeast. In a small bowl, combine 1/4 cup bread crumbs, 1/4 teaspoon salt, 1/4 teaspoon garlic powder and 1 teaspoon olive oil. Form eggplant mixture into balls (I used a 1/4 cup measure for each). Toss each ball in the breadcrumb & oil mixture. Place coated balls on a parchment lined baking sheet. I got 9 balls out of this batch.

Bake balls at 375 degrees for 20-25 minutes. Turn heat up to 425 degrees and cook for another 25 minutes or until crisp and golden, flip half way through

*adjust salt according to personal taste
**if you choose not to use nutritional yeast, you may need to replace it with more bread crumbs

Best of Basic: Avocado Toast

Best of Basic: Avocado Toast

DSC_0182

I was long distance chatting with my mom the other day, and because our conversations often revolve around food, she was raving about an avocado toast she recently had for lunch at a cafe in my hometown, St. Louis. She then proceeded to ask how to make Avocado Toast. I could feel my face twist up as I thought, “It’s pretty self explanatory, no?” But before saying anything out loud, I quickly realized that, to her point, there’s a difference between smashed avocado slathered on any old slice of bread and a real Avocado Toast. So my mom wants to know how to make the best version of a real Avocado Toast? Challenge accepted. Continue reading “Best of Basic: Avocado Toast”

Greek Style 7-Layer Dip

Greek Style 7-Layer Dip

DSC_0219

House warming party success! Matt and I had such a blast last weekend breaking in our new apartment with all of our New York  friends and quite a few cocktails. Although the party didn’t get started until 9:30pm or so, I still wanted a solid supply of delicious apps and snacks around to satisfy the inevitable munchies. And because I’m fearless, I whipped up two main appetizers that I’d never attempted before, except in my imagination’s kitchen of course. Continue reading “Greek Style 7-Layer Dip”