Best of Basic: Loaded Italian Pasta Salad

Best of Basic: Loaded Italian Pasta Salad

IMG_9036.jpg
Is it possible that June is already coming to an end? Fine by me, because I’ll be spending the first days of July on vacation. A glorious 10 day vaca in a remote area of Lake Huron in Ontario, Canada, it’s pretty much my favorite place on earth. You see, my extended family owns a modest island, smack dab in the middle of the wilderness, and it can only be described as rustic, comfortable, and totally epic. We sleep in sleeping bags and spend 80% of the day without electricity. We spend our days on the lake and evenings by the fire. And the breeze coming off the water at night, while falling asleep in the open air cabins, is pure magic.

This year, I’ll be heading up a bit earlier than usual and spending the first week of July on the island with my parents. But that means, I’ll be missing America’s birthday. I first want to say that I’m not trying to make a political statement here. Although I’d be lying if I said moving out of Trump country hasn’t crossed my mind. But I love the States, and because I’ll be missing one of the best celebrations of summer, I wanted to share a perfect (and easy) recipe for a BBQ-must-have… Loaded Italian Pasta Salad.

IMG_9040.jpg
I actually developed this recipe a couple weekends ago when I was visiting my hometown, St. Louis. While everyone else enjoyed this delish pasta salad alongside turkey burgers, I instead, topped it with a medley of grilled veggies, making it a scrumptious main dish for a meat-free eater. Added bonus, this salad can be made gluten-free (using a gluten-free pasta) or made vegan (by omitting the fresh mozzarella balls). Finicky foodies rejoice!

IMG_9042.jpg
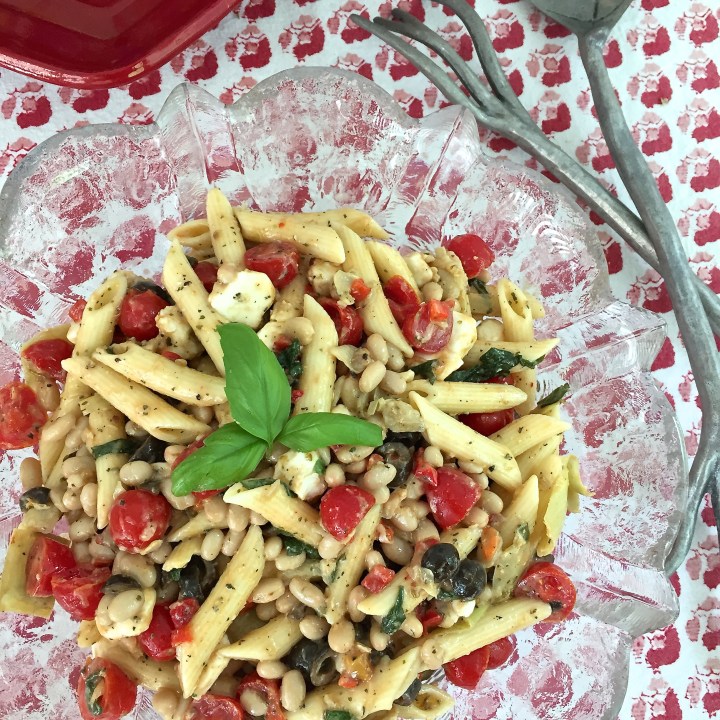
Other than being diet-restriction friendly, this “best of basic” pasta salad is amazing for two reasons. Firstly because it’s a cinch to make. In the time it takes to cook the pasta, the remainder of the ingredients are ready to go. Then all that’s left is a chill session in the fridge to bring everything together. The second reason is because this pasta salad is packed with fresh flavor from basil leaves and cherry tomatoes, texture from al dente pasta, beans and artichokes, and health supportive because of protein, fiber, vitamins and healthy fats. Finally, the simple vinaigrette, flavored with oregano, dry mustard and garlic powder, brings it all home by adding even more flavor and richness. This pasta salad is seriously perfect. So if you’re looking for a clean, balanced and crowd-pleasing pasta salad to be your go-to summer side dish, look no further. This is it.

IMG_9057.JPG
loads of roasted veggies + pasta salad side dish = delish main meal

Best of Basic: Loaded Italian Pasta Salad
Serves: 8 (large side dish portion)   Start to Finish: 30 min + chilling time

Ingredients

1 lb (16 ounces) pasta of choice* (see below for notes)
1/3 cup extra virgin olive oil
1/3 cup red wine vinegar
1.5 teaspoons sea salt, fine grain
1.5 teaspoons dried oregano
1 teaspoon dried mustard
1/2 teaspoon garlic powder (or granulated garlic)
1/2 teaspoon black pepper
1 tablespoon maple syrup, or sweetener of choice, optional**
1 12-oz can white beans, drained and rinsed
1 12-oz can artichoke hearts, quartered
1 pint cherry tomatoes, halved or quartered (depending on size)
1 5-oz can sliced black olives
1 5-oz can pimentos
25 medium basil leaves, about 1 small package, chopped or cut into chiffonade
8-oz fresh mozzarella, I prefer the mini balls (if using a large ball, cut into small pieces)

To Make

Bring 5 quarts of water to a boil. Add 1 teaspoon salt and pasta. Cook until al dente. I usually drain the pasta about 1-3 minutes earlier than package instructions say to cook. The best way to know? Try 2-3 noodles. When some noodles are cooked and some noodles seem under-cooked, they’re ready. After the pasta sits in the dressing, the underdone noodles will finish cooking. Avoid over cooking noodles, they will far apart after marinading.

While water boils and pasta cooks. Prepare dressing. In a blender, or using a hand blender, combine ingredients olive oil through maple syrup. Blend until fully emulsified. Set aside.

In a large bowl, combine ingredients white beans through pimentos.  Toss with cooked/drained pasta (still hot) and prepped vinaigrette. Allow to cool down to room temp (about 10 minutes). Toss mozzarella and basil with pasta salad. Cover and refrigerate for at least 1 hour or until fully chilled. However, the longer it sits, the better it gets. Make 1 day ahead if possible.

*Pasta Options
– I chose an organic, white flour variety for a classic pasta salad
– Use whole wheat for additional fiber, a chewier texture and a nuttier flavor
– Use a gluten-free pasta if desired, I love Banza brand
– As for shape, penne, fusilli and bowtie are my top choices – I used penne here

**I think a bit of sweetener (just 1 tbs for 8 servings) makes the dressing more palatable and makes the salad more of a crowd-pleaser. Feel free to omit the sweetener or add less

IMG_9023.jpg

Grain-Free Cauliflower Fried “Rice”

Grain-Free Cauliflower Fried “Rice”

Cauliflower Fried -Rice- (2).jpg

As I practice more and more with healthful, diet-restriction-friendly recipes (you know – vegan, gluten free, paleo, etc.), I find more and more ways to use cauliflower. From cauliflower “steaks” to cauliflower “rice,” the possibilities are seriously endless. A healthy, grain-free version of fried rice is one of my latest projects. Grated cauliflower, diced carrots, yellow onions and chopped red bell peppers make up the bulk of this dish. Then I add flavor with organic, cage-free eggs, a simple tamari-based sauce and a garnish of fresh scallions. For a genuine paleo/whole30 version, simply use coconut aminos instead of tamari. But for me, an organic soy-based tamari does the job perfectly.

DSC_0441.JPG

When I think about it, many of the recipes I make are inspired by takeout and delivery classics, and this dish is the perfect example.  Making your own “takeout” at home is much healthier than ordering out, and cheaper too. But for people who have dietary restrictions, it’s sometimes the only option to be able to enjoy favorite foods and cuisines. A grain-free/gluten-free lifestyle is the driving force behind this dish, but it also qualifies as vegetarian, dairy-free and, if using coconut aminos instead of tamari, paleo-friendly. Serve with a selection of proteins like grilled chicken, vegetables, tofu or steak, and you’ve got a meal that’s customizable enough (and delicious enough) to please a crowd.

DSC_0435.JPG
Now, let’s go over a couple of my favorite health-supportive benefits of this recipe’s star, cauliflower.

Cauliflower is a cruciferous vegetable, and one of my all-time favorite vegetables, mostly because it’s super versatile. Cruciferous vegetables (like cauliflower, broccoli, turnips, kale and arugula) contain glucosinolates, a chemical that contains sulfur. When broken down during digestion, glucosinolates turn into compounds associated with anti-cancer effects. Cauliflower is also a great source of fiber, aiding in digestion, and also a great source of Vitamins K & C. Cauliflower is high in several powerful antioxidants, which are essential in providing adequate defense to your cells, which is believed to help your body in fighting off illnesses such as cancer.

Enjoy!

Cauliflower Fried -Rice- for Pinterest (2).jpg

Grain-Free Cauliflower Fried “Rice”
Serves: 2 (main) or 4 (side dish)   Start to Finish: 25 minutes

Ingredients

1 large carrot, peeled and diced
1 red bell pepper, seeded and diced
1/2 medium yellow onion, diced
2 cloves garlic, peeled and minced
2 tablespoons canola or coconut oil (organic preferred), divided
4 cups raw cauliflower rice*
1 teaspoon dried ginger
1.5 teaspoons sea salt, fine grain, divided
2 tablespoons tamari (use coconut aminos instead for paleo/whole30 version)
2 eggs (cage-free, organic preferred)
chopped scallions, garnish (1-2 scallions is enough)

To Make

Note: You may want to use a non-stick skillet or wok for this recipe. My stainless steel pan worked well for this recipe with no sticking/burning issues, but a non-stick skillet will be more fool-proof.

Prep carrots, peppers, onion and garlic. Using a box grater or food processor, grate large cauliflower florets into cauliflower “rice.” Use the stem portion of the florets too.

Crack eggs into a bowl and scramble with a fork. Set aside.

Heat 1.5 tablespoons oil in a large skillet over medium-high heat. Add carrots, peppers, onions, garlic and 1 teaspoon sea salt to pan. Cook for 5-6 minutes, until vegetables have softened and released liquid. Add grated cauliflower and ginger to pan. Cook for another 3-5 minutes, stirring frequently, until moisture from cauliflower is released and evaporated.

Add tamari (or coconut aminos) to pan, toss to coat, and cook for about 2 minutes, until excess moisture is removed. Push cauliflower aside and add remaining oil to open space in pan. Add scrambled eggs to oil. Frequently use a spoon to cut through liquified eggs in order to rotate uncooked eggs into the heat. Just as the egg solidifies (after about a minute), mix the cauliflower mixture into the eggs. Season with sea salt to taste (I added an additional 1/2 teaspoon) and cook for 1-2 minutes, until excess moisture is gone.

Garnish with scallions, serve immediately.

*1 head of caulifower is plenty for this recipe. You can also purchase pre-riced cauliflower in the freezer and/or produce section of many supermarkets.

Sources
Benefits of Cauliflower

Veganized Cauliflower Reuben Sandwiches

Veganized Cauliflower Reuben Sandwiches

cauliflower reuben sandwiches

2017 is the year of the Cauliflower Steak. I’m literally obsessed. If you haven’t yet heard of the concept, it’s pretty much exactly what it sounds like – a slab (or steak, if you will) of cauliflower, roasted or grilled until rich in flavor and tender in texture. Eat this tasty “steak” on it’s own, or use it as a clean, whole, nutrient-rich and satisfying substitute, wherever slices of animal protein are traditionally used. Yesterday, during my improvisation class at culinary school, my partner and I layered slabs of roasted cauliflower with a delicious mock-bolognese sauce made with tempeh. It was divine. But this obsession actually started while home for the holidays, when I used cauliflower steaks as a replacement for the burgers everyone else was eating on bbq night.

dsc_0119

Also on bbq night, is when I came up with the idea for a Cauliflower “Reuben” Sandwich using the slabs of cauliflower. I asked my mom to add the traditional reuben toppings to the burger bar, and the result was delicious. So when I returned to NYC last week, I was obviously craving another cauliflower reuben sandwich…stat.

A traditional reuben sandwich consists of sauerkraut, swiss cheese, a sweet Russian dressing and some rye bread. Well, pastrami is also an important component, but that’s not happening in my kitchen. So what’s my version? Perfectly cooked cauliflower steaks, seasoned with traditional pastrami spices (corriander, garlic, onion, paprika, black pepper), fresh rye bread from the local bakery, nutty swiss cheese, sauerkraut and a “lightened up” yogurt-based Russian dressing. Yum, right? I don’t know about you, but I’m not missing the pastrami one bit.

dsc_0114

Making cauliflower steaks is easy. Simply slice the cauliflower right down the middle, vertically. Then, moving out from the center cut, slice the cauliflower vertically into 1/4-1/2″ slabs. Be mindful that as the cuts move further from the original center cut, the slabs will begin to fall apart and transform into florets. So basically, you can only count on 2-4 solid slabs that will hold together. But no matter, there are countless uses for the leftover florets. I add them to soups and stirfries, use them as a simple side dish, or food-process them into low-carb “rice.” For slabs that are mostly staying together, with just a couple florets starting to peel off, I keep them together as best as possible while cooking so it still looks like a slab. Easy enough, yeah?

dsc_0078

dsc_0101

Now that the cauliflower is covered, all that’s left to talk about is the accessories. I picked up some fresh rye bread from Northside Bakery in Williamsburg, Brooklyn. Why? Grocery store-bought bread has too many additives. Bakery-fresh bread on the other hand, is pure. Not to mention it supports small, local businesses. Next is the swiss cheese. Not much to say about this. It’s cheese and it’s delicious. Next up, sauerkraut. Sauerkraut, if you don’t know, is pickled or fermented cabbage. You can find pickled sauerkraut in jars or cans at the market. It has a sour flavor and is a perfect compliment to the richness of the cheese and sauce on this sandwich. While most store-bought sauerkrauts are heated during processing, there are also uncooked, unpasturized varieties of sauerkraut, which are filled-to-the-brim with gut-healthy bacteria and Vitamins B, C & K. To find a store-bought version like this, that include the digestion-healthy probiotics and live cultures/bacteria, look for jars of organic sauerkraut in the refrigerated section of the market. Both versions, pickled and fermented, work for this recipe. The choice is yours.

Finally, that sauce. Traditional russian dressing is a rich and creamy mixture of mayonnaise and ketchup, with some other ingredients, depending on the recipe. I made my sauce as simple as possible and added vegan variations too.

dsc_0097

So there you have it. A classic Reuben Sandwich, reinvented to cater to the health-conscious, meat-free crowd. But honestly, meat-eaters and meat-freers alike can benefit from veggie-centric, lightened up recipes like this one. Stay tuned for more recipes using my new best friend, Cauliflower Steak. Maybe buffalo style next time? If you have any suggestions, for sure let me know!

Cauliflower Reuben-Style Sandwich
Serves: 4    Start to Finish: 45 minutes

Ingredients

2 medium heads cauliflower
1/2 teaspoon coriander
1/2 teaspoon paprika
1/2 teaspoon garlic powder or granulated garlic
1/4 teaspoon onion powder
1/4 teaspoon black pepper
sea salt, fine grain
1 tablespoon olive oil
6 ounces swiss cheese, sliced (vegan? Try VioLife cheese slices)
1 cup organic sauerkraut
3/4 cup full-fat, plain yogurt (mayo, vegan mayo or cashew cream also work)
3 tablespoons ketchup
1 tablespoon grated onion, white or yellow
2 teaspoons maple syrup
1/4 teaspoon lemon juice
1/8 teaspoon garlic powder
8 slices rye bread (or bread of choice)

To Make

Preheat oven to 425 degrees F.

Cut cauliflower into steaks by slicing the cauliflower right down the middle, vertically through the stem. Then, moving out from the center cut, to slice the cauliflower vertically into 1/4-1/2″ slabs. You’ll get two “steaks” from each cauliflower. Cut the remaining cauliflower into florets and save for another meal.

Heat cast iron pan or griddle over medium-high heat. Combine spices, black pepper through coriander, in a small bowl with 1/2 teaspoon salt. Brush both sides of cauliflower slabs with 1/2 tablespoon oil and season both sides of slabs with seasoning blend. Add remaining 1/2 tablespoon olive oil to pan. Brown cauliflower slabs in pan until golden, about 2 minutes per side. Transfer to a parchment-lined baking sheet. Bake in oven for 20 minutes, until the core of the cauliflower is soft and tender.*

While cauliflower cooks, make sauce by combining ingredients yogurt through garlic powder, plus 3/4 teaspoon salt. Add more salt to taste. Set aside in fridge.

When cauliflower is finished, remove from oven and cut each slab into 2 equal-sized pieces (four total). Season the top of each slice with a pinch of salt. Evenly distribute cheese slices over cauliflower. Return slabs to oven for 3-5 minutes, until cheese is melted.

Make sandwiches by layering ingredients as follows… 1 slice rye bread, 1-2 tablespoons sauce, one cheese-covered cauliflower steak, 1/4 cup sauerkraut, 1-2 tablespoons sauce, 2nd slice of rye bread. Repeat to make 4 sandwiches.

*You can also cook the cauliflower steaks fully in the oven for about 35 minutes, flipping halfway through OR cauliflower slabs can be grilled, without needing to brown in on cast iron first

**i like to gently squeeze excess liquid from the sauerkraut before adding to sandwich, it’s less messy/soggy when eating