Roasted Eggplant & Fresh Mozzarella Pizza

Roasted Eggplant & Fresh Mozzarella Pizza

DSC_0884

Yesterday was a very big day for me. A day that marked the beginning of an end and also the start of a new chapter. You see, for the last five years, ever since graduating from college, I’ve worked in New York City for the same fashion company. More recently, I decided that fashion is not the field for me, and that I needed to make a switch to an industry more in line with my passions, ideals and values. So yesterday, I gave my boss notice that I wouldn’t be returning to Ralph Lauren come September, as I’ll be pursuing a career and a life dedicated to wholesome and healthy cooking and living.

Although I’ve known about this move for a bit, there’s something about saying it out loud, without hesitation, to everyone, even coworkers, that makes it feel real. I feel free and excited. I feel like I’m finally starting to find my way. My first step in this journey is to study at the Natural Gourmet Institute in Manhattan, a nationally recognized culinary school focusing on healthful cooking. So I’m going back to school (amazing) and taking my life in a new direction. I seriously couldn’t be more thrilled.

DSC_0896
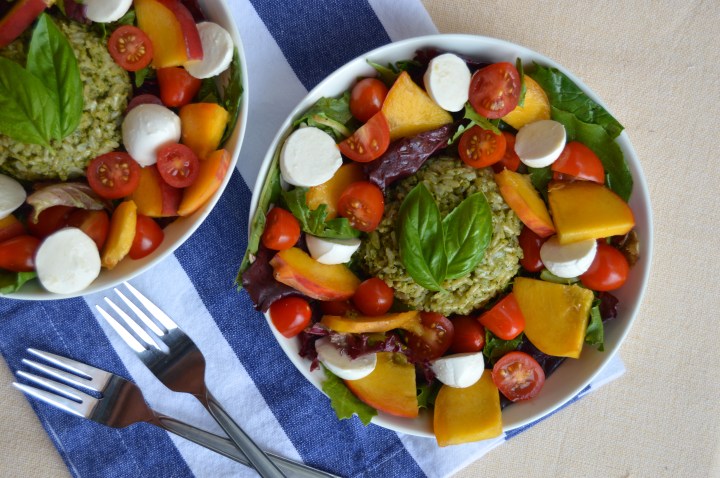
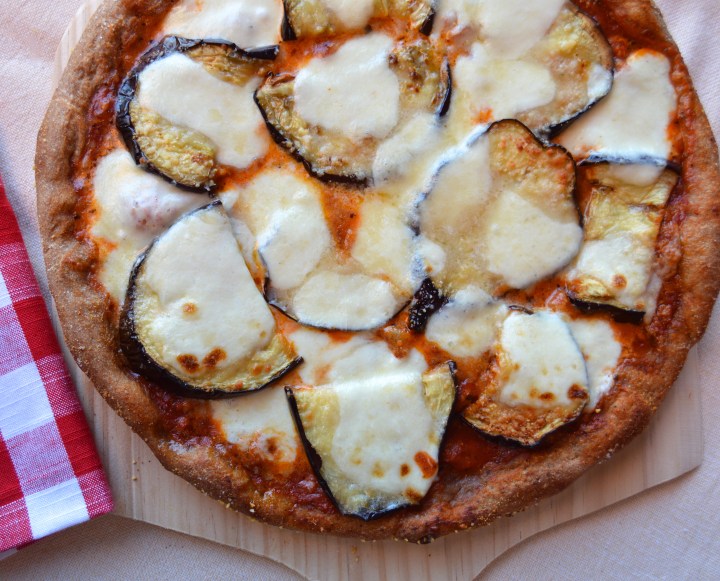
In addition to the freedom to fully announce and embrace the next phase of my life, I also had a great day yesterday because of dinner. That sounds weird (or maybe it doesn’t if you love eating as much as I do), but hear me out. When deciding what to do for dinner last night, I had only one requirement. It had to be ready quick so Matt could eat before leaving for rec hockey (and so I could enjoy a night of relaxing and watching Bravo). I raced through Whole Foods, grabbing refrigerated whole wheat pizza dough, a big beautiful eggplant, a ball of fresh mozzarella and a jar of marinara, knowing that I could pull these ingredients together with little thought or effort.

DSC_0891
As soon as I got home I sliced the eggplant and got it into the oven. Once finished, I piled on the sauce, roasted eggplant, mozz, and some finishing touches, and my roasted eggplant and fresh mozzarella pizza was ready for the oven.

After a long 10 minutes, I took it out and was seriously taken aback by how good it looked. My eyes darted to the balcony, and to my delight, I saw daylight, which means adequate food-photography lighting. On a night when a blog post was the last thing on my mind, the stars aligned and I accidentally came up with a delicious recipe and the pictures to go along with it. Awesome.

DSC_0872

So here I am, everything seemingly falling into place; both my life and a delicious Eggplant Pizza post. I have no idea what the future holds, which is kind of scary. But, of course, that’s life; an ongoing series of ups, downs and unknowns. All I can really do is cherish the ups, learn from the downs and enjoy the whole ride, and that’s exactly what I plan to do.

Eggplant Parmesan Pizza
Serves: 2-3   Start to Finish: 45 minutes

Ingredients

1 15-16 oz package refrigerated Pizza Dough, I used whole wheat*
1 Eggplant, about 1.5 pounds
Sea Salt
Olive Oil
Cornmeal
1 cup Marinara or Pizza Sauce
6 ounces Fresh Mozzarella Cheese
1/4 cup grated Parmesan Cheese
Garlic Powder, optional

To Make

Remove dough from fridge, allow to sit at room temp for an hour or so.

Preheat oven to 425 degrees.

Trim eggplant ends and slice width-wise into 1/4 to 1/2 inch slices. Sprinkle each side of each slice with salt and allow to sit for about 10 minutes. Dab off excess moisture and place in a single layer onto a parchment lined baking sheet. Lightly coat each side of each slice with olive oil. Bake for 35 minutes, flipping once during cooking.

When the eggplant is about 10 minute from done, form dough into desired shape. Place onto pizza pan or baking sheet that’s been brushed with a little olive oil and dusted with cornmeal. I used a circular pizza pan this time for a thicker crust.

Top crust with an even layer of sauce. Slice mozzarella and cut into big bite size pieces. Remove eggplant from oven and turn the oven temp up to 500 degrees. Place the eggplant discs evenly over the sauce (I cut them in half to make placement easier). Top with mozzarella and grated parm.

Optional step: brush olive oil onto crust and season with sea salt and garlic powder.

Bake for 10 minutes or until crust is crisp and cheese is starting to brown.

*of course you can use homemade dough too, get my recipe here (use 1/2 batch)

Caprese Bowls with Pesto-Rice & Peaches

Caprese Bowls with Pesto-Rice & Peaches

DSC_0878

Hello readers! I’m just going to jump right in because I’m so excited for this post. I don’t say this often because I’m cooking literally all the time, but this recipe tops the charts for me. One of my favorite dishes I’ve ever come up with. While this dish is really simple, there’s a lot going on, so let’s break it down a little.

Last week I made a batch of classic basil pesto. I first used it for a simple pesto fusilli pasta with sun dried tomatoes, artichoke hearts, zucchini and roasted red peppers. Yummy no doubt, but pretty standard. So for the remainder of the pesto, I wanted to come up with something new and original. While at a restaurant a couple weeks ago, I had a delish Caprese salad layered with pesto instead of fresh basil and it was just divine. Additionally, Chop’t (my go-to fast-casual restaurant for inventive and fresh salads) recently added a summer seasonal salad plate that combines the classic Caprese flavors with sweet peaches. A Caprese-style dish with basil pesto and peaches was obviously the direction I needed to go. But the question was, how to make it a meal? Why not toss the pesto with nutty brown rice and make it a rice bowl!? Perfect.

DSC_0899

When I put this dish together last night, Matt was definitely skeptical. I have tried peaches in savory dishes a handful of times, so I wasn’t quite as worried as him. But still, I was eager to see if my recipe came together as deliciously as I had imagined. Short answer, it did. Matt and I both absolutely loved it. The ripe and juicy peaches with the savory basil pesto worked together in perfect harmony. And who doesn’t love mini balls of fresh mozzarella and sweet cherry tomatoes? The last touch was to add mixed greens tossed in balsamic vinaigrette. Ugh, so good. I’m totally obsessed. It’s summer in a bowl!

DSC_0910

I love this dish too because not only are the flavors out of control, but it’s also a balanced and light meal that I don’t feel even the slightest bit guilty eating. It’s naturally gluten-free due to the brown rice and packed with fresh produce (aka tons of vitamins and nutrients). Because of this, I definitely consider it to be a “detox meal”. Yes, it has cheese. But that doesn’t stop me from calling something healthy. No way.

Warning, I’m about to go on a mini rant.

I got a comment on my Instagram one time because I had hash-tagged “healthy” on a simple cage-free-vegetarian-fed-egg and cheese sandwich on a sprouted grain English muffin. Side note: I love commentary, especially commentary that sparks healthy debate so know I’m not lashing out because of a controversial comment. Anyway, the commentor simply said “cheese isn’t healthy”. Since then, the whole “cheese is not healthy” issue is something that really bothers me. Not only because I love cheese and find that it can make many meat-free meals more satisfying, but also because it’s such a  ridiculous notion. Processed cheese in excessive quantities, not good. Anything high in fat and sodium in excessive quantities, not good. Natural, calcium- and protein-rich cheese in moderation? Go for it. The word “healthy” is subjective and can be defined in countless ways. To label cheese as unhealthy is a major generalization that doesn’t take a lot of factors into consideration. Net net, please do not generalize all cheeses and place them automatically in the category of “unhealthy”. At least not to me.

DSC_0871

Anyway, I think I’m getting a little bit hangry here, and I have leftovers from last night’s Caprese Bowls calling my name. Screaming my name actually. Gotta go!

Caprese Bowls with Pesto Rice & Ripe Peaches
Serves: 4   Start to Finish: 20-50 min (depending on rice cooking method)

Ingredients

1 cup dry Brown Rice or 2 cups cooked Brown Rice
Sea Salt
1/3 cup Basil Pesto (get my recipe here or use store bought)
Mixed Greens
1/4 cup Balsamic Vinegar
2 ripe Peaches, pits removed, cut into bite size pieces
1 pint Cherry Tomatoes, halved or quartered
8 ounces Fresh Mozzarella (I used Bocconcini, or bite size mozzarella, each ball halved)

To Make

Cook rice according to package instructions. Cooking dry rice takes about 45 minutes, frozen cooked rice or pre-cooked rice works too. If cooking dry rice, use 1 cup rice with 2-1/4 cups water and 1/2 teaspoon salt.

Meanwhile, prepare pesto (if making from scratch, store bought works too). Cut peaches, tomatoes and mozzarella. Toss greens with vinegar. Divide dressed lettuce between 4 bowls or plates. Evenly distribute peaches, tomatoes and mozzarella over greens.

When rice is finished cooking, add pesto to rice and stir until well combine. Scoop about 1/2 cup pesto-rice onto each bowl. Serve with a fresh basil garnish if desired.

Best of Basic: Basil Pesto Sauce

Best of Basic: Basil Pesto Sauce

DSC_0896

My recent vacation to my family’s summer cottage in Canada was super inspirational in terms of cooking and food. To no one’s surprise we ate well and often, and had a blast in the kitchen along the way. The inspiration for this post came from spending time cooking with my mom, who is the master chef in my life. She is the queen of delicious, simple and inventive cooking and, somehow, everything always tastes better when she makes it.

DSC_0933
One of my favorite meals from the trip was my mom’s loaded pesto pasta with sundried tomatoes, pine nuts, zucchini and fresh basil. She’s not inventing the wheel with this one, as pesto pasta is pretty standard, but watching her throw it together in a matter of minutes made me wonder why I wasn’t taking advantage of how easy a pesto pasta comes together. I’ve said it before, I need more recipes that can be thrown together in a pinch with minimal effort, and this pasta dish falls under that category. I’ll talk more about the specifics of her awesome loaded pesto pasta in a later post, but today, I’m just focusing on the actual pesto.

DSC_0920

In addition to my mom’s pasta, I’ve been seeing and eating pesto everywhere these days. My favorite pizza place in Williamsburg (Vinnie’s) uses a pesto vinaigrette as the dressing on my favorite salad, and while driving from our cottage to the Toronto airport we stopped for lunch where I had an amazing Caprese salad layered with pesto instead of fresh basil. Finally, on a recent trip to St. Louis, I ordered a pizza at my fave spot (called Pi) that drizzled pesto on top just before serving. It’s clear that a go-to pesto recipe is a must.

DSC_0874
I’ve made pesto before, although it’s been awhile, and I’ve seen it made on TV loads of times. It’s quite simple and always pretty much the same. Use a food processor to blend the seven uncooked ingredients and you’re done. Yes, that’s it. It’s literally a five to ten minute process. Those seven ingredients are basil, garlic, nuts, olive oil, salt, pepper and Parmesan cheese. Taking a tip from my girl Ina Garten, I used a mixture of pine nuts and walnuts, but you can use one or the other if preferred. Of course, freshly grated Parmesan is ideal, but I used pre-grated from Whole Foods this time because I didn’t feel like adding another step to the process (the easier the better!). The last thing I will say about pesto is that, in order to keep it looking fresh and bright, remove all air before storing in the fridge or freezer. I find that a layer of plastic wrap directly on top of the pesto before covering with a lid is the way to go.


So without further ado, my recipe for classic and simple basil pesto, to be used on anything from pasta to pizza to salad.

Happy summer and happy Friday!

Best of Basic: Basil Pesto
Serves: 8 (2 tbs per serving)   Start to Finish: 10 minutes

Ingredients

2 cups Fresh Basil Leaves, packed
3 cloves Garlic, peeled and roughly chopped (use 4 cloves if you absolutely love garlic)
1/3 cup total Pine Nuts and/or Walnuts
2/3 cup Olive Oil
Sea Salt & Black Pepper, to taste (I used 1 tsp each)
1/2 cup Parmesan Cheese

To Make

Combine basil, garlic and nuts in the bowl of a food processor or blender. Pulse until fine. While food processor is on, drizzle in olive oil. Add Parmesan, pulse until smooth. Add salt and pepper to taste. Pulse until well combined.

Makes about 1 cup of pesto

Cheap & Easy: Garlicky Spinach & Feta Pizza

Cheap & Easy: Garlicky Spinach & Feta Pizza

DSC_0346 2

In our household, Friday night is always dinner date night. Although Matt and I eat dinner together just about every night, there’s something about Friday night (or any night without work the next day) that feels so much more relaxed and intimate. You can really focus on the food, enjoy a couple drinks without fearing the early morning alarm clock, and fully relax. For date night, we always switch it up; choosing to go out to dinner for some date nights, ordering delivery for some and, of course, cooking some date night meals ourselves. Don’t get me wrong, I love going out to eat, but I’m starting to think I like the homemade, reclusive version of date night the best. Why? Because not only is it more comfy and cozy, but it’s also so much cheaper.

DSC_0333

Last Friday, before date night, I made a quick trip to Whole Foods where I was able to pick up the few ingredients needed for this easy and delicious meal, Spinach & Feta Pizza on Whole Wheat Crust. You may be thinking “Whole Foods? Cheap?” Yes, because just about all of the ingredients for these pizzas are available in the Whole Foods 365 version. Now, if you don’t know about 365 brand products, you’re doing Whole Foods all wrong. I’m constantly hearing how expensive Whole Foods is, and I agree that there are definitely pricey products and brands at Whole Foods. But that’s where 365 comes in. 365 is the Whole Foods generic brand, and one that can be trusted in terms of quality ingredients at a great price. You can get everything from pasta, dairy and spices to canned beans, fresh spinach and frozen entrees. Literally, the store is stuffed to the brim with 365 products. If you go to Whole Foods and focus on only buying 365 brand products, you’re going to be pleasantly surprised at the register. Trust me, you will be.

DSC_0314

So anyways, the pizza turned out uber flavorful and delicious, and it was ready in a pinch. I simply sautéed the the spinach with oil, fresh garlic and salt, and then layered it onto the store-bought whole wheat crust with marinara and double cheese. A quick 10 minutes in the oven the pizza is ready for devouring. I just love this pizza. Sautéed spinach and garlic is already one of all-time fave foods. Add salty feta, gooey mozzarella and a crispy crust? Winner winner [pizza] dinner.

DSC_0328

This will be my last post until the last week of July. I’m so happy to say that I’ll be MIA next week as we are leaving tonight for our rustic lake house in Canada. It’s in the middle of nowhere and I couldn’t be more excited to get away (check out my Instagram throughout the week to experience this heavenly place, it really can’t be described). And when I return, I have a super exciting announcement to make. Intrigued? You’ll just have to wait. So enjoy the weekend and this upcoming week and definitely make this pizza. You won’t be disappointed!

Garlicky Spinach & Feta Pizza
Serves: 2-3*   Start to Finish: 30 minutes

Ingredients

22 ounces Pizza Dough, approx. (I’m using Whole Wheat for added nutritional value)
1 cup all-natural Marinara Sauce
1 cup (4 ounces) shredded Mozzarella
1/2 cup crumbled Feta Cheese
1 tablespoon Olive Oil, plus more
1 bag fresh Baby Spinach
2 cloves Garlic, peeled and roughly minced
Sea Salt, fine-grain
Corn Meal (optional)
Crushed Red Pepper Flake (optional)

To Make

Refrigerated dough should sit out for at least an hour prior to baking. Place ball of dough in a lightly oiled bowl and cover. Leave at room temperature for 1-2 hours.

Preheat oven to 450 degrees.

Make garlicky spinach topping. In a medium skillet heat 1 tablespoon olive oil and 2 cloves minced garlic over medium heat. When garlic begins to sizzle, cook for 1-2 minutes, then add fresh spinach leaves, tossing to coat with garlic and oil. When the spinach has wilted slightly, or after about 1 minute, add 2 teaspoons water and 1/4 teaspoon salt to the spinach, toss to combine. Cook for an additional 3-4 minutes, remove from heat.

Spread dough out to the fit the size of a large sheet pan (use whatever shape pan you want and/or divide dough between multiple pans, this amount of dough should make one large pizza or two smaller pizzas).

Lightly oil baking sheet with olive oil and sprinkle a thin layer of corn meal evenly over oiled pan. Place dough onto pan, readjust shape as needed.

Evenly spread sauce over the dough, leaving a thin ring around the edges untouched. Evenly distribute about half of the spinach mixture over the sauce. Sprinkle mozzarella and feta over spinach. Top with remaining spinach. At this point I like to sprinkle the crust with a little bit of salt and also add a dash or two to the whole pie, that’s optional though.

Bake pizza for 10-12 minutes. Allow to cool slightly before cutting.

* Matt and I ate, combined, about 3/4 of the pizza for dinner, with side salads. We were stuffed. It could’ve easily served 3 people with a side salad too. Without a side of some kind, I would plan on 1 pizza for every 2 people.

DSC_0344

Buffalo Cauliflower & Brown Rice Bowls (vegan optional)

Buffalo Cauliflower & Brown Rice Bowls (vegan optional)

DSC_0387

There are oh so many ways to enjoy my stellar recipe for a major food trend, Buffalo Cauliflower “Wings”. This post highlights one of my fave recipes using vegan buffalo wings, in the form of a nourish bowl. Casual yet creative, tasty yet nutritious. This recipe is simply perfect.

DSC_0399

The idea for a brown rice bowl topped with buffalo wings was inspired by a popular fast-casual restaurant in my hometown of St. Louis called Crazy Bowls and Wraps. CBW, as St. Louis-ans like to call it, has been around forever, even before healthy fast-casual joints became a thing. CBW offers customizable rice bowls, salads and wraps with all kinds of creative fillings and options. One of my absolute favorites is the buffalo fried tofu, so it wasn’t hard to come up with the idea for a buffalo cauliflower brown rice bowl.DSC_0370

I love the idea of layered bowls when serving a crowd. It makes it easy for each person to get exactly what they want. Plus, bowls like this are easy to eat. But I don’t need company to make bowls like this. In fact, last night for dinner I made Mexican rice bowls with roasted potatoes and peppers, cabbage, shredded cheddar and marinated tomatoes. When it comes to “bowls”, the possibilities are endless. Whenever I don’t know what to make, I start with a starch like rice or orzo pasta and simply add toppings according to a theme (Mexican, Greek, Italian, Asian etc.). That’s actually a really good tip if you’re ever struggling with what to cook. I use it all them time.

DSC_0383
If you’re new to rice bowls, this is a great one to start with. The spicy, crispy cauliflower compliments the fresh veggies and creamy sauce perfectly. It feels so indulgent, but it’s really very balanced. And it’s also a lot easier than it sounds. These bowls are seriously so yummy and I highly recommend trying them out, STAT. I know I can’t wait to make them again.

Buffalo Brown Rice Bowls
Serves: 4   Start to Finish: 1 hour 15 min

Ingredients

1 batch Buffalo Cauliflower (get recipe here)
1 cup Brown Rice
Sea Salt
8-10 ounces chopped Romaine Lettuce
10 ounces Cherry Tomatoes
2 large Carrots, peeled and trimmed
1 cup Dressing (get my creamy blue cheese dressing here or use the vegan recipe below)

Creamy Vegan Dressing
1 cup Vegan Mayonnaise (I like Follow Your Heart brand)
2 teaspoons Red Wine Vinegar
2 tablespoons unsweetened non-dairy milk or water (+ more to consistency)
3/4 teaspoon Garlic Powder
3/4 teaspoon Onion Powder
1/2 teaspoon Salt
1/2 teaspoon Black Pepper
1/2 teaspoon Dried Parsley

To Make

Make rice. Add 1 cup brown rice, 2 1/4 cups water and 1/2 teaspoon sea salt into a medium sauce pan. Bring to boil, reduce heat to lower simmer, cover. Simmer for 35-40 minutes. Remove from heat when all water is absorbed, allow to sit, still covered, until ready to assemble bowls.

While rice simmers, preheat oven to 450 degrees and get the Buffalo Cauliflower “Wings” started (get recipe here).

While cauliflower bakes, make dressing by combining all ingredients for vegan dressing (ingredients above) or make my yummy blue cheese dressing (get recipe here). Set aside.

Prep veggies. Wash & chop lettuce. Cut cherry tomatoes in half. Prep carrots as desired. I like making “carrot shavings” for salads. Use a vegetable peeler to peel off long strips of carrots, then run your knife through the strips to make shavings.

When cauliflower and rice are finished, assemble the bowls. Divide lettuce into 4 bowls. Top each bowl with brown rice, tomatoes, carrots, buffalo cauliflower “wings” and 2-4 tablespoons dressing.


Best of Basic: Perfect Oven Fries

Best of Basic: Perfect Oven Fries

DSC_0220

Fried potatoes are my jam. Cheese fries? Amaze. Tater tots? Obsessed. Hashbrowns? Yes please. Are there people out there who don’t love fried potatoes? No way. While deep fried foods are totally fine in moderation (that is, if they’re whole foods that are fried in healthy oils), I want French fries on the daily. So a recipe for slightly lighter and healthier oven fries was a natural for me.

I’ve been making oven fries since forever. And after a lot of trial-and-error, I’ve come up with a go-to method that makes flavorful, crispy fries that are neutral enough to go with any dipping sauce. I use small yellow or Yukon Gold potatoes for my oven fries. Yukon Golds are my favorite type of potato. I like the waxy texture, the golden color and the small size. After cutting the potatoes in thick fries, I soak them in cold water. This trick removes excess starchiness and makes for a crispy fry. Then I just toss with a simple blend of spices and olive oil. When baking the fries, I start at a lower temperature which allows the insides to become fully cooked. Then I crank up the heat to get those guys golden brown and crispity-crunchy. Perfect every time.

I’ve been meaning to share this recipe for quite awhile. Then I saw these amazing red, white and blue basket liners at Sur la Table and couldn’t resist. These liners are perfect in those red plastic woven baskets you get at diners and casual food joints. As soon as I saw them I thought “oven fries! 4th of July! BBQ perfection!” You can use these lined baskets to serve apps and sides or everyone can have their very own basket for their meal. So cute, so fun and so festive.

DSC_0217

Honestly, I’m not even sure what Matt and I are doing for the 4th. Independence Day has always been a big holiday for me. I grew up spending every July 4th at our family friends’ lake house near Milwaukee, Wisconsin, and it was always quite the celebration. The fireworks were unreal, the drinks were flowing and the group of us (sometimes over 30 people sleeping in one house) always got a little too rowdy. Those were the days. As of this year though, the lake house has been retired. I’ll really miss that place. But I wouldn’t be able to go this year anyway because it’s Matt’s brother’s engagement party in New York (woohoo!). There are plenty of activities planned for the weekend, but for the actual 4th of July we have nothing going on. I’m thinking a festive BBQ on our balcony, some all American beers, and a few sparklers will be totally awesome. I’m not quite the party-er I used to be and these days, I prefer to celebrate on the tamer side. But if this intimate celebration does end up happening, these fries will most definitely be on the menu.

Pine Lake Way Back When
Scenes from Pine Lake, Wisconsin – Back in the Day – That’s me!

I hope everyone has a super fun (and safe) holiday weekend with lots of good food and good company!

Best of Basic: Perfect Oven Fries
Serves: 4    Start to Finish: 1.5 hours

Ingredients

2 lbs Yukon Gold Potatoes
2 tablespoons Olive or Canola Oil
1/2 teaspoon Sea Salt
1/2 teaspoon Paprika
1/4 teaspoon Garlic Powder
1/4 teaspoon Black Pepper

To Make

Cut potatoes into 1/4-1/2″ slices, length wise. Cut each slice into sticks or wedges. Place cut potatoes in a big bowl of ice water. Allow to soak for 30 minutes.

Meanwhile, preheat oven to 375 degrees. Line a large baking sheet or two with parchment paper. I use one large pan for this amount but the more room the potatoes have, the crispier they’ll be.

When potatoes are finished soaking, drain and dry with a clean towel. Toss potatoes with oil and seasoning. Spread out over baking sheets. Bake for 20 min. Remove from heat, gently toss. Turn heat up to 450 degrees. Cook for 30-40 more minutes, tossing every 10-15 minutes.