
Category: Gluten-Free
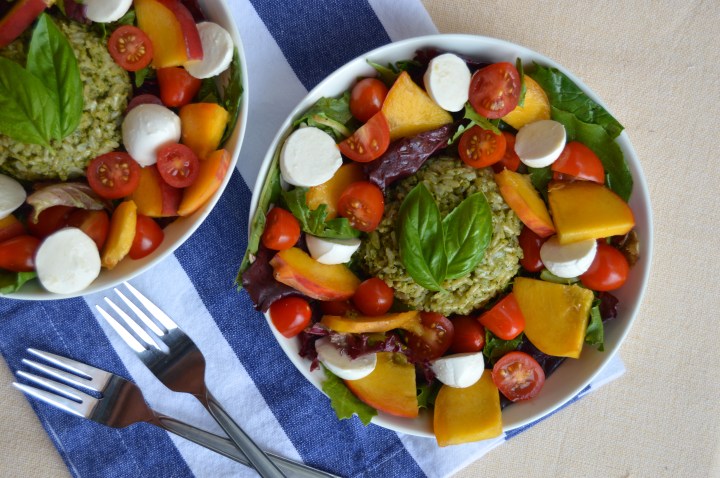
Caprese Bowls with Pesto-Rice & Peaches


Hello readers! I’m just going to jump right in because I’m so excited for this post. I don’t say this often because I’m cooking literally all the time, but this recipe tops the charts for me. One of my favorite dishes I’ve ever come up with. While this dish is really simple, there’s a lot going on, so let’s break it down a little.
Last week I made a batch of classic basil pesto. I first used it for a simple pesto fusilli pasta with sun dried tomatoes, artichoke hearts, zucchini and roasted red peppers. Yummy no doubt, but pretty standard. So for the remainder of the pesto, I wanted to come up with something new and original. While at a restaurant a couple weeks ago, I had a delish Caprese salad layered with pesto instead of fresh basil and it was just divine. Additionally, Chop’t (my go-to fast-casual restaurant for inventive and fresh salads) recently added a summer seasonal salad plate that combines the classic Caprese flavors with sweet peaches. A Caprese-style dish with basil pesto and peaches was obviously the direction I needed to go. But the question was, how to make it a meal? Why not toss the pesto with nutty brown rice and make it a rice bowl!? Perfect.

When I put this dish together last night, Matt was definitely skeptical. I have tried peaches in savory dishes a handful of times, so I wasn’t quite as worried as him. But still, I was eager to see if my recipe came together as deliciously as I had imagined. Short answer, it did. Matt and I both absolutely loved it. The ripe and juicy peaches with the savory basil pesto worked together in perfect harmony. And who doesn’t love mini balls of fresh mozzarella and sweet cherry tomatoes? The last touch was to add mixed greens tossed in balsamic vinaigrette. Ugh, so good. I’m totally obsessed. It’s summer in a bowl!
I love this dish too because not only are the flavors out of control, but it’s also a balanced and light meal that I don’t feel even the slightest bit guilty eating. It’s naturally gluten-free due to the brown rice and packed with fresh produce (aka tons of vitamins and nutrients). Because of this, I definitely consider it to be a “detox meal”. Yes, it has cheese. But that doesn’t stop me from calling something healthy. No way.
Warning, I’m about to go on a mini rant.
I got a comment on my Instagram one time because I had hash-tagged “healthy” on a simple cage-free-vegetarian-fed-egg and cheese sandwich on a sprouted grain English muffin. Side note: I love commentary, especially commentary that sparks healthy debate so know I’m not lashing out because of a controversial comment. Anyway, the commentor simply said “cheese isn’t healthy”. Since then, the whole “cheese is not healthy” issue is something that really bothers me. Not only because I love cheese and find that it can make many meat-free meals more satisfying, but also because it’s such a ridiculous notion. Processed cheese in excessive quantities, not good. Anything high in fat and sodium in excessive quantities, not good. Natural, calcium- and protein-rich cheese in moderation? Go for it. The word “healthy” is subjective and can be defined in countless ways. To label cheese as unhealthy is a major generalization that doesn’t take a lot of factors into consideration. Net net, please do not generalize all cheeses and place them automatically in the category of “unhealthy”. At least not to me.
Anyway, I think I’m getting a little bit hangry here, and I have leftovers from last night’s Caprese Bowls calling my name. Screaming my name actually. Gotta go!
Caprese Bowls with Pesto Rice & Ripe Peaches
Serves: 4 Start to Finish: 20-50 min (depending on rice cooking method)
Ingredients
1 cup dry Brown Rice or 2 cups cooked Brown Rice
Sea Salt
1/3 cup Basil Pesto (get my recipe here or use store bought)
Mixed Greens
1/4 cup Balsamic Vinegar
2 ripe Peaches, pits removed, cut into bite size pieces
1 pint Cherry Tomatoes, halved or quartered
8 ounces Fresh Mozzarella (I used Bocconcini, or bite size mozzarella, each ball halved)
To Make
Cook rice according to package instructions. Cooking dry rice takes about 45 minutes, frozen cooked rice or pre-cooked rice works too. If cooking dry rice, use 1 cup rice with 2-1/4 cups water and 1/2 teaspoon salt.
Meanwhile, prepare pesto (if making from scratch, store bought works too). Cut peaches, tomatoes and mozzarella. Toss greens with vinegar. Divide dressed lettuce between 4 bowls or plates. Evenly distribute peaches, tomatoes and mozzarella over greens.
When rice is finished cooking, add pesto to rice and stir until well combine. Scoop about 1/2 cup pesto-rice onto each bowl. Serve with a fresh basil garnish if desired.
Best of Basic: Basil Pesto Sauce
My recent vacation to my family’s summer cottage in Canada was super inspirational in terms of cooking and food. To no one’s surprise we ate well and often, and had a blast in the kitchen along the way. The inspiration for this post came from spending time cooking with my mom, who is the master chef in my life. She is the queen of delicious, simple and inventive cooking and, somehow, everything always tastes better when she makes it.

One of my favorite meals from the trip was my mom’s loaded pesto pasta with sundried tomatoes, pine nuts, zucchini and fresh basil. She’s not inventing the wheel with this one, as pesto pasta is pretty standard, but watching her throw it together in a matter of minutes made me wonder why I wasn’t taking advantage of how easy a pesto pasta comes together. I’ve said it before, I need more recipes that can be thrown together in a pinch with minimal effort, and this pasta dish falls under that category. I’ll talk more about the specifics of her awesome loaded pesto pasta in a later post, but today, I’m just focusing on the actual pesto.

In addition to my mom’s pasta, I’ve been seeing and eating pesto everywhere these days. My favorite pizza place in Williamsburg (Vinnie’s) uses a pesto vinaigrette as the dressing on my favorite salad, and while driving from our cottage to the Toronto airport we stopped for lunch where I had an amazing Caprese salad layered with pesto instead of fresh basil. Finally, on a recent trip to St. Louis, I ordered a pizza at my fave spot (called Pi) that drizzled pesto on top just before serving. It’s clear that a go-to pesto recipe is a must.
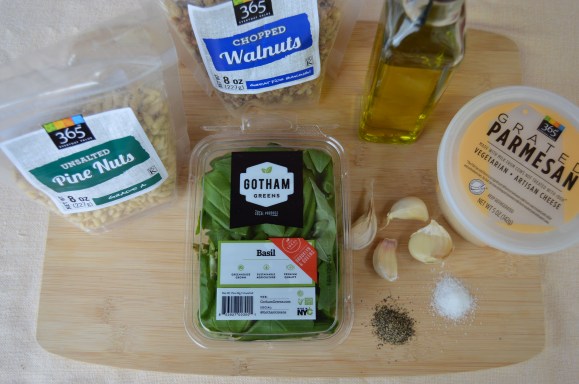
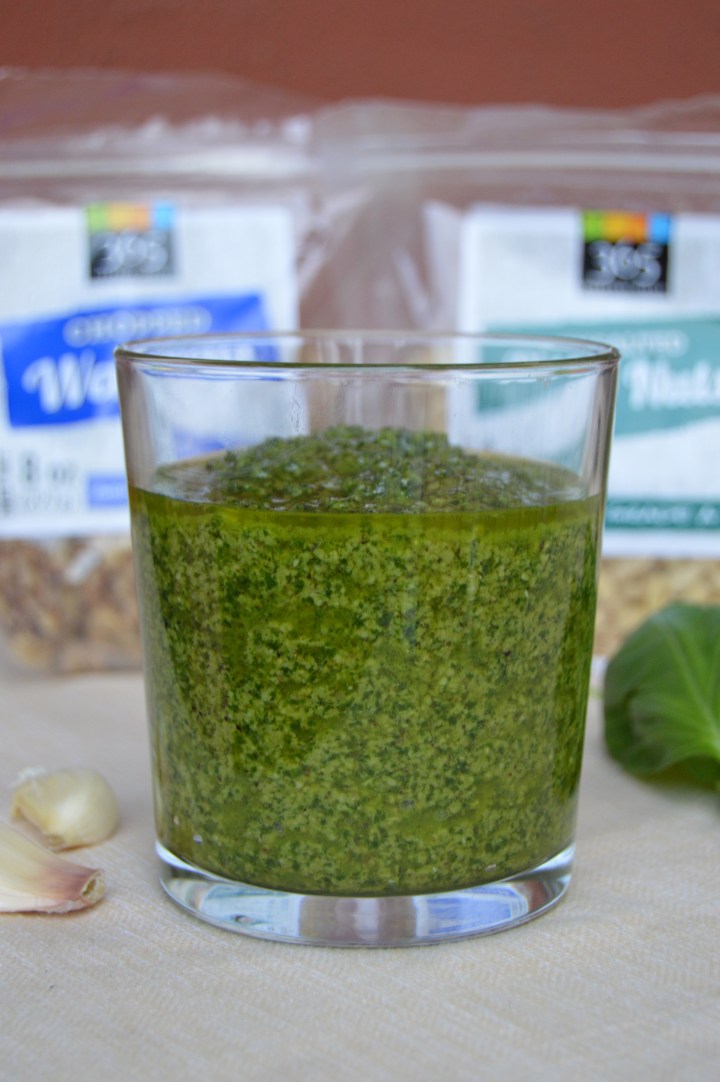
I’ve made pesto before, although it’s been awhile, and I’ve seen it made on TV loads of times. It’s quite simple and always pretty much the same. Use a food processor to blend the seven uncooked ingredients and you’re done. Yes, that’s it. It’s literally a five to ten minute process. Those seven ingredients are basil, garlic, nuts, olive oil, salt, pepper and Parmesan cheese. Taking a tip from my girl Ina Garten, I used a mixture of pine nuts and walnuts, but you can use one or the other if preferred. Of course, freshly grated Parmesan is ideal, but I used pre-grated from Whole Foods this time because I didn’t feel like adding another step to the process (the easier the better!). The last thing I will say about pesto is that, in order to keep it looking fresh and bright, remove all air before storing in the fridge or freezer. I find that a layer of plastic wrap directly on top of the pesto before covering with a lid is the way to go.

Basil, garlic & nuts.

Time to add olive oil.

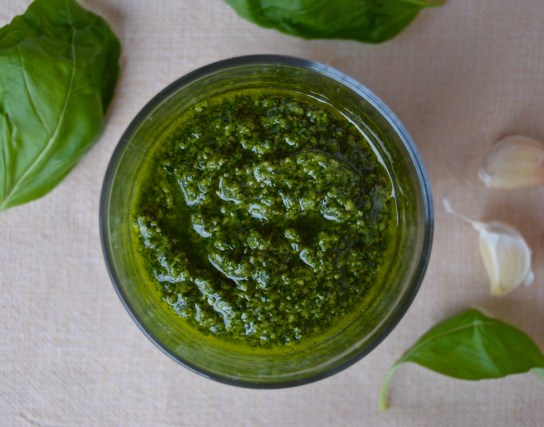
Finished.
So without further ado, my recipe for classic and simple basil pesto, to be used on anything from pasta to pizza to salad.
Happy summer and happy Friday!
Best of Basic: Basil Pesto
Serves: 8 (2 tbs per serving) Start to Finish: 10 minutes
Ingredients
2 cups Fresh Basil Leaves, packed
3 cloves Garlic, peeled and roughly chopped (use 4 cloves if you absolutely love garlic)
1/3 cup total Pine Nuts and/or Walnuts
2/3 cup Olive Oil
Sea Salt & Black Pepper, to taste (I used 1 tsp each)
1/2 cup Parmesan Cheese
To Make
Combine basil, garlic and nuts in the bowl of a food processor or blender. Pulse until fine. While food processor is on, drizzle in olive oil. Add Parmesan, pulse until smooth. Add salt and pepper to taste. Pulse until well combined.
Makes about 1 cup of pesto
Best of Basic: Perfect Oven Fries
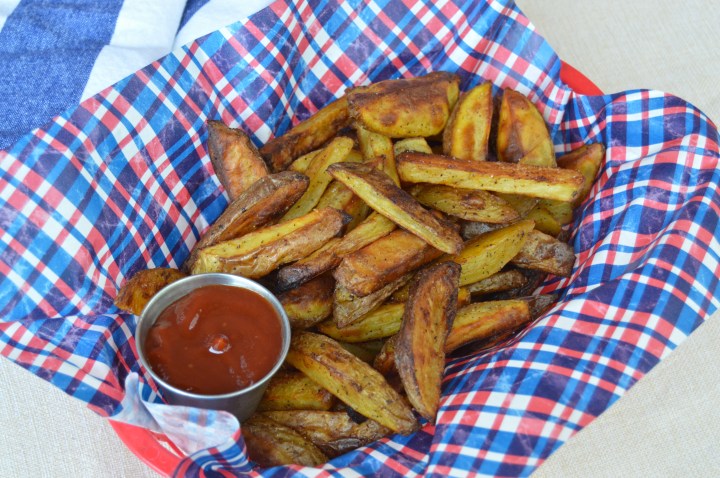

Fried potatoes are my jam. Cheese fries? Amaze. Tater tots? Obsessed. Hashbrowns? Yes please. Are there people out there who don’t love fried potatoes? No way. While deep fried foods are totally fine in moderation (that is, if they’re whole foods that are fried in healthy oils), I want French fries on the daily. So a recipe for slightly lighter and healthier oven fries was a natural for me.
I’ve been making oven fries since forever. And after a lot of trial-and-error, I’ve come up with a go-to method that makes flavorful, crispy fries that are neutral enough to go with any dipping sauce. I use small yellow or Yukon Gold potatoes for my oven fries. Yukon Golds are my favorite type of potato. I like the waxy texture, the golden color and the small size. After cutting the potatoes in thick fries, I soak them in cold water. This trick removes excess starchiness and makes for a crispy fry. Then I just toss with a simple blend of spices and olive oil. When baking the fries, I start at a lower temperature which allows the insides to become fully cooked. Then I crank up the heat to get those guys golden brown and crispity-crunchy. Perfect every time.

Before Baking.

Golden & Crispy.
I’ve been meaning to share this recipe for quite awhile. Then I saw these amazing red, white and blue basket liners at Sur la Table and couldn’t resist. These liners are perfect in those red plastic woven baskets you get at diners and casual food joints. As soon as I saw them I thought “oven fries! 4th of July! BBQ perfection!” You can use these lined baskets to serve apps and sides or everyone can have their very own basket for their meal. So cute, so fun and so festive.
Honestly, I’m not even sure what Matt and I are doing for the 4th. Independence Day has always been a big holiday for me. I grew up spending every July 4th at our family friends’ lake house near Milwaukee, Wisconsin, and it was always quite the celebration. The fireworks were unreal, the drinks were flowing and the group of us (sometimes over 30 people sleeping in one house) always got a little too rowdy. Those were the days. As of this year though, the lake house has been retired. I’ll really miss that place. But I wouldn’t be able to go this year anyway because it’s Matt’s brother’s engagement party in New York (woohoo!). There are plenty of activities planned for the weekend, but for the actual 4th of July we have nothing going on. I’m thinking a festive BBQ on our balcony, some all American beers, and a few sparklers will be totally awesome. I’m not quite the party-er I used to be and these days, I prefer to celebrate on the tamer side. But if this intimate celebration does end up happening, these fries will most definitely be on the menu.

I hope everyone has a super fun (and safe) holiday weekend with lots of good food and good company!
Best of Basic: Perfect Oven Fries
Serves: 4 Start to Finish: 1.5 hours
Ingredients
2 lbs Yukon Gold Potatoes
2 tablespoons Olive or Canola Oil
1/2 teaspoon Sea Salt
1/2 teaspoon Paprika
1/4 teaspoon Garlic Powder
1/4 teaspoon Black Pepper
To Make
Cut potatoes into 1/4-1/2″ slices, length wise. Cut each slice into sticks or wedges. Place cut potatoes in a big bowl of ice water. Allow to soak for 30 minutes.
Meanwhile, preheat oven to 375 degrees. Line a large baking sheet or two with parchment paper. I use one large pan for this amount but the more room the potatoes have, the crispier they’ll be.
When potatoes are finished soaking, drain and dry with a clean towel. Toss potatoes with oil and seasoning. Spread out over baking sheets. Bake for 20 min. Remove from heat, gently toss. Turn heat up to 450 degrees. Cook for 30-40 more minutes, tossing every 10-15 minutes.
Rich & Creamy Vegan Vodka Sauce

Happy Friday, everyone!
If you read my last post sharing a delicious recipe for Eggplant & White Bean Veggie Balls, then you know that I served these delicious “meatballs” with a homemade Vegan Vodka Sauce. The sauce was so tasty that I just had to share the recipe. And just in time for the weekend, the best time to spend some relaxation time in the kitchen.
With everything I have going on in my life (work, blogging, yoga, social life, etc.), I’d be crazy not to take advantage of shortcuts when it comes to food and cooking. A tasty jar of red sauce (made with only natural ingredients, of course) is one of those shortcuts that I often take advantage of. But still, nothing compares to a homemade tomato sauce bursting with fresh Italian flavor. So when I have the time to make my own tomato sauce, I’m all over it.

When thinking about the sauce I wanted to make to go along with the veggie balls, I really wanted to experiment with a new homemade (and vegan-friendly) sauce. Vodka Sauce was an easy choice for Matt and me because we’ve been talking about making our own version of vodka sauce for some time now. Adding vodka to a freshly made tomato sauce was simple enough, because I’ve made red sauce a million times and I always have vodka in the freezer. The real question was how to achieve the richness, creaminess and beautiful pink color of a traditional vodka sauce…without using cream.

Let’s get something straight. I love real cream. On weekends, I always treat myself to iced coffee with a splash of half-and-half. And there’s nothing like a whipped cream frosting on a moist cake. But not for this recipe. Why not use cream? Well, not only do I like the challenge of omitting dairy from recipes, but I also like to keep some days and meals dairy-free for the health and ecological benefits. So for this sauce, I’m going cream-free.

To replace the rich cream, I decided to try a vegan cream made from raw cashews. Since I’ve never made cashew cream myself, I used a recipe from Beard & Bonnet as a guide. It was so simple, just soak the cashews and then grind them up with water, lemon juice and salt until a delectably smooth cream is formed. Easy enough. While the cashews soaked I made the red sauce and vodka portion of the sauce.

This sauce is classic. Fresh plum tomatoes, lots of garlic, yellow onion and a blend of dried Italian seasonings. Not so classic is my use of coconut oil, rather than olive oil or butter. I find that coconut oil has the richness of butter and creates the subtle sweetness that I love about vodka sauce, without adding dairy or sweetener. I love what the coconut oil does for this sauce, so although it may sound strange, it’s worth a try.

I hope everyone has a super Friday and lovely weekend! And if you feel like kicking Sunday dinner up a notch, why not try this amazing vegan vodka sauce.
Creamy Vegan Vodka Sauce
Serves: 4 Start to Finish: 2 hours (45 minutes active)Ingredients2 tablespoons Coconut Oil
4 cloves Garlic
1 yellow Onion
2 pounds Tomatoes (I used Organic Plum Tomatoes)
1 cup Water (plus more if necessary)
2 teaspoons Sea Salt*
1 teaspoon Dried Basil
1 teaspoon Dried Oregano
1 teaspoon Dried Thyme
1/2 teaspoon Black Pepper
1/4 teaspoon Crushed Red Pepper Flake
1/3-1/2 cup quality Vodka**
1/4-1/2 cup Cashew Cream (get Beard & Bonnet’s recipe here or my adaptation below)
To Make
Cut tomatoes and onions into a fine dice. Finely mince garlic.
Heat coconut oil and garlic over medium heat, allow garlic to sizzle for 1-2 minutes. Add onion. Cook onion and garlic for 6-8 minutes. Add tomatoes, water and seasoning. When liquid boils, reduce to simmer. Simmer covered for 90 minutes. You can leave the sauce with some texture or you can use a food processor or emulsion blender to get a smoother consistency (I like something in the middle so I use an emulsion blender to break it up a little bit).
To make vodka sauce, carefully mix vodka into the hot (or reheated) red sauce (or 2 1/2 or 3 cups of any red sauce). Add 1/2 cup vodka. Simmer uncovered for 10 minutes or until alcohol is cooked off. Remove from heat. Stir in 1/4 cup vegan cashew cream (see recipe below) or 1/4 cup dairy cream. You can add more or less cream depending on your taste.
*adjust salt according to personal taste
**i used 1/2 cup of vodka and I could definitely taste it, in a great way. 1/4 cup or 1/3 cup will work, just with a lighter vodka flavor. Your call!
Cashew Cream Recipe (adapted from Beard & Bonnet’s recipe)
1.5 cups raw, unsalted Cashews
1 1/4 cups water (more or less)*
1 tablespoon Lemon Juice (or half of a large lemon)
3/4 teaspoon salt (more or less)
Soak raw cashews in a bowl of filtered water for 1-4 hours. Add soaked cashews to a food processor or high powered blender. Add water salt and lemon juice. Blend until smooth.
I used a food processor and it took longer than I expected. I had to stop and hand stir/scrape the bowl a couple times. When in doubt, just keep blending.
*start with 3/4 cup water and add more as needed
Best of Basic: Oven-Roasted Cherry Tomatoes


Every so often, when I’m feeling a little sluggish, or feeling like I’ve been particularly indulgent lately, I like to reset my routine and get back on track. This detox, as I like to call it, could last for a couple days, or if I’m feeling super motivated, a few weeks. With summer just around the corner, I thought it a good idea to do a lengthy detox to kick off swimsuit season… lose the bloat, gain some energy, reset my metabolism and maybe even shed a few pounds. Sounds great, right? You might be thinking “no, that does not sound great”, but I honestly love my detoxes because not only do they make me feel amazing but they’re also quite fun and delicious, when you do it my way.

Even when I’m detoxing, I refuse to sacrifice flavor or give up on my favorite foods entirely. I hate eating just for the sake of eating. I like to always enjoy and feel good about what I’m eating. So I find creative ways to make detoxing enjoyable. And these roasted cherry tomatoes are a great example of how I add flavor and interest in a light and healthy way. Roasted tomatoes are delicious in salads, on sandwiches, and in pasta, but are equally as yummy when used as a simple side dish to meat, tofu, or fish. I could seriously eat the entire batch in one sitting with only a spoon.

Roasting tomatoes is super simple because I keep it very basic. There’s simply no need to make it implicated here. Just add a little bit of quality olive oil, some garlic, sea salt, and black pepper to the halved tomatoes, and then roast for 30-40 minutes. Perfection. Roasting brings out the natural sweetness of the tomatoes and makes them super soft and juicy. They are the perfect way to add moisture and intense flavor without adding excess fat or dairy.

This batch of Roasted Cherry Tomatoes is for stuffing into pita pockets along with flavorful white bean dip and fresh spinach. This pita sandwich is simple, light, balanced, and will make a perfectly detox-friendly lunch this week. And don’t worry, my upcoming posts will focus on daily detox meal plans and recipes, including this delicious sandwich. Stay tuned!

Close Up Shot

All Together Now

Pita Sandwiches
Oven-Roasted Cherry Tomatoes
Serves: 4 Start to Finish: 45 minutes
Ingredients
2 pints Cherry Tomatoes
4 cloves Garlic, crushed, peeled, roughly minced
1/2 tablespoon Olive Oil
1/2 teaspoon Sea Salt (plus more)
1/4 Black Pepper
To Make
Preheat oven to 375 degrees. Line a large baking sheet with parchment paper. Set aside.
Combine tomatoes, garlic, 1/2 teaspoon salt and pepper in a medium size bowl. Spread out onto a lined baking sheet in a single layer. Bake for 15 minutes. Remove from oven and toss, re-spreading tomatoes out into a single layer. Bake for an additional 20 minutes. Remove from oven. Allow to cool slightly, sprinkle with an additional 1/8-1/4 teaspoon salt and toss. Serve warm, cold or at room temperature.
*for simplicity’s sake, I often roast the tomatoes whole and also leave out the garlic and black pepper – cooking time for uncut cherry tomatoes will be slightly longer – bake until most of the tomatoes have bursted and the skins are browning – these tomatoes are super delicious with just olive oil and salt
