Roasted Tomato & Creamy White Bean Pita Sandwiches

Roasted Tomato & Creamy White Bean Pita Sandwiches

DSC_0254

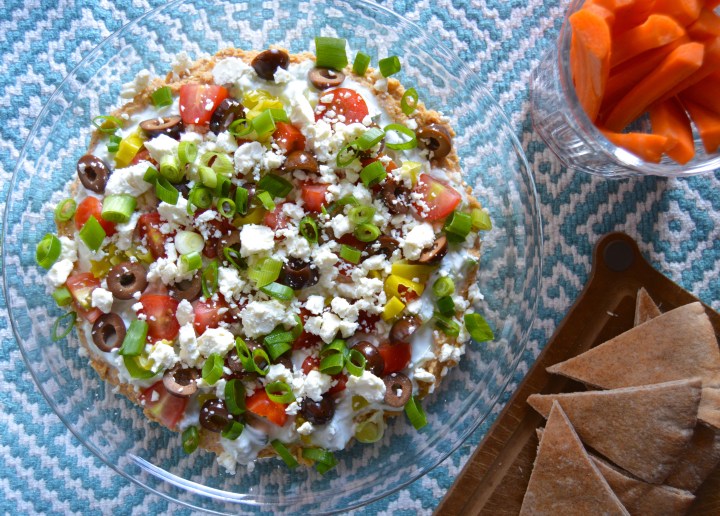
It’s Day 3 of my “debloat and recharge detox” and I’m feeling good and staying motivated. My detoxes are easy in that I’m not seriously reducing calories or only eating cabbage soup. It’s more about portion controlling, loading up on veggies and fruits (even more than usual) and reducing excess fat, sugar and carbs. Because I pretty much always stick to high quality and whole ingredients, it’s mostly about portion controlling and some calorie counting.

DSC_0223
I’m not big on calorie counting for a couple reasons. First is because I’ve spent so much time calorie counting throughout the years that I have a pretty good sense of roughly how many calories are in most foods, allowing me to be unconsciously aware of how much I’m eating. I also don’t like counting calories because I think it can take the fun out of eating a cooking. And lastly, I don’t like counting calories because I find it to be misleading in terms of choosing an unhealthy food over a healthy food just because they are equal in calories. With that said, when trying to trim down and debloat, I’ve found that it happens much faster if you’re staying within a low-to-moderate calorie range. So when detoxing I stay within a 1,500-1,900 calorie range, typically shooting for around 1,600. Obviously this varies by person, but I’ve found this to be a sustainable, satisfying and effective range for myself.

DSC_0199

DSC_0211
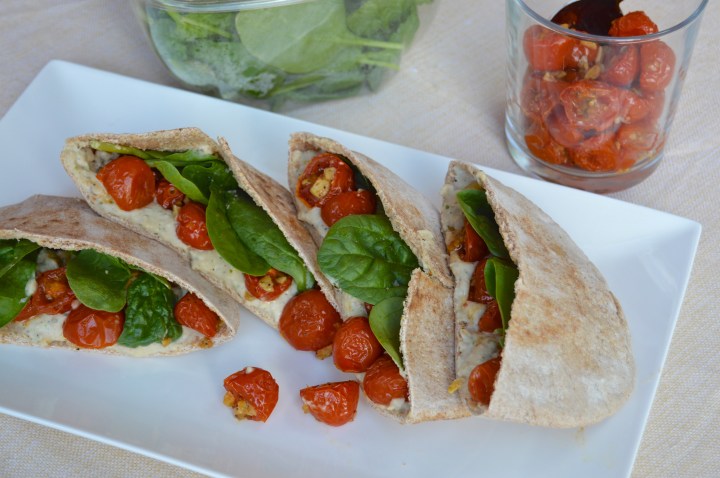
So the question is, what kinds of delicious and healthy foods do I eat during my detox regimens. Today I’m sharing my recipe for a super tasty pita pocket sandwich that clocks in at about 445 calories. I made these for both Matt and I to bring to work on Monday, and I kid you not, Matt actually called this sandwich one of the best things he’s ever eaten. Matt is the ultimate meat-eater-man so for him to say something so light and healthy is also super yummy means a lot.

DSC_0234
These pita sandwiches are a super simple combination of homemade white bean spread, oven-roasted cherry tomatoes and fresh baby spinach, all stuffed into a Demascus Bakery Whole Wheat Pita Pocket. I buy these pitas at Whole Foods and I like them because they are all-natural, made with only pronounceable ingredients, and cost just $1.50 for a pack of four. When I discovered these pitas, my commitment to a whole-foodie life got so much easier.

DSC_0246

For the white bean spread, I use my Lemony White Bean Dip recipe which is a must-try (it’s what Matt liked best about these sandwiches). But, for simplicity’s sake, an all-natural store-bough bean dip or hummus will work too. My Garlicky Roasted Cherry Tomatoes and some fresh spinach finish off the sandwich, adding depth, flavor and nutrients. And there you have it, a detox lunch that is transportable, satisfying, and one of the best things you’ll ever eat (according to Matt, that is).

Roasted Tomato and Lemony White Bean Spread Pita Sandwiches
Serves: 2    Start to Finish: 45 minutes   Calories: 450 per serving

Ingredients

1/2 batch Roasted Cherry Tomatoes (get my recipe here)
1 14-ounce can Organic Canellini Beans
2 tablespoons Olive Oil
1 Lemon
2 cloves Garlic, crushed, peeled and roughly chopped
4-6 fresh Basil Leaves, roughly chopped
2 tablespoons pure Tahini (ground sesame seeds)
1/2 teaspoon Dried Basil
1/2-1 teaspoon Sea Salt
1/4-1/2 teaspoon Black Pepper
10-15 fresh Baby Spinach Leaves (I like using Organic Girl brand greens)
2 all-natural Whole Wheat Pita Pockets (I like Damascus Bakery brand, available at Whole Foods)

To Make

First, get the cherry tomatoes in the oven (get my recipe here). While the tomatoes roast, make the white bean spread.

For the white bean spread, reserve a 1/4 cup of the white bean liquid, then drain and rinse the beans in a colander. Set aside.

Using a vegetable peeler, peel 3-4 pieces of zest from the lemon (about 1/2 the lemon). Roughly chop them up. Add oil, garlic and lemon peel to a small skillet (the smallest you have). Turn on heat to medium-low. After 2-3 minutes, add basil leaves. Cook for 2 minutes.

Into a food processor, add beans, infused oil mixture (including zest garlic and basil), tahini, 1 tablespoon fresh lemon juice, dried basil, and reserved bean liquid. Pulse until smooth. Add salt and pepper to taste (I added 1/2 tsp pepper and 3/4 tsp salt). Pulse until smooth.

When tomatoes are finished, allow to cool. Assemble sandwiches by cutting each pita in half and gently pulling open the pocket of each half. Spread 1/4 cup of white bean spread into each half. Evenly divided cherry tomatoes and spinach leave between pockets.

*if using store bough bean spread or hummus, you’ll need 1 cup for 2 sandwiches (4 half sandwiches)

**if possible, make tomatoes and bean spread in advance and refrigerate. This allows the flavors to fully incorporate and develop.

Best of Basic: Oven-Roasted Cherry Tomatoes

Best of Basic: Oven-Roasted Cherry Tomatoes

DSC_0205

Every so often, when I’m feeling a little sluggish, or feeling like I’ve been particularly indulgent lately, I like to reset my routine and get back on track. This detox, as I like to call it, could last for a couple days, or if I’m feeling super motivated, a few weeks. With summer just around the corner, I thought it a good idea to do a lengthy detox to kick off swimsuit season… lose the bloat, gain some energy, reset my metabolism and maybe even shed a few pounds. Sounds great, right? You might be thinking “no, that does not sound great”, but I honestly love my detoxes because not only do they make me feel amazing but they’re also quite fun and delicious, when you do it my way.

DSC_0182
Even when I’m detoxing, I refuse to sacrifice flavor or give up on my favorite foods entirely. I hate eating just for the sake of eating. I like to always enjoy and feel good about what I’m eating. So I find creative ways to make detoxing enjoyable. And these roasted cherry tomatoes are a great example of how I add flavor and interest in a light and healthy way. Roasted tomatoes are delicious in salads, on sandwiches, and in pasta, but are equally as yummy when used as a simple side dish to meat, tofu, or fish. I could seriously eat the entire batch in one sitting with only a spoon.

DSC_0186
Roasting tomatoes is super simple because I keep it very basic. There’s simply no need to make it implicated here. Just add a little bit of quality olive oil, some garlic, sea salt, and black pepper to the halved tomatoes, and then roast for 30-40 minutes. Perfection. Roasting brings out the natural sweetness of the tomatoes and makes them super soft and juicy. They are the perfect way to add moisture and intense flavor without adding excess fat or dairy.

DSC_0189
This batch of Roasted Cherry Tomatoes is for stuffing into pita pockets along with flavorful white bean dip and fresh spinach. This pita sandwich is simple, light, balanced, and will make a perfectly detox-friendly lunch this week. And don’t worry, my upcoming posts will focus on daily detox meal plans and recipes, including this delicious sandwich. Stay tuned!


Oven-Roasted Cherry Tomatoes
Serves: 4   Start to Finish: 45 minutes

Ingredients

2 pints Cherry Tomatoes
4 cloves Garlic, crushed, peeled, roughly minced
1/2 tablespoon Olive Oil
1/2 teaspoon Sea Salt (plus more)
1/4 Black Pepper

To Make

Preheat oven to 375 degrees. Line a large baking sheet with parchment paper. Set aside.

Combine tomatoes, garlic, 1/2 teaspoon salt and pepper in a medium size bowl. Spread out onto a lined baking sheet in a single layer. Bake for 15 minutes. Remove from oven and toss, re-spreading tomatoes out into a single layer. Bake for an additional 20 minutes. Remove from oven. Allow to cool slightly, sprinkle with an additional 1/8-1/4 teaspoon salt and toss. Serve warm, cold or at room temperature.

*for simplicity’s sake, I often roast the tomatoes whole and also leave out the garlic and black pepper – cooking time for uncut cherry tomatoes will be slightly longer – bake until most of the tomatoes have bursted and the skins are browning – these tomatoes are super delicious with just olive oil and salt

Best of Basic: Avocado Toast

Best of Basic: Avocado Toast

DSC_0182

I was long distance chatting with my mom the other day, and because our conversations often revolve around food, she was raving about an avocado toast she recently had for lunch at a cafe in my hometown, St. Louis. She then proceeded to ask how to make Avocado Toast. I could feel my face twist up as I thought, “It’s pretty self explanatory, no?” But before saying anything out loud, I quickly realized that, to her point, there’s a difference between smashed avocado slathered on any old slice of bread and a real Avocado Toast. So my mom wants to know how to make the best version of a real Avocado Toast? Challenge accepted. Continue reading “Best of Basic: Avocado Toast”

Greek Style 7-Layer Dip

Greek Style 7-Layer Dip

DSC_0219

House warming party success! Matt and I had such a blast last weekend breaking in our new apartment with all of our New York  friends and quite a few cocktails. Although the party didn’t get started until 9:30pm or so, I still wanted a solid supply of delicious apps and snacks around to satisfy the inevitable munchies. And because I’m fearless, I whipped up two main appetizers that I’d never attempted before, except in my imagination’s kitchen of course. Continue reading “Greek Style 7-Layer Dip”

Lighten Up: Creamy Blue Cheese Dressing

Lighten Up: Creamy Blue Cheese Dressing

DSC_0166

Crudités platters are often seen as the boring but required member of any party’s munchies spread. But that’s not at all how I see a good old veggie platter. In fact, I’m the girl at the party who heads immediately to the crudités platter. I’m not the girl that makes a plate of raw carrots and cherry tomatoes and considers herself full. I’m the girl who just stands there, dipping veggie after veggie into whatever creamy dip sits in the center of the platter. That is until I realize I’ve eaten about a pound of mayo. But then I dismiss that thought, telling myself that I burned 600 calories crunching and munching my way through the stacks of bell pepper, snap peas, and celery.

This love of fresh crudités and creamy dip is not just reserved for parties. I actually find myself craving sliced veggies and some kind of creamy, decadent dip, like Green Goddess or classic Ranch, on a regular basis. Lately, my dip of choice has been a lightened-up version of one of my faves, Blue Cheese Dip. And that’s the recipe I’m sharing today, my own special recipe for a creamy, dreamy (lightened up) Blue Cheese Dip.

DSC_0168
When it comes to healthy eating, I believe in balance and moderation. Because of that, the base of my dressing is equal parts low-fat, plain Greek yogurt and organic mayonnaise. This combo cuts the fat without losing the indulgent flavor I love. If you so please, cut out the mayo even further, or entirely, for an extra light and healthy dressing. Next comes red wine vinegar, some simple seasonings, and, of course, crumbled blue cheese. That’s it! Simple, delicious, versatile.

I use this blue cheese dip (dressing, sauce, etc) in countless ways, not just as a companion for fresh veggie sticks or chilled roasted veggies. I’ve also used my blue cheese dip with my easy buffalo falafel patties, as a spread on a veggie burger and as a dressing on chopped salads or coleslaw. I just love this dressing.

Lightened Up Creamy Blue Cheese Dressing
Serves: Start to Finish: 5-10 minutes

Ingredients
12 ounces combined whole milk yogurt (greek or traditional) mayonnaise and/or sour cream*
1 tablespoon vinegar, red wine or white wine vinegar both work
1/2 teaspoon each fine-grain sea salt, freshly cracked black pepper and garlic powder (or garlic granules)
1+ tablespoon milk or water (optional, + more to consistency)
6 ounces blue cheese crumbles

To Make

In a small-medium bowl, combine all ingredients and mix well. I like to use an immersion blender to create a smoother texture. Serve chilled as a dip, dressing or spread.

*I like the richness and thickness of this recipe because it works on everything from salads, as a spread on sandwiches, and as a dip for veggies, wings, etc. For a thinner consistency, add water or milk, a little at a time. If using traditional yogurt, the consistency will be thinner without needing water/milk. If using greek yogurt, mayo or sour cream, water/milk is likely needed to create desired consistency.

**I most often use only plain, full-fat yogurt for this. However, any combination of yogurt, mayo and sour cream for a total of 1.5 cups will work. My second favorite combo would be 6 ounces yogurt combined with 6 ounces mayonnaise.

Vegan ‘Shroom & Barley Soup

Vegan ‘Shroom & Barley Soup

DSC_0200

It’s April. Not a month typically viewed as stick-to-your-bones-soup-worthy. But I am once again reminded that my black and white vision of what the weather should look like during each month is totally irrelevant. Mother Nature does what she wants, and although she had the whole month of March to transition to true Spring, it’s still winter . You see, I can be patient with cold weather in March. But 40 degrees in April is just plain UGH.

However, instead of dwelling on my disappointment and unwavering desire to wear a skirt without tights, I decided to use this annoying down-coat-weather as a reason to make one last batch of hot and hearty cold-weather soup. What kind of soup? Something stick to your ribs, totally satisfying, and 100% healthy. Almost as fast as the idea for soup materialized, the thought of a vegan Mushroom & Barley Soup came to mind immediately. Back in the day, I loved eating my mom’s Beef & Barley Soup, and nostalgia typically drives many of my ideas. So my inkling to make a rich and flavorful batch of my mom’s soup (minus the meat) comes as no surprise.

DSC_0193

Soups are generally pretty simple. Especially when using store-bought broth. This soup is just that: simple. Sautéed vegetables, organic veggie broth, fresh thyme and barley. That’s about it. I use thyme here because I love the flavor of mushrooms and thyme together, and because I find that the combination adds richness and substance that would normally come from the beef. To add even more heartiness and substance, at the very end of cooking I add a cornstarch slurry, which thickens the soup beautifully.

My Mushroom & Barley Soup is definitely one to keep in the recipe box. It is not only super healthy, packed with fresh vegetables, whole grains, and fiber, but it’s also vegan-friendly and oh so yummy. For dinner on Sunday, I made grilled Swiss cheese sandwiches to go alongside the soup, and for lunch leftovers I ate the soup with a couple hunks of bakery-fresh whole wheat peasant bread that perfect for dipping and soaking. Delicious. This soup is just plain awesome. So I guess I’d like to end this post by thanking Mother Nature for giving me the opportunity to create this recipe. But I’d still really like some 60 degree days in the very near future, ok?

Vegan Mushroom Barley Soup
Serves: 4-6   Start to Finish: 90 min.

Ingredients
1/4 cup Olive Oil
2 large Carrots, peeled and cut into medium dice
1 large Onion, medium to small dice
2 large stalks Celery, cut into medium dice
1 Red Bell Pepper, cut into medium dice
4 cloves Garlic, peeled and minced
Salt
Pepper
1/2 lb Portobello Caps, cut into medium-large dice
10 ounces White Button Mushrooms, cut into medium-large dice
2 tablespoons fresh chopped Thyme leaves, divided
4 cups Organic Veggie Stock
1 cup dry Barley
2 tablespoons Corn Starch + 1/3 cup Water
3 teaspoons Frank’s Red Hot Sauce (or preferred brand added to taste)

To Make

Prep and chop all veggies. I like the veggies big enough to see and taste, but cut to any size you prefer.

Heat oil over medium heat in a large pot. Add celery, carrots, onion, and red pepper to oil. Toss to coat. Cook for 5 minutes. Add garlic to pot, toss to combine. Season with salt and pepper (I used 1/2 teaspoon of each). Cook for 5 minutes.badd mushrooms. Cook for 5 minutes. Add 1 tablespoon thyme and season with salt (I used 1/2 teaspoon). Cook for 2 minutes. Add veggie stock and dry barley to pot. Turn heat to high and bring to boil. Once boiling, reduce heat to medium-low and cover. Simmer until barley is cooked, 45-60 minutes.

With a couple minutes to go, mix 2 tablespoons cornstarch with 1/3 cup cold water. When barley is fully cooked, add the cornstarch “slurry” mixture to pot. Add remaining tablespoon thyme and an additional 1/2 cup water (or more depending on desired consistency). Bring to boil and cook for 1-2 minutes until soup is thickened from cornstarch. Turn off heat. Salt to taste (I added 1/2 teaspoon) and add hot sauce. Note that the hot sauce adds a much need cut of vinegar, it does not make it spicy unless you add more than I did.

The soup is now ready to eat. Continue adding water if desired, to maintain ideal consistency. I like it super thick so I didn’t add any additional water.