Summer Veggie Grain Bowls with Classic Lemon Hummus

Summer Veggie Grain Bowls with Classic Lemon Hummus

IMG_0050.JPG
Yep, this my third grain bowl post this month. Why? Two reasons. First is because I love nourishing bowls of goodness, packed with an array of nutrients, flavors and textures. It’s my favorite way to eat because it’s healthy, convenient, packable, stores well in the fridge and, most importantly, absolutely delish. If you want to make a crave worthy nourish-style bowl, it’s not quite as easy as piling veggies, grains and protein into a bowl. My kind of nourish bowl (aka Buddha Bowl or Grain Bowl) has depth, richness and variety. It takes advantage of seasonal produce, flavor-bombs like garlic and citrus, and requires a tasty sauce or spread to pull it all together. This takes a little bit of time and planning, but it’s worth it. And once all of the components are ready, they’re easy to throw together.

The second reason why I’m focusing on grain bowls is because they’re all the rage these days. Everywhere from fast casual restaurants to fine dining establishments are jumping on the nourish bowl bandwagon. It’s a trend for sure, and food trends, specifically health-supportive ones, are my jam.

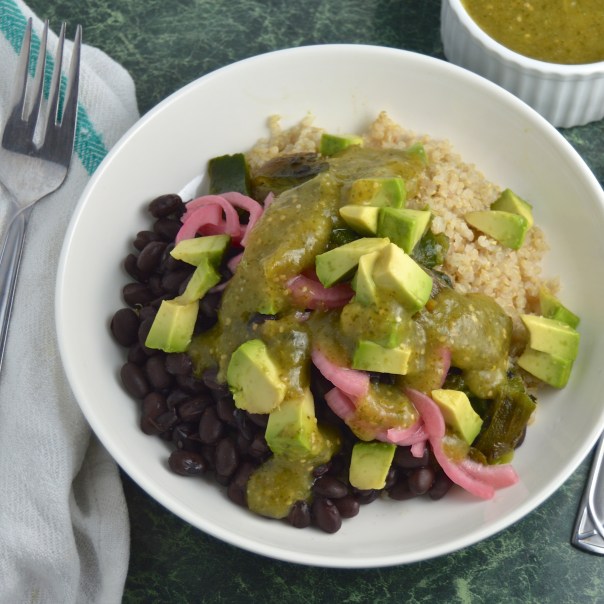
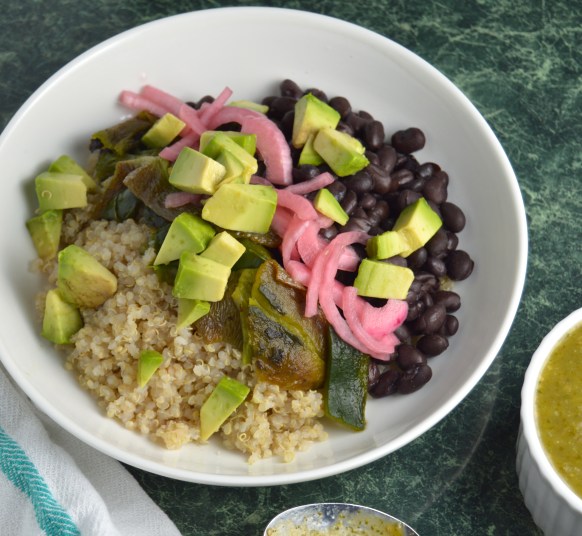
So there you have it. One more inspirational nourish bowl to get your creative juices and health vibes flowing. And if you missed the last two, check them out below.

Burrito Nourish Bowls with Roasted Peppers & Tomatillo Sauce

Cauliflower Satay Nourish Bowl

IMG_0047.jpg
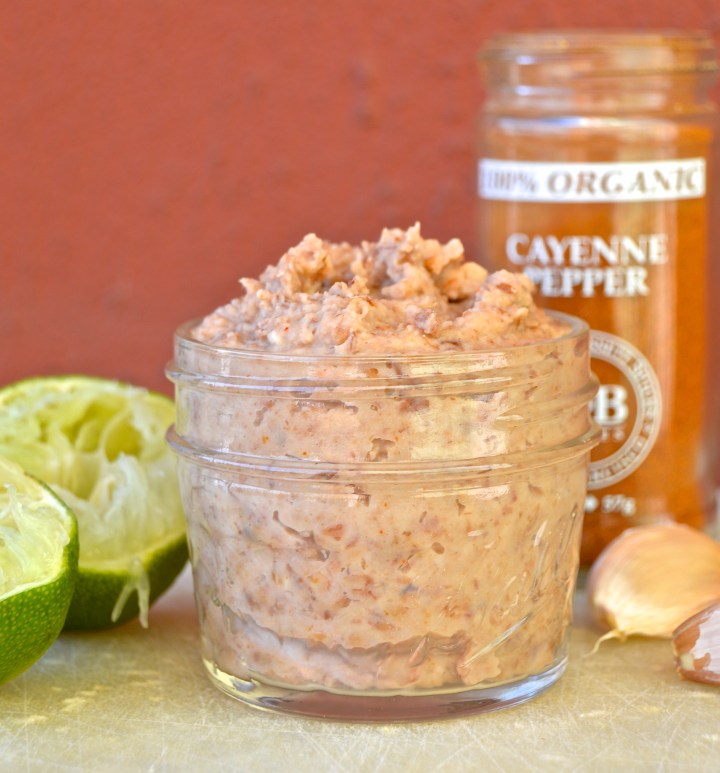
Roasted Summer Veggie Nourish Bowl with Classic Hummus
Serves: 4    Start to Finish: 1 hour    Active Time: 30 minutes

Ingredients

For Veggies & Rice

1.5 cups dry brown rice
sea salt, fine grain
2 large zucchinis, cut into a large dice
olive oil
3 large cloves garlic, minced (2 for zucchini, 1 for hummus)
1 pint cherry tomatoes
2 orange bell peppers (red and yellow bell peppers work too)

For Hummus (use storebought if desired)
1 14-oz can chickpeas
3 tablespoons tahini
2 tablespoons fresh lemon juice
1 tablespoon olive oil
3/4 teaspoons sea salt, fine grain
1/2 teaspoon cumin
1/4 teaspoon black pepper

For Assembly

4 cups lightly packed greens (I used red leaf lettuce)
2 teaspoons red wine vinegar (lemon juice works too)
1 red onion, quartered and thinly sliced
3 tablespoons pine nuts, lightly toasted

To Make

Preheat oven to 400 degrees.

Cook 1.5 cups brown rice to package instructions – it goes something like this – rinse rice in colander, add to small sauce pan with 3/4 teaspoon sea salt and 3 cups water. Bring to boil, reduce to simmer, cover with lid. Allow to cook for 35-40 minutes, until water is mostly absorbed. Remove from heat and allow to steam, covered, for 10 minutes.

Toss zucchini cubes with 3/4 teaspoons salt, 2 cloves chopped garlic and 1 tablespoon olive oil. Transfer to a parchment lined baking sheet in a single layer. Toss tomatoes with 2 teaspoons olive oil and 1/4 teaspoon salt. Transfer to baking sheet with zucchini. Cook cherry tomatoes for 20 minutes. Cook zucchini for 30-35 minutes, flipping once through.

Roast the bell peppers. I like to do this over the open flames on my burner, which takes about 8 minutes and another 10 minutes in a sealed paper paper bag or covered bowl. This allows the peppers to steam and makes the charred skins easily peel off. Once charred skin is removed, discard stem and seeds, cut into a large dice. You can also roast the peppers in the over with the other veggies. To do this, remove stem and seeds, dice bell peppers, toss with a little oil and roast for about 25 minutes.

Meanwhile, make hummus. Combine all hummus ingredients plus 5-6 tablespoons water in a food processor or in a hand blender vessel. Use the water to achieve your desired consistency.

To assemble nourish bowls – toss greens with vinegar, sliced red onions and 1/4 teaspoon sea salt. Divide evenly between 4 dishes. Top each bowl with 3/4 cup cooked rice, 1/4 of all roasted vegetables and 3-4 tablespoons hummus. Garnish each serving with 2 teaspoons toasted pine nuts.

Loaded Italian Pasta Salad

Loaded Italian Pasta Salad

IMG_9036.jpg
Is it possible that June is already coming to an end? Fine by me, because I’ll be spending the first days of July on vacation. A glorious 10 day vaca in a remote area of Lake Huron in Ontario, Canada, it’s pretty much my favorite place on earth. You see, my extended family owns a modest island, smack dab in the middle of the wilderness, and it can only be described as rustic, comfortable, and totally epic. We sleep in sleeping bags and spend 80% of the day without electricity. We spend our days on the lake and evenings by the fire. And the breeze coming off the water at night, while falling asleep in the open air cabins, is pure magic.

This year, I’ll be heading up a bit earlier than usual and spending the first week of July on the island with my parents. But that means, I’ll be missing America’s birthday. I first want to say that I’m not trying to make a political statement here. Although I’d be lying if I said moving out of Trump country hasn’t crossed my mind. But I love the States, and because I’ll be missing one of the best celebrations of summer, I wanted to share a perfect (and easy) recipe for a BBQ-must-have… Loaded Italian Pasta Salad.

IMG_9040.jpg
I actually developed this recipe a couple weekends ago when I was visiting my hometown, St. Louis. While everyone else enjoyed this delish pasta salad alongside turkey burgers, I instead, topped it with a medley of grilled veggies, making it a scrumptious main dish for a meat-free eater. Added bonus, this salad can be made gluten-free (using a gluten-free pasta) or made vegan (by omitting the fresh mozzarella balls). Finicky foodies rejoice!

IMG_9042.jpg
Other than being diet-restriction friendly, this “best of basic” pasta salad is amazing for two reasons. Firstly because it’s a cinch to make. In the time it takes to cook the pasta, the remainder of the ingredients are ready to go. Then all that’s left is a chill session in the fridge to bring everything together. The second reason is because this pasta salad is packed with fresh flavor from basil leaves and cherry tomatoes, texture from al dente pasta, beans and artichokes, and health supportive because of protein, fiber, vitamins and healthy fats. Finally, the simple vinaigrette, flavored with oregano, dry mustard and garlic powder, brings it all home by adding even more flavor and richness. This pasta salad is seriously perfect. So if you’re looking for a clean, balanced and crowd-pleasing pasta salad to be your go-to summer side dish, look no further. This is it.

IMG_9057.JPG
loads of roasted veggies + pasta salad side dish = delish main meal

Loaded Italian Pasta Salad
Serves: 4 (main dish) to 8 (large side dish)   Start to Finish: 30 min + chilling time

Ingredients

1 lb (16 ounces) pasta of choice* (see below for notes)
1/3 cup extra virgin olive oil
1/3 cup red wine vinegar
1.5 teaspoons sea salt, fine grain
1.5 teaspoons dried oregano
2 teaspoons dijon or whole grain mustard
1/2 teaspoon garlic powder (or granulated garlic)
1/2 teaspoon black pepper
1 tablespoon maple syrup, or sweetener of choice
1 12-oz can white beans, drained and rinsed
1 12-oz can artichoke hearts, quartered
1 pint cherry tomatoes, halved or quartered (depending on size)
1 5-oz can sliced black olives
1 5-oz can pimentos
25 medium basil leaves, about 1 small package, chopped or cut into chiffonade
8-oz fresh mozzarella, bite-size, optional

To Make

Bring 5 quarts of water to a boil. Add 1 teaspoon salt and pasta. Cook until al dente. I usually drain the pasta about 1-3 minutes earlier than package instructions say to cook. The best way to know? Try 2-3 noodles. When some noodles are cooked and some noodles seem under-cooked, they’re ready. After the pasta sits in the dressing, the underdone noodles will finish cooking. Avoid over cooking noodles, they will far apart after marinading.

While water boils and pasta cooks. Prepare dressing. In a blender, or using a hand blender, combine ingredients olive oil through maple syrup. Blend until fully emulsified. Set aside.

In a large bowl, combine ingredients white beans through pimentos.  Toss with cooked/drained pasta (still hot) and prepped vinaigrette. Allow to cool down to room temp (about 10 minutes). Toss mozzarella and basil with pasta salad. Cover and refrigerate for at least 1 hour or until fully chilled. However, the longer it sits, the better it gets. Make 1 day ahead if possible.

Pasta Options
– As for shape, penne, fusilli and bowtie are my top choices – I used penne here

IMG_9023.jpg

Vegan Burrito Nourish Bowls with Roasted Peppers & Tomatillo Sauce

Vegan Burrito Nourish Bowls with Roasted Peppers & Tomatillo Sauce

Burrito Nourish Bowl for FB.jpg
As I was saying in my last post, my focus these days is making healthy and clean eating easy for everyone. Whether trying to lose weight or just wanting to take advantage of the amazing health benefits that come with clean eating, the transition simply won’t happen unless it’s both convenient and delicious. This is where meal prep comes in. Having prepped ingredients in your fridge/pantry and knowing what to do with them will make your new clean eating lifestyle effortless.

DSC_0411.JPG

Last week I used my Cauliflower Satay Nourish Bowl as the perfect example of this concept. Cooked quinoa, roasted cauliflower, simple pickled red onions, avocado and peanut sauce come together to make a plant-based, satisfying and tasty meal. It’s packable for lunch on-the-go. Or easy to throw together for a quick dinner, as long as the components were easy-to-prep or pre-prepped. As promised, I’m sharing another recipe that uses a few of the same ingredients. This is meant to show you how versatile these basic components are to transform into completely new meals, keeping things fresh and interesting.

DSC_0435.JPG
For this super yummy (and vegan) burrito bowl, I’m using quinoa, pickled onions and avocado, just like in the Satay Nourish Bowl. But this time, I’m using roasted peppers instead of cauliflower, some canned black beans and my easy roasted tomatillo sauce to make a totally new and super delish meal. The key to plant-based, dairy-free and meat-free cooking is including multiple flavors and textures. Creamy avocado, refreshing tomatillo sauce, acidic pickled red onions, flavorful peppers and hearty black beans keep your tastebuds satisfied while providing your body with protein, fiber, healthy fats, vitamins, minerals and antioxidants.

DSC_0414.JPG

Now, for today’s health and nutrition lesson focusing on a toxic compound known as BPA and how to avoid it…

Black Beans are a great source of meat-free protein, fiber, copper, folate, manganese and phosphorus. I love beans because they make reaching protein intake goals easy, even when not consuming animal products. Plus, adding the starchy texture of black beans makes meals texturally satisfying. When using beans from a can, which I do almost exclusively, I recommend choosing an organic variety. Additionally, when choosing any canned products, be sure the lining is made without BPA (Bisphenol A). Why? Because BPA is a synthetic compound that has been shown to disrupt the human endocrine system (aka the system of ALL human glands and the hormones these glands produce). Sadly, BPA is everywhere these days (even in cash register receipts). It’s virtually impossible to avoid completely, but because BPA builds up in your system and can last for generations, it’s important to avoid it as much as possible. Intake of BPA through eating and drinking is likely the biggest culprit, and cooking for yourself using BPA-free products is a great way to reduce your risk of side effects. Yet another reason why cooking for yourself is so beneficial.

Burrito Nourish Bowl.jpg

Burrito Nourish Bowl with Roasted Peppers & Tomatillo Sauce
Serves: 4   Start to Finish: 50 minutes

Ingredients

1 small-medium red onion, peeled and thinly sliced
1/3+ cup red wine vinegar
1 cup dry quinoa
3-4 peppers, I like 4 poblano for spice or 3 red bell peppers for sweet or mixed
sea salt, fine grain
olive oil
1 lb tomatillos
1 large clove garlic, peeled
2 packed tablespoons cilantro leaves (plus more for garnish, optional)
2 cans black beans, drained and rinsed (organic preferred)
1-2 teaspoons hot sauce
2 avocados, diced or sliced

To Make

**If you don’t have the time or the desire to make your own tomatillo sauce, no problem! Use a store bought Salsa Verde. Check the ingredient list to make sure all ingredients sound whole and appetizing. Even better? Go for organic.

Preheat oven to 400 degrees.

Make pickled red onion (get the full recipe here). In a small bowl, combine 1 thinly sliced red onion, 1/3 cup vinegar, 1/3 cup water and 3/4 teaspoons sea salt. Mix until salt is dissolved. Add 1 thinly sliced red onion. Toss to coat. Add additional vinegar and water, in equal amounts, to cover onions (you shouldn’t need much). Allow to sit for at least 20 minutes. Or make ahead…I always have pickled red onion ready to go in the fridge. The longer they sit, the better they get.

Roast peppers. Remove stem and seeds from peppers and cut into strips. Toss with 1 tablespoon olive oil and 1/2 teaspoon salt. Roast at 400 degrees for about 20-30 minutes, tossing once. You could also roast whole peppers over an open flame, steam in sealed paper bag for 10 minutes. Remove charred skin, seeds and stem, and then cut into strips.

Also roast whole tomatillos at 400 degrees for 15 minutes, toss, roast for another 15-20.
Blend with 3/4 teaspoons salt, 1 clove garlic and 2 packed tablespoons of cilantro (2 handfuls). Add additional salt to taste.

Meanwhile, cook quinoa. Add 1 cup dry quinoa, 2 cups water and 3/4 teaspoons salt to a medium sauce pan. Bring to boil, uncovered. Once boiling, reduce heat to simmer and cover with lid. Simmer for 14-15 minutes, until excess water is mostly absorbed. Remove from heat and allow to sit, still covered, for 10-15 minutes.

Combine black beans with 3/4 teaspoon salt and hot sauce to taste (I used about 2 teaspoons for 2 cans). Heat on stove top or in microwave I f desired.

To make each bowl, layer 1/4 of cooked quinoa (about 2/3 cup), 2/3 to 1 cup of black beans, 1/4 of the roasted peppers, 3-4 tablespoons pickled red onions (plus pickling liquid to taste), 1/2 of a sliced/diced avocado and 3 tablespoons tomatillo sauce.

BPA References

Grain-Free Cauliflower Fried “Rice”

Grain-Free Cauliflower Fried “Rice”

Cauliflower Fried -Rice- (2).jpg

As I practice more and more with healthful, diet-restriction-friendly recipes (you know – vegan, gluten free, paleo, etc.), I find more and more ways to use cauliflower. From cauliflower “steaks” to cauliflower “rice,” the possibilities are seriously endless. A healthy, grain-free version of fried rice is one of my latest projects. Grated cauliflower, diced carrots, yellow onions and chopped red bell peppers make up the bulk of this dish. Then I add flavor with organic, cage-free eggs, a simple tamari-based sauce and a garnish of fresh scallions. For a genuine paleo/whole30 version, simply use coconut aminos instead of tamari. But for me, an organic soy-based tamari does the job perfectly.

DSC_0441.JPG

When I think about it, many of the recipes I make are inspired by takeout and delivery classics, and this dish is the perfect example.  Making your own “takeout” at home is much healthier than ordering out, and cheaper too. But for people who have dietary restrictions, it’s sometimes the only option to be able to enjoy favorite foods and cuisines. A grain-free/gluten-free lifestyle is the driving force behind this dish, but it also qualifies as vegetarian, dairy-free and, if using coconut aminos instead of tamari, paleo-friendly. Serve with a selection of proteins like grilled chicken, vegetables, tofu or steak, and you’ve got a meal that’s customizable enough (and delicious enough) to please a crowd.

DSC_0435.JPG
Now, let’s go over a couple of my favorite health-supportive benefits of this recipe’s star, cauliflower.

Cauliflower is a cruciferous vegetable, and one of my all-time favorite vegetables, mostly because it’s super versatile. Cruciferous vegetables (like cauliflower, broccoli, turnips, kale and arugula) contain glucosinolates, a chemical that contains sulfur. When broken down during digestion, glucosinolates turn into compounds associated with anti-cancer effects. Cauliflower is also a great source of fiber, aiding in digestion, and also a great source of Vitamins K & C. Cauliflower is high in several powerful antioxidants, which are essential in providing adequate defense to your cells, which is believed to help your body in fighting off illnesses such as cancer.

Enjoy!

Cauliflower Fried -Rice- for Pinterest (2).jpg

Grain-Free Cauliflower Fried “Rice”
Serves: 2 (main) or 4 (side dish)   Start to Finish: 25 minutes

Ingredients

1 large carrot, peeled and diced
1 red bell pepper, seeded and diced
1/2 medium yellow onion, diced
2 cloves garlic, peeled and minced
2 tablespoons canola or coconut oil (organic preferred), divided
4 cups raw cauliflower rice*
1 teaspoon dried ginger
1.5 teaspoons sea salt, fine grain, divided
2 tablespoons tamari (use coconut aminos instead for paleo/whole30 version)
2 eggs (cage-free, organic preferred)
chopped scallions, garnish (1-2 scallions is enough)

To Make

Note: You may want to use a non-stick skillet or wok for this recipe. My stainless steel pan worked well for this recipe with no sticking/burning issues, but a non-stick skillet will be more fool-proof.

Prep carrots, peppers, onion and garlic. Using a box grater or food processor, grate large cauliflower florets into cauliflower “rice.” Use the stem portion of the florets too.

Crack eggs into a bowl and scramble with a fork. Set aside.

Heat 1.5 tablespoons oil in a large skillet over medium-high heat. Add carrots, peppers, onions, garlic and 1 teaspoon sea salt to pan. Cook for 5-6 minutes, until vegetables have softened and released liquid. Add grated cauliflower and ginger to pan. Cook for another 3-5 minutes, stirring frequently, until moisture from cauliflower is released and evaporated.

Add tamari (or coconut aminos) to pan, toss to coat, and cook for about 2 minutes, until excess moisture is removed. Push cauliflower aside and add remaining oil to open space in pan. Add scrambled eggs to oil. Frequently use a spoon to cut through liquified eggs in order to rotate uncooked eggs into the heat. Just as the egg solidifies (after about a minute), mix the cauliflower mixture into the eggs. Season with sea salt to taste (I added an additional 1/2 teaspoon) and cook for 1-2 minutes, until excess moisture is gone.

Garnish with scallions, serve immediately.

*1 head of caulifower is plenty for this recipe. You can also purchase pre-riced cauliflower in the freezer and/or produce section of many supermarkets.

Sources
Benefits of Cauliflower