
Tag: Vegetarian Food
Buffalo Cauliflower & Brown Rice Bowls (vegan optional)

There are oh so many ways to enjoy my stellar recipe for a major food trend, Buffalo Cauliflower “Wings”. This post highlights one of my fave recipes using vegan buffalo wings, in the form of a nourish bowl. Casual yet creative, tasty yet nutritious. This recipe is simply perfect.

The idea for a brown rice bowl topped with buffalo wings was inspired by a popular fast-casual restaurant in my hometown of St. Louis called Crazy Bowls and Wraps. CBW, as St. Louis-ans like to call it, has been around forever, even before healthy fast-casual joints became a thing. CBW offers customizable rice bowls, salads and wraps with all kinds of creative fillings and options. One of my absolute favorites is the buffalo fried tofu, so it wasn’t hard to come up with the idea for a buffalo cauliflower brown rice bowl.
I love the idea of layered bowls when serving a crowd. It makes it easy for each person to get exactly what they want. Plus, bowls like this are easy to eat. But I don’t need company to make bowls like this. In fact, last night for dinner I made Mexican rice bowls with roasted potatoes and peppers, cabbage, shredded cheddar and marinated tomatoes. When it comes to “bowls”, the possibilities are endless. Whenever I don’t know what to make, I start with a starch like rice or orzo pasta and simply add toppings according to a theme (Mexican, Greek, Italian, Asian etc.). That’s actually a really good tip if you’re ever struggling with what to cook. I use it all them time.

If you’re new to rice bowls, this is a great one to start with. The spicy, crispy cauliflower compliments the fresh veggies and creamy sauce perfectly. It feels so indulgent, but it’s really very balanced. And it’s also a lot easier than it sounds. These bowls are seriously so yummy and I highly recommend trying them out, STAT. I know I can’t wait to make them again.
Buffalo Brown Rice Bowls
Serves: 4 Start to Finish: 1 hour 15 min
Ingredients
1 batch Buffalo Cauliflower (get recipe here)
1 cup Brown Rice
Sea Salt
8-10 ounces chopped Romaine Lettuce
10 ounces Cherry Tomatoes
2 large Carrots, peeled and trimmed
1 cup Dressing (get my creamy blue cheese dressing here or use the vegan recipe below)
Creamy Vegan Dressing
1 cup Vegan Mayonnaise (I like Follow Your Heart brand)
2 teaspoons Red Wine Vinegar
2 tablespoons unsweetened non-dairy milk or water (+ more to consistency)
3/4 teaspoon Garlic Powder
3/4 teaspoon Onion Powder
1/2 teaspoon Salt
1/2 teaspoon Black Pepper
1/2 teaspoon Dried Parsley
To Make
Make rice. Add 1 cup brown rice, 2 1/4 cups water and 1/2 teaspoon sea salt into a medium sauce pan. Bring to boil, reduce heat to lower simmer, cover. Simmer for 35-40 minutes. Remove from heat when all water is absorbed, allow to sit, still covered, until ready to assemble bowls.
While rice simmers, preheat oven to 450 degrees and get the Buffalo Cauliflower “Wings” started (get recipe here).
While cauliflower bakes, make dressing by combining all ingredients for vegan dressing (ingredients above) or make my yummy blue cheese dressing (get recipe here). Set aside.
Prep veggies. Wash & chop lettuce. Cut cherry tomatoes in half. Prep carrots as desired. I like making “carrot shavings” for salads. Use a vegetable peeler to peel off long strips of carrots, then run your knife through the strips to make shavings.
When cauliflower and rice are finished, assemble the bowls. Divide lettuce into 4 bowls. Top each bowl with brown rice, tomatoes, carrots, buffalo cauliflower “wings” and 2-4 tablespoons dressing.
Meatless Meal Plan: Car Camping for Two

Matt and I are really big on camping. And when I say that Matt and I are really big on camping, I really mean that Matt is a camping pro and I’m along for the ride. That’s not to say I don’t love it though. I actually grew up spending my summers glamping (glamourous, more comfortable camping) on my family’s island in Ontario, Canada. While it wasn’t totally “roughing it”, going to Canada definitely made me super comfortable in nature and without the comforts of civilization. The only electricity on our little island comes from a small generator, which is rarely on. To get to the nearest major grocery store takes hours, and the nearest convenience store is a 40 minute boat ride away. On the island, we spend our time reading, playing cards, hiking, fishing, cooking, eating, napping, crafting and exploring. We sleep on old beds in ancient screened-in cabins, perfect for star gazing as you fall asleep, and we spend mornings sitting around the campfire, looking out over the beautiful Canadian wilderness. Sounds magical, right? To me, it’s heaven. In fact, we’ll be heading to Rickey Island in just over a month. Can’t wait.

In addition to our trips to Rickey Island, Matt and I always find time to do a little camping on our own. We’ve hiked to camp, we’ve canoed to camp, and we’ve car-camped. Car camping is my personal favorite, because you can take more stuff and leave the food and valuables in the car. It just makes it a little more relaxing and a little easier, ideal for a short weekend camping trip. And that’s exactly what we did last weekend. Matt and I joined some of his University of Vermont friends and had a wonderful 36 hours hiking and chilling on the water. This campsite, called Black Bear Campground, was totally awesome. One of my favorite campgrounds so far. It’s located in Phoenicia, a small town near Woodstock, New York. There were beautiful hiking trails, a wide, flowing creek running along the edge of each campsite, and a couple resident black bears. Yes, we saw a black bear and her cub at Black Bear Campground. Isn’t it ironic? Don’t you think? (I hope everyone picked up on that song reference). After our morning hike, I spent most of Saturday on a chair overlooking the creek with a beer in my hand. It was just lovely. I even saw a group of fly fishers waddle through and one of them caught a fish right in front of me! So cool.

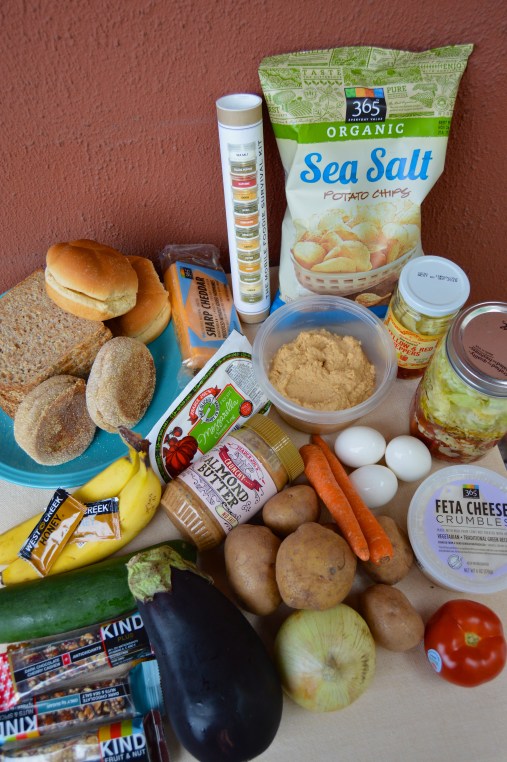
Anyway, being a whole foodie and cooking addict means that I’m not bringing just any old food supply. One of my favorite activities while camping is the food part! I like planning it, executing it, and most importantly, eating it. So what does a vegetarian whole-foodie bring camping that will satisfy both her and her carnivore boyfriend? Well that’s what this post is all about! Four meals and a few snacks that blend together the essential elements of camping food…simple, fun and satisfying. I’ve even included packing tips and essential utensils, to make prep even easier.


Matt and I didn’t arrive at the campsite until 11pm on Friday night, so we didn’t need to worry about Friday night dinner (we ordered pizza while packing up at home). Then for lunch on Sunday we headed to Woodstock for a sit down lunch. Basically this meal-plan covers all the food we needed for all of Saturday and Sunday morning (essentially one full day of camping, plus an extra breakfast before hitting the road on the second day). Use this as a guide and fill it in how you see fit…that could mean an extra dinner and lunch or maybe s’mores supplies for a classic camping dessert by the fire.


I hope my tips, tricks and pics inspire you to get outdoors, take advantage of summer and get a quick camping trip like ours on the calendar. 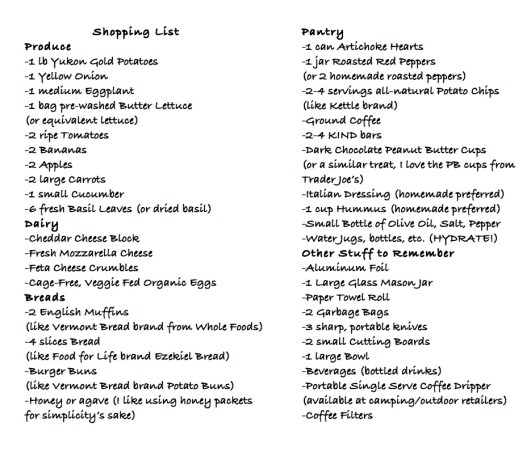
For Two Egg & Cheddar Breakfast Sandwiches and Home Fries
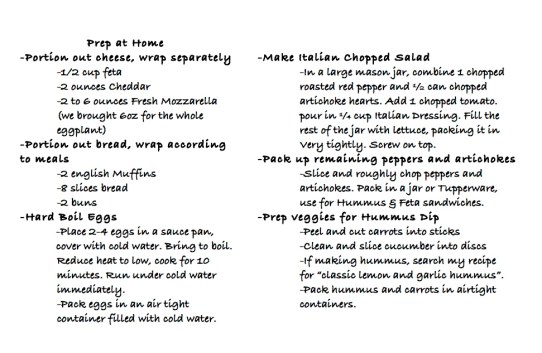
Cut potatoes and half the onion into a medium dice. Toss with a splash of olive oil, salt and pepper. Add a thin layer of olive oil to a skillet. Add potatoes and cook over camping stove or fire pit, stirring often to prevent burning. Honestly, ours got super crispy and a bit black/burned on the bottom but they still were amazing! You could also try cooking the potatoes in a foil packet over the camp fire. We didn’t want to start a fire because we were leaving after breakfast to hike, we used a camping pan and a portable flame.
Peel and slice 2 hard boiled eggs. Slice 2 ounces cheddar cheese. Use egg and cheese slices to make sandwiches on the English muffins. Season egg slices with cheese. You can griddle the sandwiches in a skillet/pan over a portable stove top or over a fire pit. Or wrap the sandwiches in foil and heat over the fire. Always be extra careful about burning food while camping, it happens easily.
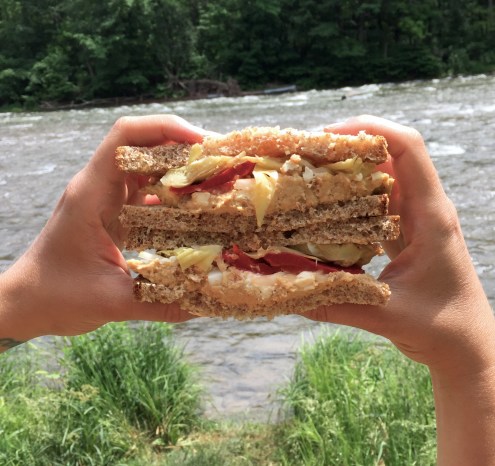
For Two Hummus Sandwiches
Spread about 1/4 cup of hummus onto 2 slices of bread. Top each slice with 1-2 ounces crumbled feta and the reserved roasted red peppers and artichoke hearts. Top each sandwich with a second slice of bread. Serve with all-natural potato chips.
For Eggplant Burgers and Chopped Salad
Slice eggplant width-wise into 1/2 slices. Sprinkle each slice with salt, allow to sit for 15-30 minutes to let the salt draw out the bitter liquid. Brush each side of each slice with olive oil. Season with pepper. Grill slices on a grate over the fire pit until soft and tender. On a BBQ it takes 3-5 minutes preside, over a fire pit the time will vary depending on the fire. When slices are almost cooked, top with 1 ounce slices fresh mozzarella cheese and allow to melt. Slice tomato. Stuff buns with 1 or 2 eggplant slices, a slice of tomato (seasoned with salt), and basil leaves (or a hefty seasoning of dried basil).
Dump mason jar filled with salad into a large bowl and toss. Serve with burgers.
I also bought a 1/3 lb beef patty for Matt. We grilled it with the eggplant and he topped his burger with both the patty and an eggplant slice.
For Almond Butter & Banana Sandwiches
Spread about 2 tablespoons of Almond Butter onto each of two slices bread. Drizzle with honey or agave (a little goes a long way. Slices bananas and layer over almond butter. Each open faced or top with another slice of bread. I prefer open face (less bread).

Rich & Creamy Vegan Vodka Sauce

Happy Friday, everyone!
If you read my last post sharing a delicious recipe for Eggplant & White Bean Veggie Balls, then you know that I served these delicious “meatballs” with a homemade Vegan Vodka Sauce. The sauce was so tasty that I just had to share the recipe. And just in time for the weekend, the best time to spend some relaxation time in the kitchen.
With everything I have going on in my life (work, blogging, yoga, social life, etc.), I’d be crazy not to take advantage of shortcuts when it comes to food and cooking. A tasty jar of red sauce (made with only natural ingredients, of course) is one of those shortcuts that I often take advantage of. But still, nothing compares to a homemade tomato sauce bursting with fresh Italian flavor. So when I have the time to make my own tomato sauce, I’m all over it.

When thinking about the sauce I wanted to make to go along with the veggie balls, I really wanted to experiment with a new homemade (and vegan-friendly) sauce. Vodka Sauce was an easy choice for Matt and me because we’ve been talking about making our own version of vodka sauce for some time now. Adding vodka to a freshly made tomato sauce was simple enough, because I’ve made red sauce a million times and I always have vodka in the freezer. The real question was how to achieve the richness, creaminess and beautiful pink color of a traditional vodka sauce…without using cream.

Let’s get something straight. I love real cream. On weekends, I always treat myself to iced coffee with a splash of half-and-half. And there’s nothing like a whipped cream frosting on a moist cake. But not for this recipe. Why not use cream? Well, not only do I like the challenge of omitting dairy from recipes, but I also like to keep some days and meals dairy-free for the health and ecological benefits. So for this sauce, I’m going cream-free.

To replace the rich cream, I decided to try a vegan cream made from raw cashews. Since I’ve never made cashew cream myself, I used a recipe from Beard & Bonnet as a guide. It was so simple, just soak the cashews and then grind them up with water, lemon juice and salt until a delectably smooth cream is formed. Easy enough. While the cashews soaked I made the red sauce and vodka portion of the sauce.

This sauce is classic. Fresh plum tomatoes, lots of garlic, yellow onion and a blend of dried Italian seasonings. Not so classic is my use of coconut oil, rather than olive oil or butter. I find that coconut oil has the richness of butter and creates the subtle sweetness that I love about vodka sauce, without adding dairy or sweetener. I love what the coconut oil does for this sauce, so although it may sound strange, it’s worth a try.

I hope everyone has a super Friday and lovely weekend! And if you feel like kicking Sunday dinner up a notch, why not try this amazing vegan vodka sauce.
Creamy Vegan Vodka Sauce
Serves: 4 Start to Finish: 2 hours (45 minutes active)Ingredients2 tablespoons Coconut Oil
4 cloves Garlic
1 yellow Onion
2 pounds Tomatoes (I used Organic Plum Tomatoes)
1 cup Water (plus more if necessary)
2 teaspoons Sea Salt*
1 teaspoon Dried Basil
1 teaspoon Dried Oregano
1 teaspoon Dried Thyme
1/2 teaspoon Black Pepper
1/4 teaspoon Crushed Red Pepper Flake
1/3-1/2 cup quality Vodka**
1/4-1/2 cup Cashew Cream (get Beard & Bonnet’s recipe here or my adaptation below)
To Make
Cut tomatoes and onions into a fine dice. Finely mince garlic.
Heat coconut oil and garlic over medium heat, allow garlic to sizzle for 1-2 minutes. Add onion. Cook onion and garlic for 6-8 minutes. Add tomatoes, water and seasoning. When liquid boils, reduce to simmer. Simmer covered for 90 minutes. You can leave the sauce with some texture or you can use a food processor or emulsion blender to get a smoother consistency (I like something in the middle so I use an emulsion blender to break it up a little bit).
To make vodka sauce, carefully mix vodka into the hot (or reheated) red sauce (or 2 1/2 or 3 cups of any red sauce). Add 1/2 cup vodka. Simmer uncovered for 10 minutes or until alcohol is cooked off. Remove from heat. Stir in 1/4 cup vegan cashew cream (see recipe below) or 1/4 cup dairy cream. You can add more or less cream depending on your taste.
*adjust salt according to personal taste
**i used 1/2 cup of vodka and I could definitely taste it, in a great way. 1/4 cup or 1/3 cup will work, just with a lighter vodka flavor. Your call!
Cashew Cream Recipe (adapted from Beard & Bonnet’s recipe)
1.5 cups raw, unsalted Cashews
1 1/4 cups water (more or less)*
1 tablespoon Lemon Juice (or half of a large lemon)
3/4 teaspoon salt (more or less)
Soak raw cashews in a bowl of filtered water for 1-4 hours. Add soaked cashews to a food processor or high powered blender. Add water salt and lemon juice. Blend until smooth.
I used a food processor and it took longer than I expected. I had to stop and hand stir/scrape the bowl a couple times. When in doubt, just keep blending.
*start with 3/4 cup water and add more as needed
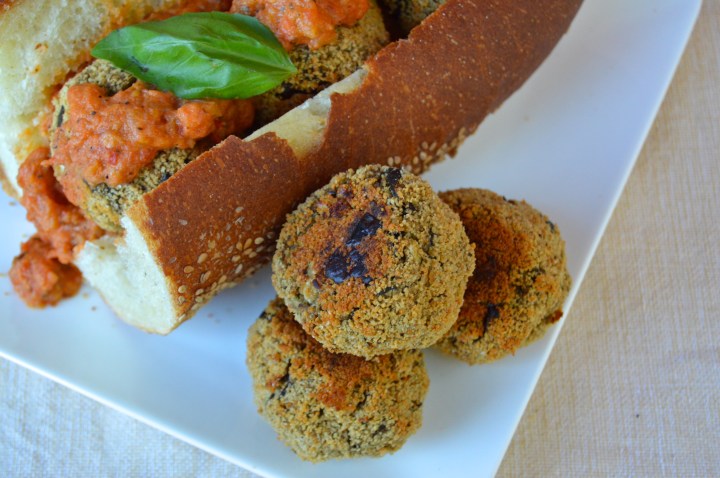
Vegan Eggplant & White Bean Veggie Balls

When I think of some of my favorite meals from my meat-eating days, classic Italian meatballs definitely top the list. Whether on a sub sandwich, over pasta or even on pizza (shout out to Dewey’s Pizza in STL), meatballs are the bomb.
Whenever my parents come to visit me in NYC, one of their go-to eateries is The Meatball Shop. It’s a favorite of mine as well, and I’ve been lucky enough to live within walking to two of their locations over the past five years. The concept of this trendy yet casual local chain of restaurants is actually really cool. Using dry erase markers, you choose what you want by “checking it off” on a laminated menu. You choose the type of ball (beef, pork etc) and the sauce (pesto, cream, tomato etc.) and then the preparation (hero, over pasta, alongside steamed spinach etc).

Whenever I say that I love The Meatball Shop, I’m undoubtedly asked how that is possible when I don’t eat meat. Easy answer. One of the ball options is a delicious veggie ball, and I like it best as either a hero sandwich or in “the kitchen sink” market plate form. No matter what preparation I choose, when choosing a sauce, I always go for the classic tomato sauce with a side of their silky parmesan cream sauce.

I think subconsciously the idea for a veggie ball hero with tomato cream sauce was inspired by my typical order at The Meatball Shop. And it was a delicious idea. I spent literally all of this past Sunday in the kitchen making my own veggie balls, vegan cashew cream and a homemade vodka sauce. I always love spending hours in the kitchen, but this particular meal turned out perfectly, so this was a long but particularly rewarding cooking sesh.
The recipe I’m sharing in this post is one of my favorite ways to make veggie balls, a Roasted Eggplant and White Bean Veggie Ball.
The inspiration for an eggplant-based veggie ball comes from Matt. A year or two ago, Matt made us a batch of roasted eggplant balls stuffed with fresh mozzarella, and they were so tasty. My variation uses the roasted eggplant and then I also added some white canellini beans for a protein boost and some hearty substance.

These meat-less meatballs are my favorite for a few reasons; they are super flavorful and yummy, they stay together and hold their shape, and they contain no eggs dairy making them vegan friendly.
But mostly I love them because of how delicious they are. The balls get their amazing flavor from sweet roasted eggplant, fresh basil, and lots of garlic. Other than all-natural whole wheat bread crumbs and some additional seasoning and a bit of olive oil, that’s all you need to create these fabulous balls. I recommend making a double batch and use them in different ways throughout the week. I should’ve made a double batch on Sunday because this batch was gone by Monday.

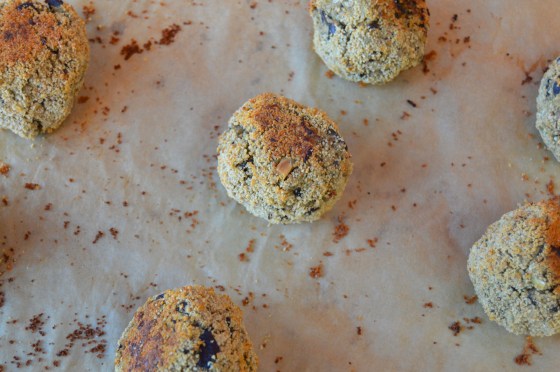
Roast Eggplant.

Add Beans, Garlic, Basil.

Mix, Mix, Mix.

Ready to Bake.
Italian Eggplant & White Bean Veggie Balls
Serves: 4 Start to Finish: 2 hours (20 min active time)
Ingredients
2 pounds Eggplant
1 tablespoon Olive Oil
Sea Salt*
1 can Canellini Beans, drained & rinsed
15 fresh Basil leaves
4 cloves Garlic, peeled and roughly chopped
1/2 cup Whole Wheat Bread Crumbs, divided (I like Whole Foods brand)
1 tablespoon Nutritional Yeast (optional)**
1/4 teaspoon Garlic Powder
1 teaspoon Olive Oil
To Make
Slice eggplant into 1″ discs. Cube each disc into 4-10 cubes, depending on disc size. Soak eggplant in a bowl of cold water for 45-90 minutes, tossing occasionally.
Preheat oven to 400 degrees.
Rinse eggplant cubes and drain in colander. Use a clean towel to remove excess moisture. Toss eggplant cubes with 1 tablespoon olive oil and 1 teaspoon salt. Bake at 400 degrees for about 40 minutes, tossing half way through cooking.
Reduce oven temperature to 375 degrees.
Allow eggplant to cool slightly. I put it in a the food processor with the top on for a few minutes to release some liquid. Combine eggplant, canellini beans, basil leaves, 4 cloves garlic and 1/2 teaspoon sea salt. Pulse until a smooth mixture begins to form, be sure to keep a little texture. Pour eggplant mixture into a bowl. Stir in 1/4 cup bread crumbs and 1 tablespoon nutritional yeast. In a small bowl, combine 1/4 cup bread crumbs, 1/4 teaspoon salt, 1/4 teaspoon garlic powder and 1 teaspoon olive oil. Form eggplant mixture into balls (I used a 1/4 cup measure for each). Toss each ball in the breadcrumb & oil mixture. Place coated balls on a parchment lined baking sheet. I got 9 balls out of this batch.
Bake balls at 375 degrees for 20-25 minutes. Turn heat up to 425 degrees and cook for another 25 minutes or until crisp and golden, flip half way through
*adjust salt according to personal taste
**if you choose not to use nutritional yeast, you may need to replace it with more bread crumbs
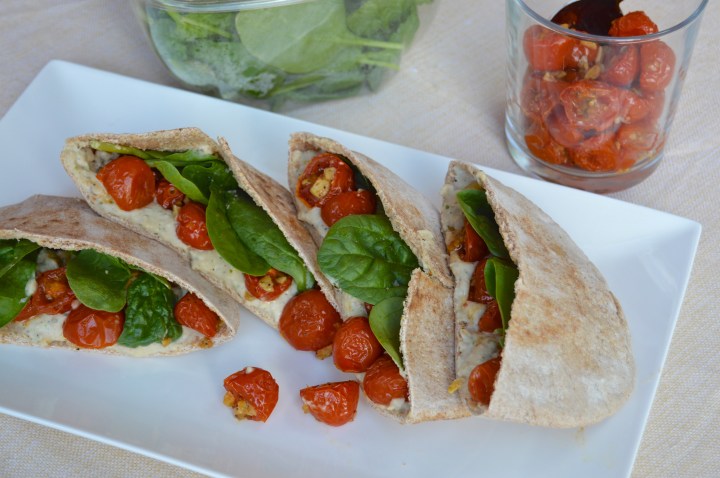
Roasted Tomato & Creamy White Bean Pita Sandwiches

It’s Day 3 of my “debloat and recharge detox” and I’m feeling good and staying motivated. My detoxes are easy in that I’m not seriously reducing calories or only eating cabbage soup. It’s more about portion controlling, loading up on veggies and fruits (even more than usual) and reducing excess fat, sugar and carbs. Because I pretty much always stick to high quality and whole ingredients, it’s mostly about portion controlling and some calorie counting.

I’m not big on calorie counting for a couple reasons. First is because I’ve spent so much time calorie counting throughout the years that I have a pretty good sense of roughly how many calories are in most foods, allowing me to be unconsciously aware of how much I’m eating. I also don’t like counting calories because I think it can take the fun out of eating a cooking. And lastly, I don’t like counting calories because I find it to be misleading in terms of choosing an unhealthy food over a healthy food just because they are equal in calories. With that said, when trying to trim down and debloat, I’ve found that it happens much faster if you’re staying within a low-to-moderate calorie range. So when detoxing I stay within a 1,500-1,900 calorie range, typically shooting for around 1,600. Obviously this varies by person, but I’ve found this to be a sustainable, satisfying and effective range for myself.


So the question is, what kinds of delicious and healthy foods do I eat during my detox regimens. Today I’m sharing my recipe for a super tasty pita pocket sandwich that clocks in at about 445 calories. I made these for both Matt and I to bring to work on Monday, and I kid you not, Matt actually called this sandwich one of the best things he’s ever eaten. Matt is the ultimate meat-eater-man so for him to say something so light and healthy is also super yummy means a lot.

These pita sandwiches are a super simple combination of homemade white bean spread, oven-roasted cherry tomatoes and fresh baby spinach, all stuffed into a Demascus Bakery Whole Wheat Pita Pocket. I buy these pitas at Whole Foods and I like them because they are all-natural, made with only pronounceable ingredients, and cost just $1.50 for a pack of four. When I discovered these pitas, my commitment to a whole-foodie life got so much easier.

For the white bean spread, I use my Lemony White Bean Dip recipe which is a must-try (it’s what Matt liked best about these sandwiches). But, for simplicity’s sake, an all-natural store-bough bean dip or hummus will work too. My Garlicky Roasted Cherry Tomatoes and some fresh spinach finish off the sandwich, adding depth, flavor and nutrients. And there you have it, a detox lunch that is transportable, satisfying, and one of the best things you’ll ever eat (according to Matt, that is).
Roasted Tomato and Lemony White Bean Spread Pita Sandwiches
Serves: 2 Start to Finish: 45 minutes Calories: 450 per serving
Ingredients
1/2 batch Roasted Cherry Tomatoes (get my recipe here)
1 14-ounce can Organic Canellini Beans
2 tablespoons Olive Oil
1 Lemon
2 cloves Garlic, crushed, peeled and roughly chopped
4-6 fresh Basil Leaves, roughly chopped
2 tablespoons pure Tahini (ground sesame seeds)
1/2 teaspoon Dried Basil
1/2-1 teaspoon Sea Salt
1/4-1/2 teaspoon Black Pepper
10-15 fresh Baby Spinach Leaves (I like using Organic Girl brand greens)
2 all-natural Whole Wheat Pita Pockets (I like Damascus Bakery brand, available at Whole Foods)
To Make
First, get the cherry tomatoes in the oven (get my recipe here). While the tomatoes roast, make the white bean spread.
For the white bean spread, reserve a 1/4 cup of the white bean liquid, then drain and rinse the beans in a colander. Set aside.
Using a vegetable peeler, peel 3-4 pieces of zest from the lemon (about 1/2 the lemon). Roughly chop them up. Add oil, garlic and lemon peel to a small skillet (the smallest you have). Turn on heat to medium-low. After 2-3 minutes, add basil leaves. Cook for 2 minutes.
Into a food processor, add beans, infused oil mixture (including zest garlic and basil), tahini, 1 tablespoon fresh lemon juice, dried basil, and reserved bean liquid. Pulse until smooth. Add salt and pepper to taste (I added 1/2 tsp pepper and 3/4 tsp salt). Pulse until smooth.
When tomatoes are finished, allow to cool. Assemble sandwiches by cutting each pita in half and gently pulling open the pocket of each half. Spread 1/4 cup of white bean spread into each half. Evenly divided cherry tomatoes and spinach leave between pockets.
*if using store bough bean spread or hummus, you’ll need 1 cup for 2 sandwiches (4 half sandwiches)
**if possible, make tomatoes and bean spread in advance and refrigerate. This allows the flavors to fully incorporate and develop.
