
Tag: Best of Basic
Best of Basic: Mild Red Enchilada Sauce

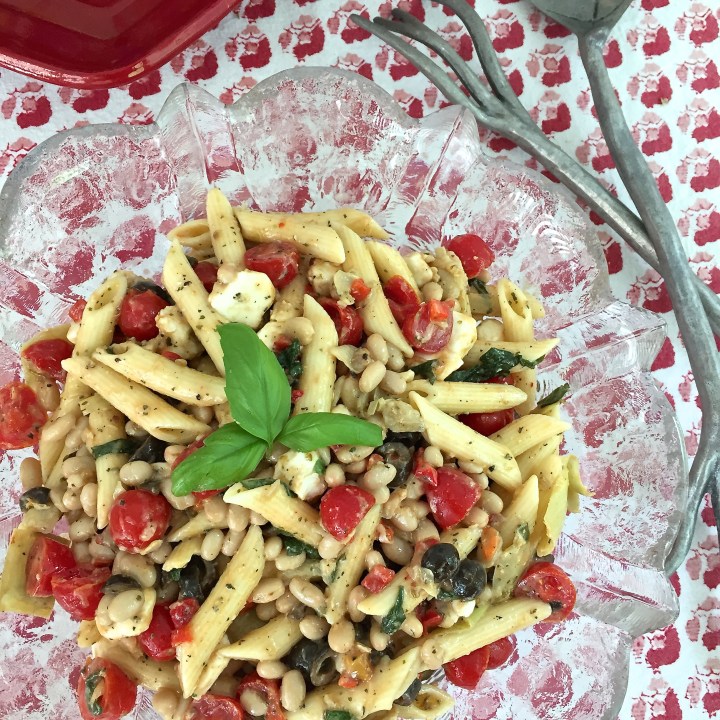
Loaded Italian Pasta Salad

Is it possible that June is already coming to an end? Fine by me, because I’ll be spending the first days of July on vacation. A glorious 10 day vaca in a remote area of Lake Huron in Ontario, Canada, it’s pretty much my favorite place on earth. You see, my extended family owns a modest island, smack dab in the middle of the wilderness, and it can only be described as rustic, comfortable, and totally epic. We sleep in sleeping bags and spend 80% of the day without electricity. We spend our days on the lake and evenings by the fire. And the breeze coming off the water at night, while falling asleep in the open air cabins, is pure magic.
This year, I’ll be heading up a bit earlier than usual and spending the first week of July on the island with my parents. But that means, I’ll be missing America’s birthday. I first want to say that I’m not trying to make a political statement here. Although I’d be lying if I said moving out of Trump country hasn’t crossed my mind. But I love the States, and because I’ll be missing one of the best celebrations of summer, I wanted to share a perfect (and easy) recipe for a BBQ-must-have… Loaded Italian Pasta Salad.

I actually developed this recipe a couple weekends ago when I was visiting my hometown, St. Louis. While everyone else enjoyed this delish pasta salad alongside turkey burgers, I instead, topped it with a medley of grilled veggies, making it a scrumptious main dish for a meat-free eater. Added bonus, this salad can be made gluten-free (using a gluten-free pasta) or made vegan (by omitting the fresh mozzarella balls). Finicky foodies rejoice!

Other than being diet-restriction friendly, this “best of basic” pasta salad is amazing for two reasons. Firstly because it’s a cinch to make. In the time it takes to cook the pasta, the remainder of the ingredients are ready to go. Then all that’s left is a chill session in the fridge to bring everything together. The second reason is because this pasta salad is packed with fresh flavor from basil leaves and cherry tomatoes, texture from al dente pasta, beans and artichokes, and health supportive because of protein, fiber, vitamins and healthy fats. Finally, the simple vinaigrette, flavored with oregano, dry mustard and garlic powder, brings it all home by adding even more flavor and richness. This pasta salad is seriously perfect. So if you’re looking for a clean, balanced and crowd-pleasing pasta salad to be your go-to summer side dish, look no further. This is it.

Loaded Italian Pasta Salad
Serves: 4 (main dish) to 8 (large side dish) Start to Finish: 30 min + chilling time
Ingredients
1 lb (16 ounces) pasta of choice* (see below for notes)
1/3 cup extra virgin olive oil
1/3 cup red wine vinegar
1.5 teaspoons sea salt, fine grain
1.5 teaspoons dried oregano
2 teaspoons dijon or whole grain mustard
1/2 teaspoon garlic powder (or granulated garlic)
1/2 teaspoon black pepper
1 tablespoon maple syrup, or sweetener of choice
1 12-oz can white beans, drained and rinsed
1 12-oz can artichoke hearts, quartered
1 pint cherry tomatoes, halved or quartered (depending on size)
1 5-oz can sliced black olives
1 5-oz can pimentos
25 medium basil leaves, about 1 small package, chopped or cut into chiffonade
8-oz fresh mozzarella, bite-size, optional
To Make
Bring 5 quarts of water to a boil. Add 1 teaspoon salt and pasta. Cook until al dente. I usually drain the pasta about 1-3 minutes earlier than package instructions say to cook. The best way to know? Try 2-3 noodles. When some noodles are cooked and some noodles seem under-cooked, they’re ready. After the pasta sits in the dressing, the underdone noodles will finish cooking. Avoid over cooking noodles, they will far apart after marinading.
While water boils and pasta cooks. Prepare dressing. In a blender, or using a hand blender, combine ingredients olive oil through maple syrup. Blend until fully emulsified. Set aside.
In a large bowl, combine ingredients white beans through pimentos. Toss with cooked/drained pasta (still hot) and prepped vinaigrette. Allow to cool down to room temp (about 10 minutes). Toss mozzarella and basil with pasta salad. Cover and refrigerate for at least 1 hour or until fully chilled. However, the longer it sits, the better it gets. Make 1 day ahead if possible.
Pasta Options
– As for shape, penne, fusilli and bowtie are my top choices – I used penne here

Best of Basic: Basil Pesto Sauce
My recent vacation to my family’s summer cottage in Canada was super inspirational in terms of cooking and food. To no one’s surprise we ate well and often, and had a blast in the kitchen along the way. The inspiration for this post came from spending time cooking with my mom, who is the master chef in my life. She is the queen of delicious, simple and inventive cooking and, somehow, everything always tastes better when she makes it.

One of my favorite meals from the trip was my mom’s loaded pesto pasta with sundried tomatoes, pine nuts, zucchini and fresh basil. She’s not inventing the wheel with this one, as pesto pasta is pretty standard, but watching her throw it together in a matter of minutes made me wonder why I wasn’t taking advantage of how easy a pesto pasta comes together. I’ve said it before, I need more recipes that can be thrown together in a pinch with minimal effort, and this pasta dish falls under that category. I’ll talk more about the specifics of her awesome loaded pesto pasta in a later post, but today, I’m just focusing on the actual pesto.

In addition to my mom’s pasta, I’ve been seeing and eating pesto everywhere these days. My favorite pizza place in Williamsburg (Vinnie’s) uses a pesto vinaigrette as the dressing on my favorite salad, and while driving from our cottage to the Toronto airport we stopped for lunch where I had an amazing Caprese salad layered with pesto instead of fresh basil. Finally, on a recent trip to St. Louis, I ordered a pizza at my fave spot (called Pi) that drizzled pesto on top just before serving. It’s clear that a go-to pesto recipe is a must.
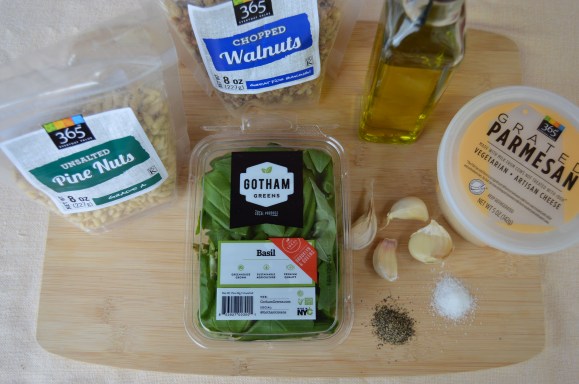
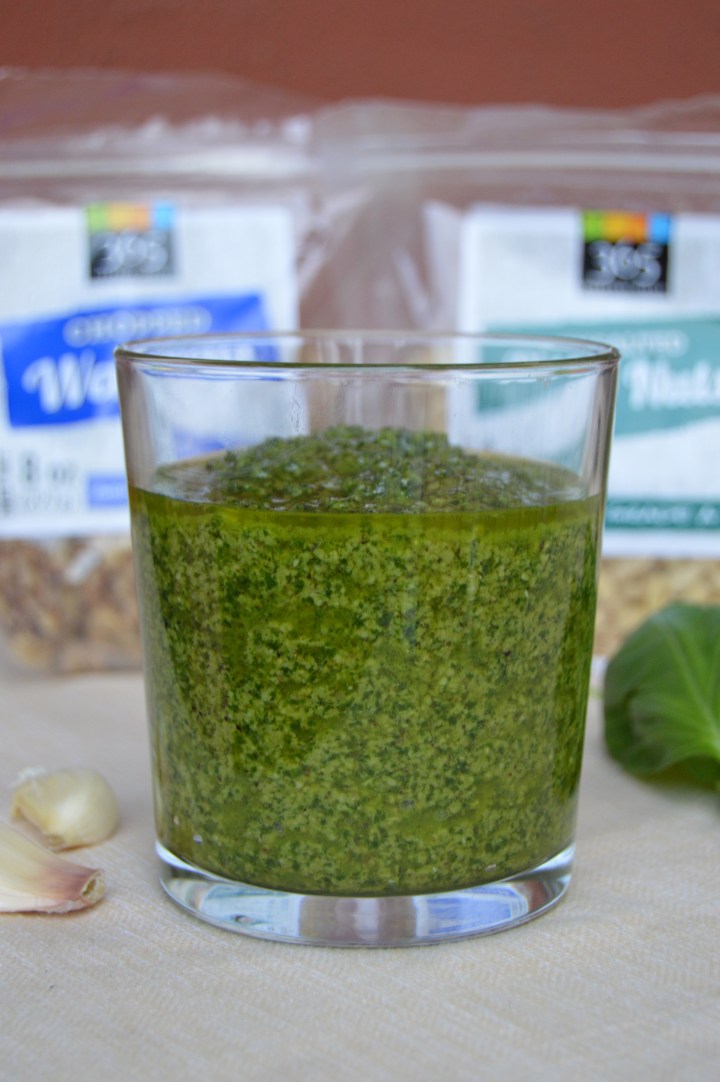
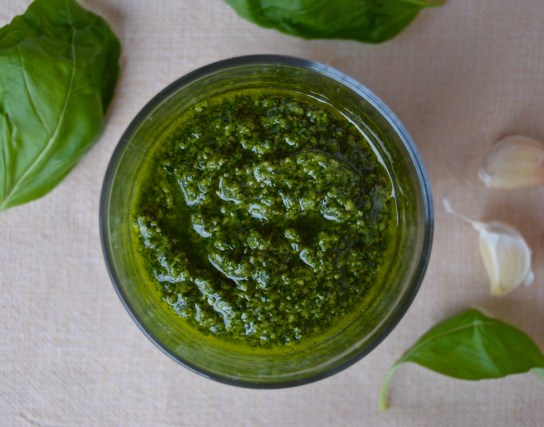
I’ve made pesto before, although it’s been awhile, and I’ve seen it made on TV loads of times. It’s quite simple and always pretty much the same. Use a food processor to blend the seven uncooked ingredients and you’re done. Yes, that’s it. It’s literally a five to ten minute process. Those seven ingredients are basil, garlic, nuts, olive oil, salt, pepper and Parmesan cheese. Taking a tip from my girl Ina Garten, I used a mixture of pine nuts and walnuts, but you can use one or the other if preferred. Of course, freshly grated Parmesan is ideal, but I used pre-grated from Whole Foods this time because I didn’t feel like adding another step to the process (the easier the better!). The last thing I will say about pesto is that, in order to keep it looking fresh and bright, remove all air before storing in the fridge or freezer. I find that a layer of plastic wrap directly on top of the pesto before covering with a lid is the way to go.

Basil, garlic & nuts.

Time to add olive oil.

Finished.
So without further ado, my recipe for classic and simple basil pesto, to be used on anything from pasta to pizza to salad.
Happy summer and happy Friday!
Best of Basic: Basil Pesto
Serves: 8 (2 tbs per serving) Start to Finish: 10 minutes
Ingredients
2 cups Fresh Basil Leaves, packed
3 cloves Garlic, peeled and roughly chopped (use 4 cloves if you absolutely love garlic)
1/3 cup total Pine Nuts and/or Walnuts
2/3 cup Olive Oil
Sea Salt & Black Pepper, to taste (I used 1 tsp each)
1/2 cup Parmesan Cheese
To Make
Combine basil, garlic and nuts in the bowl of a food processor or blender. Pulse until fine. While food processor is on, drizzle in olive oil. Add Parmesan, pulse until smooth. Add salt and pepper to taste. Pulse until well combined.
Makes about 1 cup of pesto
Best of Basic: Perfect Oven Fries
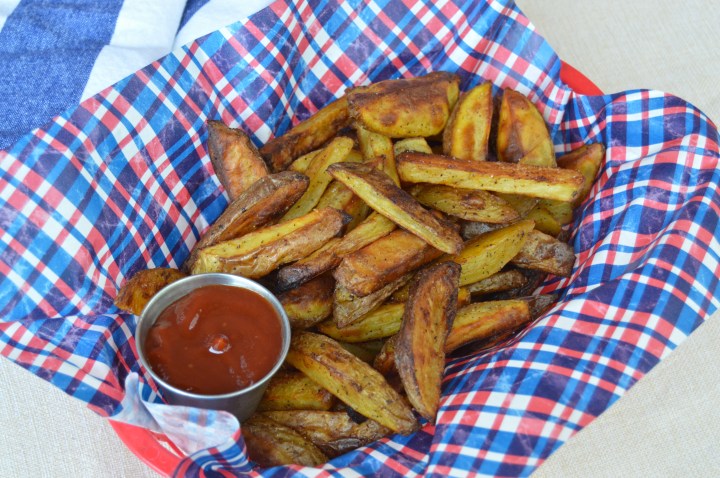

Fried potatoes are my jam. Cheese fries? Amaze. Tater tots? Obsessed. Hashbrowns? Yes please. Are there people out there who don’t love fried potatoes? No way. While deep fried foods are totally fine in moderation (that is, if they’re whole foods that are fried in healthy oils), I want French fries on the daily. So a recipe for slightly lighter and healthier oven fries was a natural for me.
I’ve been making oven fries since forever. And after a lot of trial-and-error, I’ve come up with a go-to method that makes flavorful, crispy fries that are neutral enough to go with any dipping sauce. I use small yellow or Yukon Gold potatoes for my oven fries. Yukon Golds are my favorite type of potato. I like the waxy texture, the golden color and the small size. After cutting the potatoes in thick fries, I soak them in cold water. This trick removes excess starchiness and makes for a crispy fry. Then I just toss with a simple blend of spices and olive oil. When baking the fries, I start at a lower temperature which allows the insides to become fully cooked. Then I crank up the heat to get those guys golden brown and crispity-crunchy. Perfect every time.

Before Baking.

Golden & Crispy.
I’ve been meaning to share this recipe for quite awhile. Then I saw these amazing red, white and blue basket liners at Sur la Table and couldn’t resist. These liners are perfect in those red plastic woven baskets you get at diners and casual food joints. As soon as I saw them I thought “oven fries! 4th of July! BBQ perfection!” You can use these lined baskets to serve apps and sides or everyone can have their very own basket for their meal. So cute, so fun and so festive.
Honestly, I’m not even sure what Matt and I are doing for the 4th. Independence Day has always been a big holiday for me. I grew up spending every July 4th at our family friends’ lake house near Milwaukee, Wisconsin, and it was always quite the celebration. The fireworks were unreal, the drinks were flowing and the group of us (sometimes over 30 people sleeping in one house) always got a little too rowdy. Those were the days. As of this year though, the lake house has been retired. I’ll really miss that place. But I wouldn’t be able to go this year anyway because it’s Matt’s brother’s engagement party in New York (woohoo!). There are plenty of activities planned for the weekend, but for the actual 4th of July we have nothing going on. I’m thinking a festive BBQ on our balcony, some all American beers, and a few sparklers will be totally awesome. I’m not quite the party-er I used to be and these days, I prefer to celebrate on the tamer side. But if this intimate celebration does end up happening, these fries will most definitely be on the menu.

I hope everyone has a super fun (and safe) holiday weekend with lots of good food and good company!
Best of Basic: Perfect Oven Fries
Serves: 4 Start to Finish: 1.5 hours
Ingredients
2 lbs Yukon Gold Potatoes
2 tablespoons Olive or Canola Oil
1/2 teaspoon Sea Salt
1/2 teaspoon Paprika
1/4 teaspoon Garlic Powder
1/4 teaspoon Black Pepper
To Make
Cut potatoes into 1/4-1/2″ slices, length wise. Cut each slice into sticks or wedges. Place cut potatoes in a big bowl of ice water. Allow to soak for 30 minutes.
Meanwhile, preheat oven to 375 degrees. Line a large baking sheet or two with parchment paper. I use one large pan for this amount but the more room the potatoes have, the crispier they’ll be.
When potatoes are finished soaking, drain and dry with a clean towel. Toss potatoes with oil and seasoning. Spread out over baking sheets. Bake for 20 min. Remove from heat, gently toss. Turn heat up to 450 degrees. Cook for 30-40 more minutes, tossing every 10-15 minutes.
Best of Basic: Avocado Toast


I was long distance chatting with my mom the other day, and because our conversations often revolve around food, she was raving about an avocado toast she recently had for lunch at a cafe in my hometown, St. Louis. She then proceeded to ask how to make Avocado Toast. I could feel my face twist up as I thought, “It’s pretty self explanatory, no?” But before saying anything out loud, I quickly realized that, to her point, there’s a difference between smashed avocado slathered on any old slice of bread and a real Avocado Toast. So my mom wants to know how to make the best version of a real Avocado Toast? Challenge accepted. Continue reading “Best of Basic: Avocado Toast”
