White Three-Bean Chili (vegan | gf)

White Three-Bean Chili (vegan | gf)

After about a month, I’m back in action here on radiatefoodvibes.com. Time flies even more than usual lately. As I continue the very early phases of building my own brand and my own business, in addition to learning everything and anything I can about professional cooking, my personal recipe development has slipped a bit. But now I’m back at it.

Today’s post is a veganized recipe of the white chicken chili I made for a client this week. I loved the creaminess and richness of this hearty chicken chili combined with the sweet crunch of the fresh corn kernels. All I needed to do was omit the chicken. I then decided to take it even further and omit the cream as well (aka veganize it). I’ve been going a little heavy on the dairy lately and a detox-friendly soup is exactly what my body is craving right now. So no cream in this one (although I have the option to add it in the recipe below). You may be wondering how I achieved the creaminess without adding dairy or gluten (yes, it’s also gluten-free). No brainer. I turned to my beloved coconut milk and it worked perfectly.

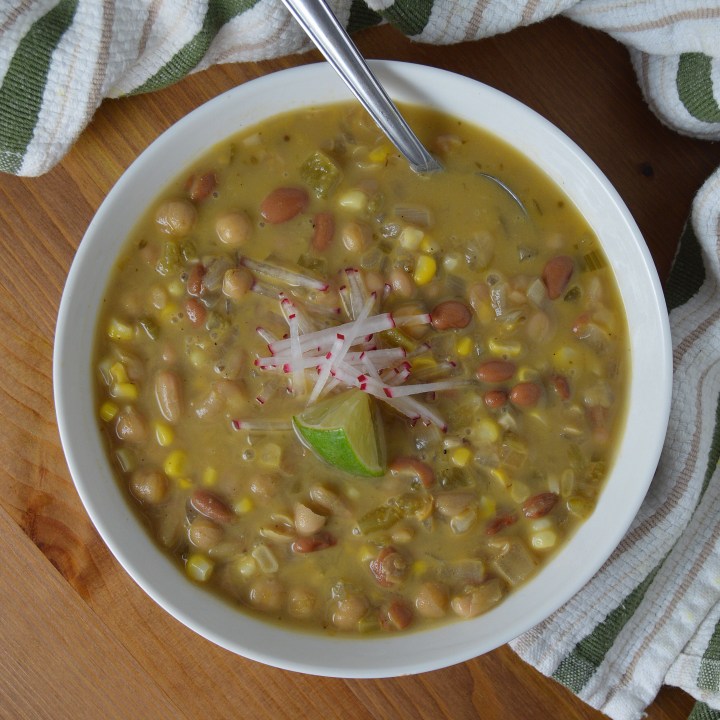
This White Three-Bean Chili is creamy, satisfying, filling and nourishing. I also consider this dish to be detox-friendly (you know, for when you’re trying to balance out an indulgent weekend or healthily shed a few pounds). This is because it’s packed with complete protein and fiber thanks to the beans and the corn.

Beans make up the bulk of this chili. I use three different types of beans in this recipe, all of which are great sources of gut-cleansing fiber and energizing protein. Corn is sometimes confused for a vegetable, but it’s actually a grain. Not only does corn add flavor and texture to this chili, but it also combines with the beans to form a complete protein. Complete proteins contain all nine essential amino acids required by the human body. Animal proteins (meat, dairy, eggs) are complete on their own, so when eating a plant-forward diet it’s essential (pun intended) to eat a variety of plant-based protein sources to ensure you’re getting all nine essential amino acids.

Although this recipe can be made year round using canned or frozen corn, I recommend cooking up a batch ASAP to fully take advantage of the fresh summer corn that’s in peak season right about now.

White Three-Bean Chili

Serves: 4-6 Start to Finish: 45 minutes

Ingredients

2 tablespoons olive oil
1 yellow onion, small diced
3 cloves garlic, minced
2 celery ribs, small diced
sea salt
1 teaspoon chili powder
1 teaspoon dried oregano
1 teaspoon cumin powder
1/2 teaspoon coriander
1/2 teaspoon black pepper
3-4 cups all-natural vegetable stock
1 4-oz can diced green chilies (I used mild)
1 14-oz cans cannellini beans, drained and rinsed
1 14-oz cans pinto beans, drained and rinsed
1 14-oz cans garbanzo beans, drained and rinsed
2 ears fresh corn, husked, kernels cut off (approx. 1.5 cups)
1/2 cup full-fat coconut milk (or use heavy cream if desired)
1 tablespoon arrow root powder or other starch of choice such as corn or potato (omit if using cream)
1 teaspoon fresh lime juice, plus lime wedges for serving
4 radishes for garnish, sliced or matchsticked (optional)

To Make

Heat oil over medium heat in a large pot. Add onion, garlic, celery and 1/2 teaspoon sea salt. Cook for 2-3 minutes until onions begin to release moisture. Stir occasionally.

Add chili powder, oregano, cumin, coriander and black pepper. Stir to combine. Cook for 3-4 minutes.

Add 3 cups vegetable stock, beans, corn kernels, green chilies and 1 teaspoon sea salt. Bring to boil, reduce to simmer for 15 minutes. Add up to 1 additional cup of vegetable stock to achieve desired liquid to solid ratio.

Turn off heat. Stir in coconut milk or heavy cream. Return to heat, bring to boil, reduce to simmer. Meanwhile, mix together 1 tablespoon arrow root powder (or other starch) with 2 tablespoons cool water. Mix well to form a “slurry”. Add slurry to soup. Simmer for 5 to 10 minutes. Season with 1 teaspoon lime juice and sea salt to taste. I added another 1/2 teaspoon or so of sea salt.

If using heavy cream instead of coconut milk – be careful not to full-on boil the cream after adding to the chili, it could curdle (yuck). I recommend adding a tablespoon of the hot chili liquid into the cream to temper it before adding to the pot. You can omit the arrow root slurry if using cream instead of coconut milk. The soup should thicken with just the cream and a quick simmer session.

Roasted Tomato & Creamy White Bean Pita Sandwiches

Roasted Tomato & Creamy White Bean Pita Sandwiches

DSC_0254

It’s Day 3 of my “debloat and recharge detox” and I’m feeling good and staying motivated. My detoxes are easy in that I’m not seriously reducing calories or only eating cabbage soup. It’s more about portion controlling, loading up on veggies and fruits (even more than usual) and reducing excess fat, sugar and carbs. Because I pretty much always stick to high quality and whole ingredients, it’s mostly about portion controlling and some calorie counting.

DSC_0223
I’m not big on calorie counting for a couple reasons. First is because I’ve spent so much time calorie counting throughout the years that I have a pretty good sense of roughly how many calories are in most foods, allowing me to be unconsciously aware of how much I’m eating. I also don’t like counting calories because I think it can take the fun out of eating a cooking. And lastly, I don’t like counting calories because I find it to be misleading in terms of choosing an unhealthy food over a healthy food just because they are equal in calories. With that said, when trying to trim down and debloat, I’ve found that it happens much faster if you’re staying within a low-to-moderate calorie range. So when detoxing I stay within a 1,500-1,900 calorie range, typically shooting for around 1,600. Obviously this varies by person, but I’ve found this to be a sustainable, satisfying and effective range for myself.

DSC_0199

DSC_0211
So the question is, what kinds of delicious and healthy foods do I eat during my detox regimens. Today I’m sharing my recipe for a super tasty pita pocket sandwich that clocks in at about 445 calories. I made these for both Matt and I to bring to work on Monday, and I kid you not, Matt actually called this sandwich one of the best things he’s ever eaten. Matt is the ultimate meat-eater-man so for him to say something so light and healthy is also super yummy means a lot.

DSC_0234
These pita sandwiches are a super simple combination of homemade white bean spread, oven-roasted cherry tomatoes and fresh baby spinach, all stuffed into a Demascus Bakery Whole Wheat Pita Pocket. I buy these pitas at Whole Foods and I like them because they are all-natural, made with only pronounceable ingredients, and cost just $1.50 for a pack of four. When I discovered these pitas, my commitment to a whole-foodie life got so much easier.

DSC_0246

For the white bean spread, I use my Lemony White Bean Dip recipe which is a must-try (it’s what Matt liked best about these sandwiches). But, for simplicity’s sake, an all-natural store-bough bean dip or hummus will work too. My Garlicky Roasted Cherry Tomatoes and some fresh spinach finish off the sandwich, adding depth, flavor and nutrients. And there you have it, a detox lunch that is transportable, satisfying, and one of the best things you’ll ever eat (according to Matt, that is).

Roasted Tomato and Lemony White Bean Spread Pita Sandwiches
Serves: 2    Start to Finish: 45 minutes   Calories: 450 per serving

Ingredients

1/2 batch Roasted Cherry Tomatoes (get my recipe here)
1 14-ounce can Organic Canellini Beans
2 tablespoons Olive Oil
1 Lemon
2 cloves Garlic, crushed, peeled and roughly chopped
4-6 fresh Basil Leaves, roughly chopped
2 tablespoons pure Tahini (ground sesame seeds)
1/2 teaspoon Dried Basil
1/2-1 teaspoon Sea Salt
1/4-1/2 teaspoon Black Pepper
10-15 fresh Baby Spinach Leaves (I like using Organic Girl brand greens)
2 all-natural Whole Wheat Pita Pockets (I like Damascus Bakery brand, available at Whole Foods)

To Make

First, get the cherry tomatoes in the oven (get my recipe here). While the tomatoes roast, make the white bean spread.

For the white bean spread, reserve a 1/4 cup of the white bean liquid, then drain and rinse the beans in a colander. Set aside.

Using a vegetable peeler, peel 3-4 pieces of zest from the lemon (about 1/2 the lemon). Roughly chop them up. Add oil, garlic and lemon peel to a small skillet (the smallest you have). Turn on heat to medium-low. After 2-3 minutes, add basil leaves. Cook for 2 minutes.

Into a food processor, add beans, infused oil mixture (including zest garlic and basil), tahini, 1 tablespoon fresh lemon juice, dried basil, and reserved bean liquid. Pulse until smooth. Add salt and pepper to taste (I added 1/2 tsp pepper and 3/4 tsp salt). Pulse until smooth.

When tomatoes are finished, allow to cool. Assemble sandwiches by cutting each pita in half and gently pulling open the pocket of each half. Spread 1/4 cup of white bean spread into each half. Evenly divided cherry tomatoes and spinach leave between pockets.

*if using store bough bean spread or hummus, you’ll need 1 cup for 2 sandwiches (4 half sandwiches)

**if possible, make tomatoes and bean spread in advance and refrigerate. This allows the flavors to fully incorporate and develop.

Best of Basic: Oven-Roasted Cherry Tomatoes

Best of Basic: Oven-Roasted Cherry Tomatoes

DSC_0205

Every so often, when I’m feeling a little sluggish, or feeling like I’ve been particularly indulgent lately, I like to reset my routine and get back on track. This detox, as I like to call it, could last for a couple days, or if I’m feeling super motivated, a few weeks. With summer just around the corner, I thought it a good idea to do a lengthy detox to kick off swimsuit season… lose the bloat, gain some energy, reset my metabolism and maybe even shed a few pounds. Sounds great, right? You might be thinking “no, that does not sound great”, but I honestly love my detoxes because not only do they make me feel amazing but they’re also quite fun and delicious, when you do it my way.

DSC_0182
Even when I’m detoxing, I refuse to sacrifice flavor or give up on my favorite foods entirely. I hate eating just for the sake of eating. I like to always enjoy and feel good about what I’m eating. So I find creative ways to make detoxing enjoyable. And these roasted cherry tomatoes are a great example of how I add flavor and interest in a light and healthy way. Roasted tomatoes are delicious in salads, on sandwiches, and in pasta, but are equally as yummy when used as a simple side dish to meat, tofu, or fish. I could seriously eat the entire batch in one sitting with only a spoon.

DSC_0186
Roasting tomatoes is super simple because I keep it very basic. There’s simply no need to make it implicated here. Just add a little bit of quality olive oil, some garlic, sea salt, and black pepper to the halved tomatoes, and then roast for 30-40 minutes. Perfection. Roasting brings out the natural sweetness of the tomatoes and makes them super soft and juicy. They are the perfect way to add moisture and intense flavor without adding excess fat or dairy.

DSC_0189
This batch of Roasted Cherry Tomatoes is for stuffing into pita pockets along with flavorful white bean dip and fresh spinach. This pita sandwich is simple, light, balanced, and will make a perfectly detox-friendly lunch this week. And don’t worry, my upcoming posts will focus on daily detox meal plans and recipes, including this delicious sandwich. Stay tuned!


Oven-Roasted Cherry Tomatoes
Serves: 4   Start to Finish: 45 minutes

Ingredients

2 pints Cherry Tomatoes
4 cloves Garlic, crushed, peeled, roughly minced
1/2 tablespoon Olive Oil
1/2 teaspoon Sea Salt (plus more)
1/4 Black Pepper

To Make

Preheat oven to 375 degrees. Line a large baking sheet with parchment paper. Set aside.

Combine tomatoes, garlic, 1/2 teaspoon salt and pepper in a medium size bowl. Spread out onto a lined baking sheet in a single layer. Bake for 15 minutes. Remove from oven and toss, re-spreading tomatoes out into a single layer. Bake for an additional 20 minutes. Remove from oven. Allow to cool slightly, sprinkle with an additional 1/8-1/4 teaspoon salt and toss. Serve warm, cold or at room temperature.

*for simplicity’s sake, I often roast the tomatoes whole and also leave out the garlic and black pepper – cooking time for uncut cherry tomatoes will be slightly longer – bake until most of the tomatoes have bursted and the skins are browning – these tomatoes are super delicious with just olive oil and salt

Cheap & Easy: Eggplant Parm Melts

Cheap & Easy: Eggplant Parm Melts

DSC_0180

Moving is the worst. It doesn’t matter how exciting the prospect of a new home is, when it comes time to move, misery is the prevailing emotion. That’s how it is for me, at least. Also contributing to the misery is the fact that I need things to be perfectly organized and scheduled, and when it comes to moving, even the most meticulous planning will no doubt unravel. It’s exhausting, frustrating and overwhelming. Needless to say, the last two weeks of packing and moving and unpacking have been non stop crazy.

Im so happy to say that we’re all moved in, pretty much set up, and absolutely loving our new apartment in Williamsburg, a trendy Brooklyn neighborhood of NYC. This is my 5th neighborhood since moving to New York in 2011, and I have a feeling it’s going to be my favorite. Although there is still a lot to do, I feel as though I can finally fall back into my usual routine and I couldn’t be more ready.

In honor of the move, I’m sharing a super simple, cheap and healthy dinner idea that came in handy during the moving process. I actually first made these delicious eggplant parm melts while in Florida a few weeks ago with my family. When trying to use up items in the fridge one afternoon, we used leftover grilled eggplant discs, fresh mozzarella cheese, jarred tomato sauce and my favorite Ezekiel English Muffins to make a light and simple lunch. I knew immediately that this would be a new go-to for us. Now let’s fast forward to the whole packing and moving process, when lack of time, saving money and staying healthy were all on my mind when coming up with dinner every night. My answer to these concerns on more than one occasion over the past couple weeks was to make these eggplant parm melts, and now I feel an almost emotional attachment to them.

DSC_0173I changed up the recipe slightly from Florida to be even more economical. I replaced fresh mozzarella with regular mozzarella and used the Whole Foods brand canned tomato sauce instead of a fancy jarred marinara. The beauty of this recipe is that you can really use whatever you have on hand, the brands you prefer, or items on sale at the moment. I do find that using a simple canned sauce tastes better with some simple seasoning action, like dried basil and garlic powder. I further add flavor with the technique of rubbing raw garlic onto the lightly toasted base English muffins before adding the toppings. This is optional but highly recommended.

Finally, I have a quick note about cooking eggplant, but then I’ll get to the recipe. Cooking eggplant is sometimes seen as intimidating, probably because so many recipes require removing some of the moisture with salt or soaking the eggplant in water before cooking. These steps are important to remove the slight bitterness inherent in eggplants. But never fear, eggplant is rather forgiving and these small steps before cooking take minimal effort. And sometimes, I ignore these pre-cooking steps completely. It’s not the end of the world, depending on the recipe.

DSC_0163

When it comes to cooking the eggplant for this recipe, there are a few options. Using leftover grilled eggplant like I did in Florida, or grilling eggplant for this specific recipe, makes these melts insanely quick and easy, like under 30 minutes. But not everyone has a grill pan for the stovetop and grilling outside can often become a production. In this case, I recommend roasting the eggplant. Roasting the eggplant takes a little longer, but it’s really just as simple. Make dinner time even easier by roasting the eggplant in advance.

And without further ado, my simple recipe for Eggplant Parmesan Melts, perfect for those days you want an easy dinner that won’t blow your wallet or your diet.

DSC_0168

Cheap & Easy Eggplant Parm Melts
Serves: 4    Start to Finish: 45 minutes

Ingredients
1 Italian Eggplant, about a pound
2 tablespoons Olive Oil
Salt
4 English Muffins, split (I used Ezekiel Sprouted Grain English Muffins)
1 14-oz can Tomato Sauce (I used Whole Foods 365 brand)
4 ounces Part-Skim Mozzarella, shred while eggplant cooks (I used Whole Foods Brand)
1/4-1/2 cup Grated Parmesan Cheese (I used Whole Foods brand)
1 clove Garlic, kept whole and peeled, optional
Dried Basil, optional
Garlic Powder, optional

To Make

Trim ends of eggplant. Slice lengthwise into 1/2 inch discs. Season both sides of each disc with salt. Allow to sit for 20 minutes. Use a clean towel to remove the excess moisture.

Preheat oven to 425 degrees to roast eggplant.

Spread eggplant slices out on a parchment lined baking sheet. Brush each side with olive oil and season with black pepper. Roast eggplant for 25-30 minutes, flipping once half way through cooking.

While eggplant cooks, brush each muffin half with olive oil. Lightly toast English muffins in a toaster oven or in broiler. Peel a clove of a garlic and cut in half. Rub the cut side over toasted English muffins (doing this gives a slight garlic flavor, this step is optional).

When eggplant is finished, assemble the melts. Top each muffin half with 2 spoonfuls of sauce. I like to season the sauce layer with salt, garlic powder and dried basil (optional). Top sauce with 1 or 2 slices of eggplant, depending on size of slice. Top eggplant with 1 or 2 more spoonfuls of sauce, 1 or 2 tablespoons mozzarella, and then 1 tablespoon grated Parmesan cheese.

Using a broiler or toaster oven, broil muffins until cheese is melted and golden brown. Season with salt and liberally sprinkle on some dried basil.

Serve with fresh fruit or simple salad.

*The baking method takes about 30 minutes. You could also grill the discs over medium-high heat, using an outdoor grill or stovetop grill pan, for about 4 minutes per side (saves time).

Everything Bagel Sausage Rolls with Bloody Mary Ketchup (Vegan Optional!)

Everything Bagel Sausage Rolls with Bloody Mary Ketchup (Vegan Optional!)

DSC_0139

Cooking together is an almost daily ritual for my boyfriend, Matt, and me. Although Matt didn’t grow up addicted to Food Network and spending hours cooking like I did, he’s actually quite skilled in the kitchen. He often says that I critique too much and that I don’t fully trust him the kitchen, but that’s just because I’m a perfectionist who likes to have control, especially when it comes to food. In any event, Matt deserves all the credit for this genius breakfast/brunch dish, which is a delicious twist on classic Pigs in a Blanket. Continue reading “Everything Bagel Sausage Rolls with Bloody Mary Ketchup (Vegan Optional!)”

Quick & Simple: Vegan Sloppy Joe Sandwiches

Quick & Simple: Vegan Sloppy Joe Sandwiches

Sloppy Joe Sandwich

I’ve said it before, much of my inspiration in the kitchen comes from my mom. Growing up, we had family dinners every weeknight, and my mom always managed to make delicious, creative, balanced and varied meals for us. Because my mom ran a successful non-profit and had three kids, two dogs and a husband to deal with, these meals also had to be fast, affordable and simple to get on the table. Continue reading “Quick & Simple: Vegan Sloppy Joe Sandwiches”