Tag: Food
Kale Pesto & Roasted Veggie Flatbread Sandwiches

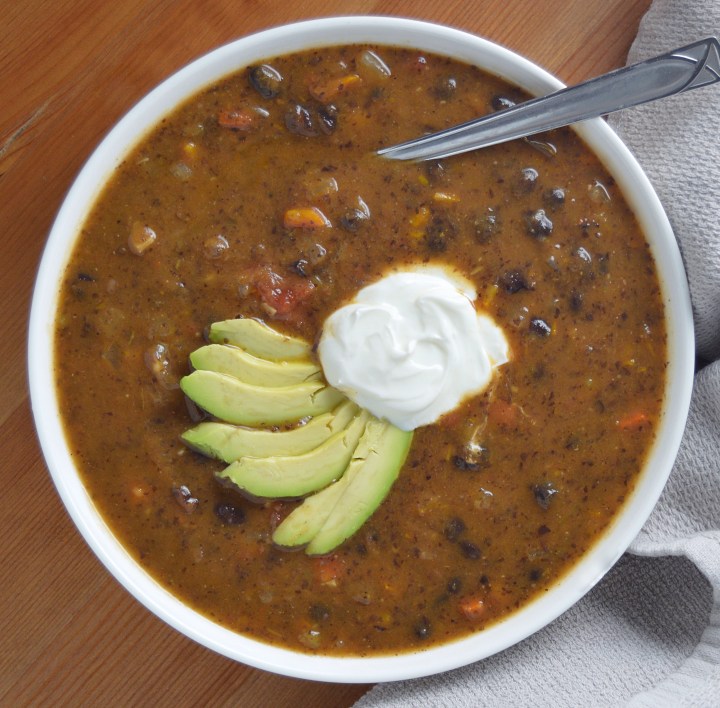
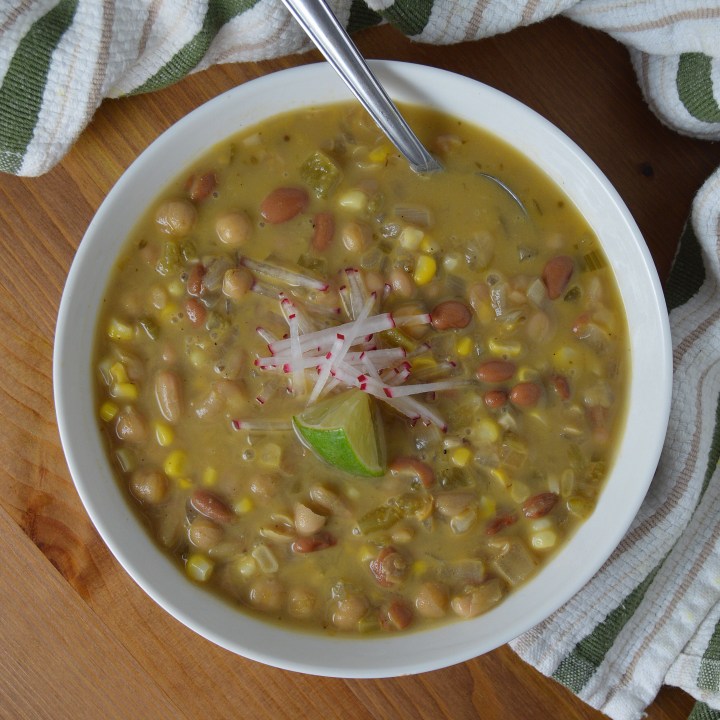
White Three-Bean Chili (vegan | gf)
After about a month, I’m back in action here on radiatefoodvibes.com. Time flies even more than usual lately. As I continue the very early phases of building my own brand and my own business, in addition to learning everything and anything I can about professional cooking, my personal recipe development has slipped a bit. But now I’m back at it.

Today’s post is a veganized recipe of the white chicken chili I made for a client this week. I loved the creaminess and richness of this hearty chicken chili combined with the sweet crunch of the fresh corn kernels. All I needed to do was omit the chicken. I then decided to take it even further and omit the cream as well (aka veganize it). I’ve been going a little heavy on the dairy lately and a detox-friendly soup is exactly what my body is craving right now. So no cream in this one (although I have the option to add it in the recipe below). You may be wondering how I achieved the creaminess without adding dairy or gluten (yes, it’s also gluten-free). No brainer. I turned to my beloved coconut milk and it worked perfectly.

This White Three-Bean Chili is creamy, satisfying, filling and nourishing. I also consider this dish to be detox-friendly (you know, for when you’re trying to balance out an indulgent weekend or healthily shed a few pounds). This is because it’s packed with complete protein and fiber thanks to the beans and the corn.
Beans make up the bulk of this chili. I use three different types of beans in this recipe, all of which are great sources of gut-cleansing fiber and energizing protein. Corn is sometimes confused for a vegetable, but it’s actually a grain. Not only does corn add flavor and texture to this chili, but it also combines with the beans to form a complete protein. Complete proteins contain all nine essential amino acids required by the human body. Animal proteins (meat, dairy, eggs) are complete on their own, so when eating a plant-forward diet it’s essential (pun intended) to eat a variety of plant-based protein sources to ensure you’re getting all nine essential amino acids.

Although this recipe can be made year round using canned or frozen corn, I recommend cooking up a batch ASAP to fully take advantage of the fresh summer corn that’s in peak season right about now.
White Three-Bean Chili
Serves: 4-6 Start to Finish: 45 minutes
Ingredients
2 tablespoons olive oil
1 yellow onion, small diced
3 cloves garlic, minced
2 celery ribs, small diced
sea salt
1 teaspoon chili powder
1 teaspoon dried oregano
1 teaspoon cumin powder
1/2 teaspoon coriander
1/2 teaspoon black pepper
3-4 cups all-natural vegetable stock
1 4-oz can diced green chilies (I used mild)
1 14-oz cans cannellini beans, drained and rinsed
1 14-oz cans pinto beans, drained and rinsed
1 14-oz cans garbanzo beans, drained and rinsed
2 ears fresh corn, husked, kernels cut off (approx. 1.5 cups)
1/2 cup full-fat coconut milk (or use heavy cream if desired)
1 tablespoon arrow root powder or other starch of choice such as corn or potato (omit if using cream)
1 teaspoon fresh lime juice, plus lime wedges for serving
4 radishes for garnish, sliced or matchsticked (optional)
To Make
Heat oil over medium heat in a large pot. Add onion, garlic, celery and 1/2 teaspoon sea salt. Cook for 2-3 minutes until onions begin to release moisture. Stir occasionally.
Add chili powder, oregano, cumin, coriander and black pepper. Stir to combine. Cook for 3-4 minutes.
Add 3 cups vegetable stock, beans, corn kernels, green chilies and 1 teaspoon sea salt. Bring to boil, reduce to simmer for 15 minutes. Add up to 1 additional cup of vegetable stock to achieve desired liquid to solid ratio.
Turn off heat. Stir in coconut milk or heavy cream. Return to heat, bring to boil, reduce to simmer. Meanwhile, mix together 1 tablespoon arrow root powder (or other starch) with 2 tablespoons cool water. Mix well to form a “slurry”. Add slurry to soup. Simmer for 5 to 10 minutes. Season with 1 teaspoon lime juice and sea salt to taste. I added another 1/2 teaspoon or so of sea salt.
If using heavy cream instead of coconut milk – be careful not to full-on boil the cream after adding to the chili, it could curdle (yuck). I recommend adding a tablespoon of the hot chili liquid into the cream to temper it before adding to the pot. You can omit the arrow root slurry if using cream instead of coconut milk. The soup should thicken with just the cream and a quick simmer session.
Summer Veggie Grain Bowls with Classic Lemon Hummus


Yep, this my third grain bowl post this month. Why? Two reasons. First is because I love nourishing bowls of goodness, packed with an array of nutrients, flavors and textures. It’s my favorite way to eat because it’s healthy, convenient, packable, stores well in the fridge and, most importantly, absolutely delish. If you want to make a crave worthy nourish-style bowl, it’s not quite as easy as piling veggies, grains and protein into a bowl. My kind of nourish bowl (aka Buddha Bowl or Grain Bowl) has depth, richness and variety. It takes advantage of seasonal produce, flavor-bombs like garlic and citrus, and requires a tasty sauce or spread to pull it all together. This takes a little bit of time and planning, but it’s worth it. And once all of the components are ready, they’re easy to throw together.
The second reason why I’m focusing on grain bowls is because they’re all the rage these days. Everywhere from fast casual restaurants to fine dining establishments are jumping on the nourish bowl bandwagon. It’s a trend for sure, and food trends, specifically health-supportive ones, are my jam.
So there you have it. One more inspirational nourish bowl to get your creative juices and health vibes flowing. And if you missed the last two, check them out below.
Burrito Nourish Bowls with Roasted Peppers & Tomatillo Sauce
Cauliflower Satay Nourish Bowl

Roasted Summer Veggie Nourish Bowl with Classic Hummus
Serves: 4 Start to Finish: 1 hour Active Time: 30 minutes
Ingredients
For Veggies & Rice
1.5 cups dry brown rice
sea salt, fine grain
2 large zucchinis, cut into a large dice
olive oil
3 large cloves garlic, minced (2 for zucchini, 1 for hummus)
1 pint cherry tomatoes
2 orange bell peppers (red and yellow bell peppers work too)
For Hummus (use storebought if desired)
1 14-oz can chickpeas
3 tablespoons tahini
2 tablespoons fresh lemon juice
1 tablespoon olive oil
3/4 teaspoons sea salt, fine grain
1/2 teaspoon cumin
1/4 teaspoon black pepper
For Assembly
4 cups lightly packed greens (I used red leaf lettuce)
2 teaspoons red wine vinegar (lemon juice works too)
1 red onion, quartered and thinly sliced
3 tablespoons pine nuts, lightly toasted
To Make
Preheat oven to 400 degrees.
Cook 1.5 cups brown rice to package instructions – it goes something like this – rinse rice in colander, add to small sauce pan with 3/4 teaspoon sea salt and 3 cups water. Bring to boil, reduce to simmer, cover with lid. Allow to cook for 35-40 minutes, until water is mostly absorbed. Remove from heat and allow to steam, covered, for 10 minutes.
Toss zucchini cubes with 3/4 teaspoons salt, 2 cloves chopped garlic and 1 tablespoon olive oil. Transfer to a parchment lined baking sheet in a single layer. Toss tomatoes with 2 teaspoons olive oil and 1/4 teaspoon salt. Transfer to baking sheet with zucchini. Cook cherry tomatoes for 20 minutes. Cook zucchini for 30-35 minutes, flipping once through.
Roast the bell peppers. I like to do this over the open flames on my burner, which takes about 8 minutes and another 10 minutes in a sealed paper paper bag or covered bowl. This allows the peppers to steam and makes the charred skins easily peel off. Once charred skin is removed, discard stem and seeds, cut into a large dice. You can also roast the peppers in the over with the other veggies. To do this, remove stem and seeds, dice bell peppers, toss with a little oil and roast for about 25 minutes.
Meanwhile, make hummus. Combine all hummus ingredients plus 5-6 tablespoons water in a food processor or in a hand blender vessel. Use the water to achieve your desired consistency.
To assemble nourish bowls – toss greens with vinegar, sliced red onions and 1/4 teaspoon sea salt. Divide evenly between 4 dishes. Top each bowl with 3/4 cup cooked rice, 1/4 of all roasted vegetables and 3-4 tablespoons hummus. Garnish each serving with 2 teaspoons toasted pine nuts.
Grain-Free Cauliflower Fried “Rice”


As I practice more and more with healthful, diet-restriction-friendly recipes (you know – vegan, gluten free, paleo, etc.), I find more and more ways to use cauliflower. From cauliflower “steaks” to cauliflower “rice,” the possibilities are seriously endless. A healthy, grain-free version of fried rice is one of my latest projects. Grated cauliflower, diced carrots, yellow onions and chopped red bell peppers make up the bulk of this dish. Then I add flavor with organic, cage-free eggs, a simple tamari-based sauce and a garnish of fresh scallions. For a genuine paleo/whole30 version, simply use coconut aminos instead of tamari. But for me, an organic soy-based tamari does the job perfectly.

When I think about it, many of the recipes I make are inspired by takeout and delivery classics, and this dish is the perfect example. Making your own “takeout” at home is much healthier than ordering out, and cheaper too. But for people who have dietary restrictions, it’s sometimes the only option to be able to enjoy favorite foods and cuisines. A grain-free/gluten-free lifestyle is the driving force behind this dish, but it also qualifies as vegetarian, dairy-free and, if using coconut aminos instead of tamari, paleo-friendly. Serve with a selection of proteins like grilled chicken, vegetables, tofu or steak, and you’ve got a meal that’s customizable enough (and delicious enough) to please a crowd.

Now, let’s go over a couple of my favorite health-supportive benefits of this recipe’s star, cauliflower.
Cauliflower is a cruciferous vegetable, and one of my all-time favorite vegetables, mostly because it’s super versatile. Cruciferous vegetables (like cauliflower, broccoli, turnips, kale and arugula) contain glucosinolates, a chemical that contains sulfur. When broken down during digestion, glucosinolates turn into compounds associated with anti-cancer effects. Cauliflower is also a great source of fiber, aiding in digestion, and also a great source of Vitamins K & C. Cauliflower is high in several powerful antioxidants, which are essential in providing adequate defense to your cells, which is believed to help your body in fighting off illnesses such as cancer.
Enjoy!

Grain-Free Cauliflower Fried “Rice”
Serves: 2 (main) or 4 (side dish) Start to Finish: 25 minutes
Ingredients
1 large carrot, peeled and diced
1 red bell pepper, seeded and diced
1/2 medium yellow onion, diced
2 cloves garlic, peeled and minced
2 tablespoons canola or coconut oil (organic preferred), divided
4 cups raw cauliflower rice*
1 teaspoon dried ginger
1.5 teaspoons sea salt, fine grain, divided
2 tablespoons tamari (use coconut aminos instead for paleo/whole30 version)
2 eggs (cage-free, organic preferred)
chopped scallions, garnish (1-2 scallions is enough)
To Make
Note: You may want to use a non-stick skillet or wok for this recipe. My stainless steel pan worked well for this recipe with no sticking/burning issues, but a non-stick skillet will be more fool-proof.
Prep carrots, peppers, onion and garlic. Using a box grater or food processor, grate large cauliflower florets into cauliflower “rice.” Use the stem portion of the florets too.
Crack eggs into a bowl and scramble with a fork. Set aside.
Heat 1.5 tablespoons oil in a large skillet over medium-high heat. Add carrots, peppers, onions, garlic and 1 teaspoon sea salt to pan. Cook for 5-6 minutes, until vegetables have softened and released liquid. Add grated cauliflower and ginger to pan. Cook for another 3-5 minutes, stirring frequently, until moisture from cauliflower is released and evaporated.
Add tamari (or coconut aminos) to pan, toss to coat, and cook for about 2 minutes, until excess moisture is removed. Push cauliflower aside and add remaining oil to open space in pan. Add scrambled eggs to oil. Frequently use a spoon to cut through liquified eggs in order to rotate uncooked eggs into the heat. Just as the egg solidifies (after about a minute), mix the cauliflower mixture into the eggs. Season with sea salt to taste (I added an additional 1/2 teaspoon) and cook for 1-2 minutes, until excess moisture is gone.
Garnish with scallions, serve immediately.
*1 head of caulifower is plenty for this recipe. You can also purchase pre-riced cauliflower in the freezer and/or produce section of many supermarkets.
Sources
Benefits of Cauliflower
Vegetarian Sweet Potato Nachos with Cheddar-Jalapeño Sauce


Being a University of Wisconsin alum, I’m obviously beyond ecstatic that the Badgers beat defending champ, Villanova, and made it to the Sweet Sixteen round of March Madness. If you know me at all, you’d know that watching sports isn’t really my thing. That is unless it involves my beloved St. Louis Cardinals, the STL Blues or anything relating to UW-Madison. There’s one other exception, March Madness. Maybe it’s because I grew up glued to the TV during March Madness, thanks to my dad. Or maybe because I actually played A LOT of basketball in my early years, so I’m able to better relate to the games. No matter the reason, I love this classic tournament, especially when my alma mater surprises the nation and beats the #1 team in the second round.

So, to go along with an amazing game and lots of excitement to come, I thought I’d share a healthy-ish twist on a classic sports bar appetizer – nachos. Instead of traditional tortilla chips, I’m using roasted rounds of sweet potato. Through roasting, the sweet potatoes become sturdy enough to hold all of the amazing toppings that get piled on. What toppings, you may be wondering? Well, there’s a decadent homemade cheese sauce spiked with fresh jalapeño, crisp romaine lettuce, refreshing yogurt and, last but not least, creamy guacamole. Doesn’t this all sound simply amazing?

Yes, these nachos are still rich and indulgent. But, like everything else, I make all of my recipes as clean and health-supportive as possible, even if it’s a dish that’s not supposed be light or healthy. That’s why I call this version of nachos “healthy-ish”. Because I’ve made them as healthy as possible while still maintaining the crowd-pleasing, addictive, satisfying element. There are several health-supportive ingredients in this recipe. Check them out below. Then head down to the recipe, just in time for game day. Go Badgers!
Sweet Potatoes are a power house of nutrition. By replacing fried corn chips with sweet potatoes, this recipe gets a hefty dose of vitamin A, potassium and fiber, plus some vitamin B-6 and protein. Sweet potatoes are also a filling food, making these nachos substantial enough to become a satisfying and nourishing main dish.
Romaine Lettuce, like other lettuces, fills you up without adding extra calories or fat. Adding fresh lettuce to any dish increases vitamins and assists the body in flushing out toxins. Lettuce also adds freshness and balance to this rich dish.
Grass-Fed Plain Yogurt (full-fat) is my new favorite ingredient. Not only can I trust that grass-fed cows live a healthier and happier lifestyle (grain-fed cows live extremely bloated, confined and uncomfortable lives), but grass-fed cows produce dairy containing high-quality fats. These fats are then transformed into conjugated linoleic acid (CLA) through the process of making yogurt with lactic acid. Grass-fed dairy, like grass-fed beef, contains a higher concentration of CLA’s. Research has linked CLA consumption with decreased risk of heart attack, bone-mass loss and inflammation. Additionally, live cultures in yogurt aid in digestion, immunity, weight-loss and regular bowel movement. Yogurt is also naturally high in calcium and protein. Whoa! Go grass-fed yogurt go!
Avocados, like in my guacamole, are known for providing the body with “good fats” such as mono- and polyunsaturated fats which can reduce levels of bad cholesterol in the blood and the risk of heart disease. Avocados are rich in potassium, vitamin E, B-vitamins, folic acid and other essential nutrients. Avocados are also amazing because they add guilt-free richness, flavor and decadence to just about any dish, which is especially important for vegetarians and vegans.
Sweet Potato Nachos with Homemade Cheddar-Jalapeño Sauce & Fresh Guacamole
Serves: 2-3 (entree), 6 (appetizer) Start to Finish: 1 hour
Ingredients
2 sweet potatoes, sliced into 1/2 inch rounds
1 tablespoon olive oil
sea salt, fine grain
1 avocado, very ripe
2 tablespoons minced red onion
3 teaspoons minced jalapeño, approx. 1/2 of a medium jalapeño, divided
1 tablespoon fresh lime juice
1 tablespoon finely chopped cilantro, plus more for garnish
hot sauce, to taste, if desired
1 tablespoon butter
1 tablespoon all-purpose flour
1 garlic clove, peeled and minced
2/3 to 1 cup whole milk
2 ounces shredded white cheddar cheese
1.5 cups shredded romaine lettuce (1 heart of romaine will be more than enough)
1/4 cup plain yogurt (full-fat, grass-fed preferred)
To Make
Preheat oven to 400 degrees.
Make potato rounds. Prep potatoes, brush with oil, season with a pinch of salt on each side of each round, and place potato rounds in a single layer on a parchment lined baking sheet. Bake for 45-50 minutes, until color begins to brown and the rounds are sturdy.
Make guacamole. Combine 1 smashed avocado with with 2 tablespoons minced red onion, 2 teaspoons minced jalapeño, 1 tablespoon lime juice, 1/4 teaspoon sea salt and 1 tablespoon chopped cilantro. Add a couple dashes hot sauce if desired and season with salt if needed. Refrigerate until needed.
Make cheddar sauce. Melt 1 tablespoon of butter in a small saucepan over medium-heat. Add 1 minced garlic clove and 1 teaspoon minced jalapeño. Cook for 1 minute. Whisk in 1 tablespoon of flour until smooth. Allow flour/butter mixture to cook for 1-2 minutes, whisking occasionally. Slowly whisk in 2/3 cup whole milk until smooth and creamy. Allow mixture to gently simmer until thickened, 3-4 minutes. Whisk in 2 ounces shredded cheddar cheese and 1/2 teaspoon salt. Set aside. If queso sauce gets to thick, add a bit more milk until desired consistency is reached. Gently reheat on stove top when needed.
Assemble. When potato slices are finished roasting, lay out on a platter or large plate. It’s okay to overlap but make sure a good section of each slice is visible. Pour queso sauce over top of potatoes. Top with shredded iceberg lettuce, plain yogurt and a cilantro garnish, if desired. Serve with guacamole (and some fresh corn chips maybe?).
Nutrition Information References:
http://www.whfoods.com/genpage.php?tname=foodspice&dbid=124
https://www.symptomfind.com/nutrition-supplements/probiotic-bacteria/

